Kubernetes Node の cordon/drain
Node の cordon/drain について整理し挙動を確認しました。
1. 説明
1.1. cordon/uncordon
Node は以下のどちらかのステータスを持ちます。
| ステータス | 説明 |
|---|---|
SchedulingEnabled |
Node がスケジューリング対象になっている状態(Pod を新たに起動できる状態) |
SchedulingDisabled |
Node がスケジューリング対象から外れている状態(Pod を新たに起動できない状態) |
このステータスを変更する際に cordon/uncordon コマンドを使用します。
kubectl cordon <Node> で Node のステータスを SchedulingDisabled に変更し、kubectl uncordon <Node> で SchedulingEnabled に戻します。
なお、cordon で SchedulingDisabled に変更しても、元々その Node で起動していた Pod に影響はありません。
1.2. drain
cordon を実行しても既存の Pod には影響がありません。新しい Pod を起動できないだけです。
既存の Pod も退避させる場合は drain を使用します。kubectl drain <Node> を実行すると Node を SchedulingDisabled に変更してから各 Pod に SIGTERM シグナルを送信して Pod を退避します。drain 処理には cordon 処理が含まれるため drain の前に cordon を実行する必要はありません。
なお、drain 時は Pod に SIGTERM を送るため、Pod 上のアプリケーションが SIGTERM/SIGKILL に対応している必要があります。(アプリケーションが SIGTERM を受け取った際に処置が途中のものは処理が完全に完了してからアプリを落とす作りにする必要がある)
また、特定の Pod が起動している Node では drain 時にエラーが発生します。その場合はオプションを与える事で drain できます。
| エラーとなる Pod | エラーとなる理由 | drain 時に必要なオプション |
|---|---|---|
| DaemonSet が管理している Pod | DaemonSet のため、Pod を退避して他の Node で起動できない | ignore-daemonsets |
| emptyDir を使用している Pod | Pod を削除すると emptyDir のデータも消える(emptyDir のデータは Pod のローカルのため Pod の削除と共に消える) | delete-emptydir-data |
| ReplicationController, ReplicaSet, Job, DaemonSet, StatefulSet が管理していない Pod | 管理されていないため Pod 退避後に他の Node で起動できない | force |
drain 時に Pod の退避数を制限できる PodDisruptionBudget(PDB) というリソースについては別記事で整理します。
2. 検証
2.1. 検証環境構築
eksctl コマンドで EKS Cluster を作成する - YasuBlog で作成した EKS Cluster を使用します。
適当な Deployment も起動しておきます。
apiVersion: apps/v1
kind: Deployment
metadata:
  name: test-deployment
spec:
  replicas: 3
  selector:
    matchLabels:
      app: app
  template:
    metadata:
      labels:
        app: app
    spec:
      containers:
      - name: amazonlinux
        image: public.ecr.aws/amazonlinux/amazonlinux:latest
        command:
          - "bin/bash"
          - "-c"
          - "sleep 3600"
$ kubectl apply -f test-deployment.yaml
deployment.apps/deployment created
2.2. cordon
まずは cordon 前の Node,Pod の状態です。3 Node に Pod が一つずつ起動している状態です。
$ kubectl get node
NAME                                              STATUS   ROLES    AGE   VERSION
ip-10-0-101-239.ap-northeast-1.compute.internal   Ready    <none>   61m   v1.21.5-eks-9017834
ip-10-0-102-44.ap-northeast-1.compute.internal    Ready    <none>   61m   v1.21.5-eks-9017834
ip-10-0-103-228.ap-northeast-1.compute.internal   Ready    <none>   60m   v1.21.5-eks-9017834
$ kubectl get pod -o wide
NAME                          READY   STATUS    RESTARTS   AGE   IP             NODE                                              NOMINATED NODE   READINESS GATES
test-deployment-6bb985c8c9-g8qhq   1/1     Running   0          44s   10.0.103.252   ip-10-0-103-228.ap-northeast-1.compute.internal   <none>           <none>
test-deployment-6bb985c8c9-g9tx2   1/1     Running   0          44s   10.0.101.212   ip-10-0-101-239.ap-northeast-1.compute.internal   <none>           <none>
test-deployment-6bb985c8c9-wp7zv   1/1     Running   0          44s   10.0.102.88    ip-10-0-102-44.ap-northeast-1.compute.internal    <none>           <none>
この状態で cordon を実行します。
$ kubectl cordon ip-10-0-103-228.ap-northeast-1.compute.internal
node/ip-10-0-103-228.ap-northeast-1.compute.internal cordoned
$ kubectl get node
NAME                                              STATUS                     ROLES    AGE   VERSION
ip-10-0-101-239.ap-northeast-1.compute.internal   Ready                      <none>   65m   v1.21.5-eks-9017834
ip-10-0-102-44.ap-northeast-1.compute.internal    Ready                      <none>   65m   v1.21.5-eks-9017834
ip-10-0-103-228.ap-northeast-1.compute.internal   Ready,SchedulingDisabled   <none>   65m   v1.21.5-eks-9017834
$ kubectl  get pod -o wide
NAME                          READY   STATUS    RESTARTS   AGE   IP             NODE                                              NOMINATED NODE   READINESS GATES
test-deployment-6bb985c8c9-g8qhq   1/1     Running   0          56s   10.0.103.252   ip-10-0-103-228.ap-northeast-1.compute.internal   <none>           <none>
test-deployment-6bb985c8c9-g9tx2   1/1     Running   0          56s   10.0.101.212   ip-10-0-101-239.ap-northeast-1.compute.internal   <none>           <none>
test-deployment-6bb985c8c9-wp7zv   1/1     Running   0          56s   10.0.102.88    ip-10-0-102-44.ap-northeast-1.compute.internal    <none>           <none>
cordon を実行した Node の STATUS が SchedulingDisabled になりました。既存の Pod には変化はありませんでした。
describe node を実行すると Taint に node.kubernetes.io/unschedulable:NoSchedule が設定されていました。
% kubectl describe node ip-10-0-103-228.ap-northeast-1.compute.internal
~省略~

Taints:             node.kubernetes.io/unschedulable:NoSchedule
Unschedulable:      true

~省略~
この状態で Deployment の replicas の値を 3 から 10 に変更します。
$ kubectl scale deployment/test-deployment --replicas=10
deployment.apps/test-deployment scaled
$ kubectl get pod -o wide
NAME                               READY   STATUS    RESTARTS   AGE   IP             NODE                                              NOMINATED NODE   READINESS GATES
test-deployment-6bb985c8c9-4p7qw   1/1     Running   0          5s    10.0.102.14    ip-10-0-102-44.ap-northeast-1.compute.internal    <none>           <none>
test-deployment-6bb985c8c9-g8qhq   1/1     Running   0          74s   10.0.103.252   ip-10-0-103-228.ap-northeast-1.compute.internal   <none>           <none>
test-deployment-6bb985c8c9-g9tx2   1/1     Running   0          74s   10.0.101.212   ip-10-0-101-239.ap-northeast-1.compute.internal   <none>           <none>
test-deployment-6bb985c8c9-hwsmw   1/1     Running   0          5s    10.0.101.177   ip-10-0-101-239.ap-northeast-1.compute.internal   <none>           <none>
test-deployment-6bb985c8c9-ldr7h   1/1     Running   0          5s    10.0.101.65    ip-10-0-101-239.ap-northeast-1.compute.internal   <none>           <none>
test-deployment-6bb985c8c9-nx649   1/1     Running   0          5s    10.0.102.184   ip-10-0-102-44.ap-northeast-1.compute.internal    <none>           <none>
test-deployment-6bb985c8c9-rgslw   1/1     Running   0          5s    10.0.102.42    ip-10-0-102-44.ap-northeast-1.compute.internal    <none>           <none>
test-deployment-6bb985c8c9-vd8bn   1/1     Running   0          5s    10.0.102.208   ip-10-0-102-44.ap-northeast-1.compute.internal    <none>           <none>
test-deployment-6bb985c8c9-wm77s   1/1     Running   0          5s    10.0.101.186   ip-10-0-101-239.ap-northeast-1.compute.internal   <none>           <none>
test-deployment-6bb985c8c9-wp7zv   1/1     Running   0          74s   10.0.102.88    ip-10-0-102-44.ap-northeast-1.compute.internal    <none>           <none>
新しい Pod が 7 個起動しましたが、cordon した Node(SchedulingDisabled になっている Node)には新しい Pod が起動していないことが確認できました。
2.3. uncordon
uncordon を実行して SchedulingDisabled から SchedulingEnabled に戻します。
まずは uncordon 前の状態です。一つの Node が SchedulingDisabled の状態です。
$ kubectl get node
NAME                                              STATUS                     ROLES    AGE   VERSION
ip-10-0-101-239.ap-northeast-1.compute.internal   Ready                      <none>   84m   v1.21.5-eks-9017834
ip-10-0-102-44.ap-northeast-1.compute.internal    Ready                      <none>   84m   v1.21.5-eks-9017834
ip-10-0-103-228.ap-northeast-1.compute.internal   Ready,SchedulingDisabled   <none>   83m   v1.21.5-eks-9017834
$ kubectl get pod -o wide
NAME                               READY   STATUS    RESTARTS   AGE   IP             NODE                                              NOMINATED NODE   READINESS GATES
test-deployment-6bb985c8c9-8l8rp   1/1     Running   0          40s   10.0.101.84    ip-10-0-101-239.ap-northeast-1.compute.internal   <none>           <none>
test-deployment-6bb985c8c9-9s7lm   1/1     Running   0          40s   10.0.102.176   ip-10-0-102-44.ap-northeast-1.compute.internal    <none>           <none>
test-deployment-6bb985c8c9-t8bzh   1/1     Running   0          40s   10.0.101.113   ip-10-0-101-239.ap-northeast-1.compute.internal   <none>           <none>
uncordon を実行します。
$ kubectl uncordon ip-10-0-103-228.ap-northeast-1.compute.internal
node/ip-10-0-103-228.ap-northeast-1.compute.internal uncordoned
$ kubectl get node
NAME                                              STATUS   ROLES    AGE   VERSION
ip-10-0-101-239.ap-northeast-1.compute.internal   Ready    <none>   86m   v1.21.5-eks-9017834
ip-10-0-102-44.ap-northeast-1.compute.internal    Ready    <none>   86m   v1.21.5-eks-9017834
ip-10-0-103-228.ap-northeast-1.compute.internal   Ready    <none>   85m   v1.21.5-eks-9017834
Node の STATUS から SchedulingDisabled が消えました。
describe node を実行すると node.kubernetes.io/unschedulable:NoSchedule の Taint が消えていました。
% kubectl describe node ip-10-0-103-228.ap-northeast-1.compute.internal
~省略~

Taints:             <none>
Unschedulable:      false

~省略~
この状態で Deployment の replicas の値を 3 から 10 に変更します。
$ kubectl scale deployment/test-deployment --replicas=10
deployment.apps/test-deployment scaled
$ kubectl get pod -o wide
NAME                               READY   STATUS    RESTARTS   AGE     IP             NODE                                              NOMINATED NODE   READINESS GATES
test-deployment-6bb985c8c9-2nt8q   1/1     Running   0          37s     10.0.102.208   ip-10-0-102-44.ap-northeast-1.compute.internal    <none>           <none>
test-deployment-6bb985c8c9-8l8rp   1/1     Running   0          3m18s   10.0.101.84    ip-10-0-101-239.ap-northeast-1.compute.internal   <none>           <none>
test-deployment-6bb985c8c9-9s7lm   1/1     Running   0          3m18s   10.0.102.176   ip-10-0-102-44.ap-northeast-1.compute.internal    <none>           <none>
test-deployment-6bb985c8c9-fc444   1/1     Running   0          37s     10.0.103.215   ip-10-0-103-228.ap-northeast-1.compute.internal   <none>           <none>
test-deployment-6bb985c8c9-lgmpg   1/1     Running   0          37s     10.0.103.153   ip-10-0-103-228.ap-northeast-1.compute.internal   <none>           <none>
test-deployment-6bb985c8c9-m8mqk   1/1     Running   0          37s     10.0.101.212   ip-10-0-101-239.ap-northeast-1.compute.internal   <none>           <none>
test-deployment-6bb985c8c9-qnnr5   1/1     Running   0          37s     10.0.102.184   ip-10-0-102-44.ap-northeast-1.compute.internal    <none>           <none>
test-deployment-6bb985c8c9-t8bzh   1/1     Running   0          3m18s   10.0.101.113   ip-10-0-101-239.ap-northeast-1.compute.internal   <none>           <none>
test-deployment-6bb985c8c9-thbf5   1/1     Running   0          37s     10.0.102.42    ip-10-0-102-44.ap-northeast-1.compute.internal    <none>           <none>
test-deployment-6bb985c8c9-zpjmx   1/1     Running   0          37s     10.0.103.104   ip-10-0-103-228.ap-northeast-1.compute.internal   <none>           <none>
uncordon した Node に Pod が起動されている事を確認できました。
2.4. drain
2.4.1. DaemonSet がある場合
まずは drain 前の Node,Pod の状態です。3 Node に Pod が一つずつ起動している状態です。
$ kubectl get node
NAME                                              STATUS   ROLES    AGE   VERSION
ip-10-0-101-239.ap-northeast-1.compute.internal   Ready    <none>   98m   v1.21.5-eks-9017834
ip-10-0-102-44.ap-northeast-1.compute.internal    Ready    <none>   98m   v1.21.5-eks-9017834
ip-10-0-103-228.ap-northeast-1.compute.internal   Ready    <none>   98m   v1.21.5-eks-9017834
$ kubectl get pod -o wide
NAME                               READY   STATUS    RESTARTS   AGE   IP             NODE                                              NOMINATED NODE   READINESS GATES
test-deployment-6bb985c8c9-kgndl   1/1     Running   0          8s    10.0.103.153   ip-10-0-103-228.ap-northeast-1.compute.internal   <none>           <none>
test-deployment-6bb985c8c9-t7wqf   1/1     Running   0          8s    10.0.102.42    ip-10-0-102-44.ap-northeast-1.compute.internal    <none>           <none>
test-deployment-6bb985c8c9-zscgl   1/1     Running   0          8s    10.0.101.177   ip-10-0-101-239.ap-northeast-1.compute.internal   <none>           <none>
drain を実行します。
$ kubectl drain ip-10-0-103-228.ap-northeast-1.compute.internal
node/ip-10-0-103-228.ap-northeast-1.compute.internal cordoned
error: unable to drain node "ip-10-0-103-228.ap-northeast-1.compute.internal" due to error:cannot delete DaemonSet-managed Pods (use --ignore-daemonsets to ignore): kube-system/aws-node-jls99, kube-system/kube-proxy-x95dw, continuing command...
There are pending nodes to be drained:
 ip-10-0-103-228.ap-northeast-1.compute.internal
cannot delete DaemonSet-managed Pods (use --ignore-daemonsets to ignore): kube-system/aws-node-jls99, kube-system/kube-proxy-x95dw
エラーになりました。これは EKS の場合だと VPC CNI プラグインの aws-node や kube-proxy が DaemonSet で動いているためです。エラー文言にも書いてありますが最初の説明に記載した通り --ignore-daemonsets オプションを付与する事で drain できます。
$ kubectl drain ip-10-0-103-228.ap-northeast-1.compute.internal --ignore-daemonsets
node/ip-10-0-103-228.ap-northeast-1.compute.internal already cordoned
WARNING: ignoring DaemonSet-managed Pods: kube-system/aws-node-jls99, kube-system/kube-proxy-x95dw
evicting pod default/test-deployment-6bb985c8c9-kgndl
pod/test-deployment-6bb985c8c9-kgndl evicted
node/ip-10-0-103-228.ap-northeast-1.compute.internal drained
$ kubectl get node
NAME                                              STATUS                     ROLES    AGE    VERSION
ip-10-0-101-239.ap-northeast-1.compute.internal   Ready                      <none>   104m   v1.21.5-eks-9017834
ip-10-0-102-44.ap-northeast-1.compute.internal    Ready                      <none>   104m   v1.21.5-eks-9017834
ip-10-0-103-228.ap-northeast-1.compute.internal   Ready,SchedulingDisabled   <none>   103m   v1.21.5-eks-9017834
Node が drain されました。cordon を実行しなくても SchedulingDisabled になりました。
Taint には node.kubernetes.io/unschedulable:NoSchedule が設定されています。
% kubectl describe node ip-10-0-103-228.ap-northeast-1.compute.internal
~省略~

Taints:             node.kubernetes.io/unschedulable:NoSchedule
Unschedulable:      true

~省略~
drain 中の Pod の状態遷移です。
$ kubectl get pod -o wide -w
NAME                               READY   STATUS    RESTARTS   AGE   IP             NODE                                              NOMINATED NODE   READINESS GATES
test-deployment-6bb985c8c9-kgndl   1/1     Running   0          60s   10.0.103.153   ip-10-0-103-228.ap-northeast-1.compute.internal   <none>           <none>
test-deployment-6bb985c8c9-t7wqf   1/1     Running   0          60s   10.0.102.42    ip-10-0-102-44.ap-northeast-1.compute.internal    <none>           <none>
test-deployment-6bb985c8c9-zscgl   1/1     Running   0          60s   10.0.101.177   ip-10-0-101-239.ap-northeast-1.compute.internal   <none>           <none>
test-deployment-6bb985c8c9-kgndl   1/1     Terminating   0          3m32s   10.0.103.153   ip-10-0-103-228.ap-northeast-1.compute.internal   <none>           <none>
test-deployment-6bb985c8c9-t2xpr   0/1     Pending       0          0s      <none>         <none>                                            <none>           <none>
test-deployment-6bb985c8c9-t2xpr   0/1     Pending       0          0s      <none>         ip-10-0-102-44.ap-northeast-1.compute.internal    <none>           <none>
test-deployment-6bb985c8c9-t2xpr   0/1     ContainerCreating   0          0s      <none>         ip-10-0-102-44.ap-northeast-1.compute.internal    <none>           <none>
test-deployment-6bb985c8c9-t2xpr   1/1     Running             0          3s      10.0.102.184   ip-10-0-102-44.ap-northeast-1.compute.internal    <none>           <none>
test-deployment-6bb985c8c9-kgndl   0/1     Terminating         0          4m2s    10.0.103.153   ip-10-0-103-228.ap-northeast-1.compute.internal   <none>           <none>
test-deployment-6bb985c8c9-kgndl   0/1     Terminating         0          4m6s    10.0.103.153   ip-10-0-103-228.ap-northeast-1.compute.internal   <none>           <none>
test-deployment-6bb985c8c9-kgndl   0/1     Terminating         0          4m6s    10.0.103.153   ip-10-0-103-228.ap-northeast-1.compute.internal   <none>           <none>
$ kubectl get pod -o wide
NAME                               READY   STATUS    RESTARTS   AGE    IP             NODE                                              NOMINATED NODE   READINESS GATES
test-deployment-6bb985c8c9-t2xpr   1/1     Running   0          93s    10.0.102.184   ip-10-0-102-44.ap-northeast-1.compute.internal    <none>           <none>
test-deployment-6bb985c8c9-t7wqf   1/1     Running   0          5m5s   10.0.102.42    ip-10-0-102-44.ap-northeast-1.compute.internal    <none>           <none>
test-deployment-6bb985c8c9-zscgl   1/1     Running   0          5m5s   10.0.101.177   ip-10-0-101-239.ap-northeast-1.compute.internal   <none>           <none>
drain 対象の Node で起動していた Pod が終了し別 Node で起動した事が確認できました。
2.4.2. emptyDir を使用する Pod がある場合
以下 manifest の Deployment を起動して検証します。
apiVersion: apps/v1
kind: Deployment
metadata:
  name: test-emptydir-deployment
spec:
  replicas: 3
  selector:
    matchLabels:
      app: app-emptydir
  template:
    metadata:
      labels:
        app: app-emptydir
    spec:
      containers:
      - name: amazonlinux
        image: public.ecr.aws/amazonlinux/amazonlinux:latest
        command:
          - "bin/bash"
          - "-c"
          - "sleep 3600"
        volumeMounts:
        - mountPath: /hoge
          name: hoge-volume
      volumes:
      - name: hoge-volume
        emptyDir:
          sizeLimit: 1Gi
drain すると以下エラーが出ました。
$ kubectl drain ip-10-0-101-69.ap-northeast-1.compute.internal --ignore-daemonsets
node/ip-10-0-101-69.ap-northeast-1.compute.internal cordoned
error: unable to drain node "ip-10-0-101-69.ap-northeast-1.compute.internal" due to error:cannot delete Pods with local storage (use --delete-emptydir-data to override): default/test-emptydir-deployment-79859745dd-l6fbh, continuing command...
There are pending nodes to be drained:
 ip-10-0-101-69.ap-northeast-1.compute.internal
cannot delete Pods with local storage (use --delete-emptydir-data to override): default/test-emptydir-deployment-79859745dd-l6fbh
delete-emptydir-data オプションを付与する事で drain できます。
$ kubectl drain ip-10-0-101-69.ap-northeast-1.compute.internal --ignore-daemonsets --delete-emptydir-data
node/ip-10-0-101-69.ap-northeast-1.compute.internal already cordoned
WARNING: ignoring DaemonSet-managed Pods: kube-system/aws-node-8597j, kube-system/kube-proxy-pw5st
evicting pod default/test-emptydir-deployment-79859745dd-l6fbh
pod/test-emptydir-deployment-79859745dd-l6fbh evicted
node/ip-10-0-101-69.ap-northeast-1.compute.internal drained
2.4.3. ReplicationController, ReplicaSet, Job, DaemonSet, StatefulSet が管理していない Pod がある場合
以下 manifest の Pod を起動して検証します。
apiVersion: v1
kind: Pod
metadata:
  name: test-pod
spec:
  containers:
    - name: amazonlinux
      image: public.ecr.aws/amazonlinux/amazonlinux:latest
      command:
        - "bin/bash"
        - "-c"
        - "sleep 3600"
drain すると以下エラーが出ました。
$ kubectl drain ip-10-0-103-89.ap-northeast-1.compute.internal --ignore-daemonsets --delete-emptydir-data
node/ip-10-0-103-89.ap-northeast-1.compute.internal already cordoned
error: unable to drain node "ip-10-0-103-89.ap-northeast-1.compute.internal" due to error:cannot delete Pods not managed by ReplicationController, ReplicaSet, Job, DaemonSet or StatefulSet (use --force to override): default/test-pod, continuing command...
There are pending nodes to be drained:
 ip-10-0-103-89.ap-northeast-1.compute.internal
cannot delete Pods not managed by ReplicationController, ReplicaSet, Job, DaemonSet or StatefulSet (use --force to override): default/test-pod
force オプションを付与する事で drain できます。
$ kubectl drain ip-10-0-103-89.ap-northeast-1.compute.internal --ignore-daemonsets --delete-emptydir-data --force
node/ip-10-0-103-89.ap-northeast-1.compute.internal already cordoned
WARNING: deleting Pods not managed by ReplicationController, ReplicaSet, Job, DaemonSet or StatefulSet: default/test-pod; ignoring DaemonSet-managed Pods: kube-system/aws-node-vnmfx, kube-system/kube-proxy-6x767
evicting pod kube-system/coredns-76f4967988-7slnc
evicting pod default/test-pod
pod/coredns-76f4967988-7slnc evicted
pod/test-pod evicted
node/ip-10-0-103-89.ap-northeast-1.compute.internal drained
3. まとめ
cordon/uncordon/drain は Kubernetes クラスタのメンテナンス時によく使うコマンドなので整理して挙動を確認しました。
4. 参考
EKS Cluster の消費 IP 数を減らす
EKS Cluster を構築すると VPC 内の IP を大量に使うので、IP 数の削減方法について整理し検証しました。
- 1. EKS Cluster の ENI と IP アドレスの挙動
- 2. デフォルト設定の Cluster を構築した際の消費 IP 数
- 3. 消費 IP の削減方法
- 4. 検証
- 5. まとめ
- 6. 参考
1. EKS Cluster の ENI と IP アドレスの挙動
EKS のデフォルト CNI である Amazon VPC CNI の ENI と IP アドレスの挙動は以下になります。
- コントロールプレーン(Master)
- ENI が 2 個付く
- ENI の
説明項目はAmazon EKS <クラスタ名>となる - この ENI を使用してデータプレーンと通信する
- データプレーン(Node)
- Node 作成時に一つの ENI(プライマリ ENI)がアタッチされる
- 後述する環境変数に基づき、追加の ENI(セカンダリ ENI)がアタッチされる
- ENI にアサインされるプライマリプライベート IP は Node 自体が使用し、セカンダリプライベート IP は Pod が使用する
- ENI にアサインされる IP の数は Node のインスタンスサイズ(の制限)に依存する
- 空きセカンダリプライベート IP の数が閾値を下回ると、ENI が最大数までアタッチされていない限り、新たな ENI が Node にアタッチされる
- デフォルト設定では、空きセカンダリ IP 数が
ENI の最大 IP 数 - 1を下回った際に新たな ENI がアタッチされる(つまり、一つ目の Pod が起動したらすぐに新たな ENI がアタッチされる)
- デフォルト設定では、空きセカンダリ IP 数が
Amazon VPC CNI プラグインは aws-node という名前の daemonset としてデプロイされます。上記の ENI, IP の挙動をデフォルトから変更したい場合はこの aws-node の設定を変更する必要があります。
2. デフォルト設定の Cluster を構築した際の消費 IP 数
EKS Cluster を構築する VPC は以下構成になっています。
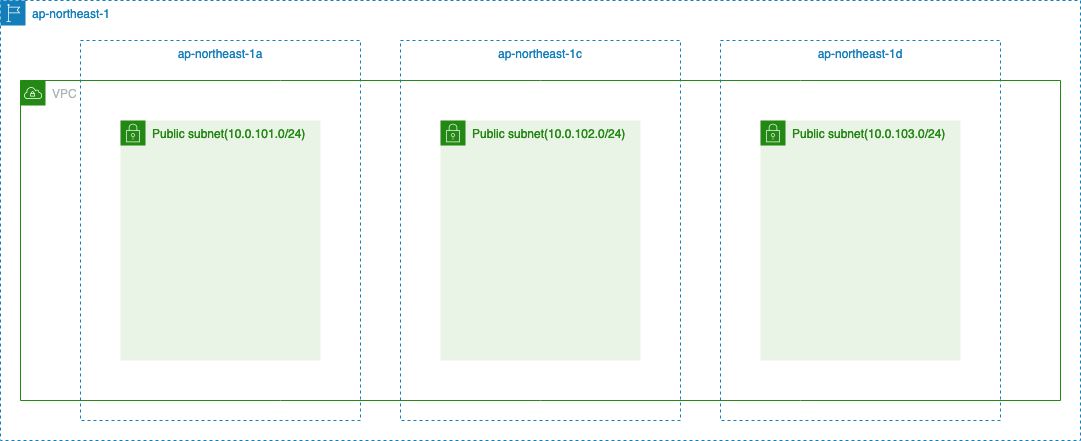
特に何のリソースも作成していない状態でマネジメントコンソールから確認した各 Subnet の空き IP 数は 753(251 + 251 + 251)でした。

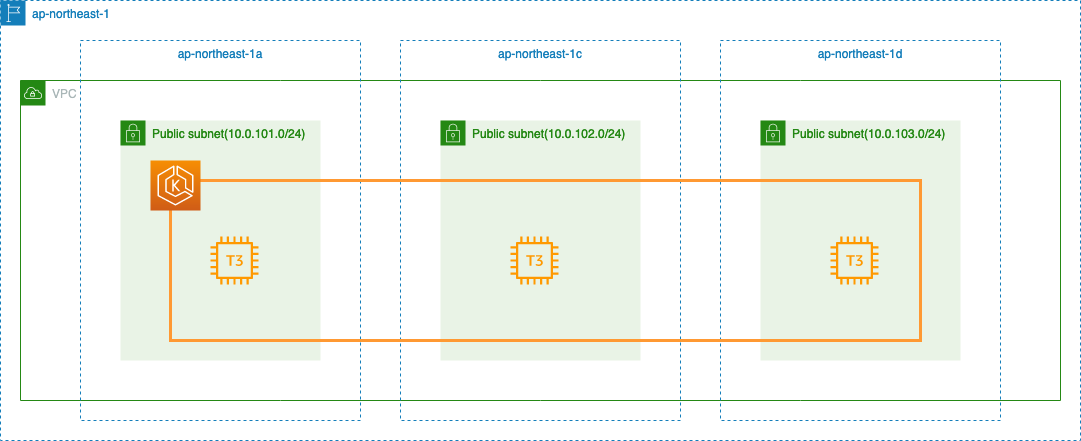
この状態で各 AZ に Node を 1 台配置するシンプルな構成の EKS Cluster を構築します。
yaml は以下です。
    ---
    apiVersion: eksctl.io/v1alpha5
    kind: ClusterConfig
    metadata:
      name: ekstest
      region: ap-northeast-1
      version: "1.21"
    vpc:
      id: "vpc-063b58ff16344acfd"
      subnets:
        public:
          ap-northeast-1a:
              id: "subnet-06324dcadf5706acb"
          ap-northeast-1c:
              id: "subnet-048cad38a6c49de67"
          ap-northeast-1d:
              id: "subnet-0bb85370bb4b4528d"
    managedNodeGroups:
      - name: managed-ng
        instanceType: t3.medium
        desiredCapacity: 3
        volumeSize: 30
        availabilityZones: ["ap-northeast-1a", "ap-northeast-1c", "ap-northeast-1d"]
        ssh:
          allow: true
          publicKeyName: ekstest
EKS Cluster 作成後の各 Subnet の空き IP 数は以下の通り 721(239 + 238 + 244) でした。Cluster を作成しただけで VPC の IP を 32 個使用していることがわかります。

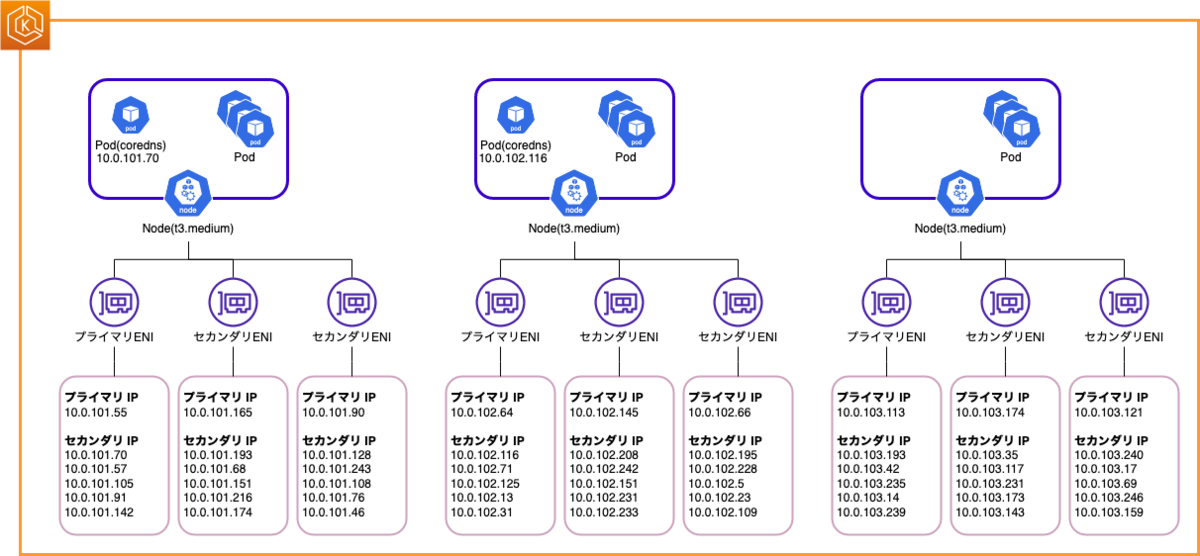
Node の ENI, IP の構成を図に表すと以下のようになります。未使用の IP はグレーにしています。

Node(データプレーン) が 30 IP, Master(コントロールプレーン)が 2 IP を使用しています。
なお、coredns が一つの Node に二つ起動する場合は ENI の数が一つ減ります。可用性のためには分散した方が良いので今回は二つの Node に分散したケースを前提として検証します。
3. 消費 IP の削減方法
(ユーザ管理の)Pod を起動していない状態でもクラスタが多くの IP を使用する(t3.medimu x3 構成で 32 IP)ことがわかりました。 複数チームやサービスで共有している VPC 環境などでは IP を節約する必要があるため、消費 IP の削減方法を整理します。
Amazon VPC CNI プラグイン aws-node の環境変数を変更することで ENI,IP の数を変更することが可能です。
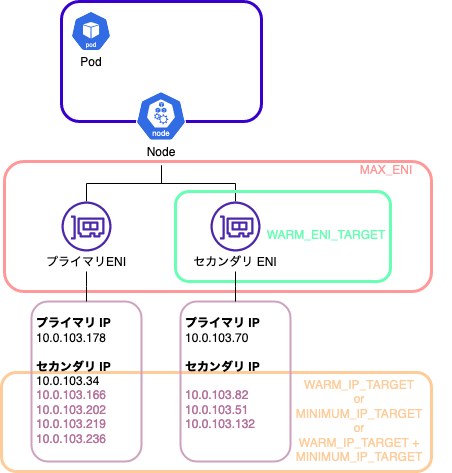
以下が ENI,IP の数に関連する環境変数です。
| 環境変数 | デフォルト値 | 説明 |
|---|---|---|
WARM_ENI_TARGET |
1 | ・Node にアタッチする余剰 ENI 数 ・Node への IP の付け替えが大量に発生すると EC2 API がスロットリングされ、ENI,IP がアタッチできなくなる可能性がある。デフォルト値が 1 になっている理由は、未使用の IP を大量に持つ状態と、EC2 API がスロットリングされるリスクとの間のバランスを取っている ・ENI のアタッチには最大 10 秒かかる ・ WARM_IP_TARGET が設定されている場合、この環境変数は無視される |
MAX_ENI |
None | ・Node にアタッチする最大 ENI 数 ・未設定か 0 以下の場合は、インスタンスサイズの ENI 制限値が MAX_ENI の値となるElastic Network Interface - Amazon Elastic Compute Cloud |
WARM_IP_TARGET |
None | ・Node が Pod 用に確保しておく余剰 IP 数 ・0 未満の場合は無効 ・例えば 5 に設定した場合、常に 5 個の IP を使用可能な状態にしておく。もし ENI の IP 数上限に達している場合は新たに ENI をアタッチして 5 個の空き IP を確保する ・小規模なクラスタや Pod の作成/削除が少ない環境に向いている ・大規模なクラスタや Pod の作成/削除が高頻度で行われる環境では、EC2 API がスロットリングされる可能性があるため向いていない ・ MINIMUM_IP_TARGET と同時に設定する場合、両方の制約を満たそうとする・ WARM_ENI_TARGET より WARM_IP_TARGET が優先される |
MINIMUM_IP_TARGET |
None | ・Node が Pod 用に確保しておく最小 IP 数 ・0 未満の場合は無効 ・例えば Node あたり 30 Pod 起動するクラスタの場合 ・ WARM_IP_TARGET=30 にすると、30 Pod 起動後に新たに 30 IP を追加する・ MINIMUM_IP_TARGET=30, WARM_IP_TARGET=2 にすると、30 Pod 起動後に新たに 2 IP を追加する・Node 上で動く予定の Pod 数より少し多めの値を設定することを推奨 |
ざっくり図に表すと以下のようなイメージです。
4. 検証
上記で作成した EKS Cluster で検証します。
4.1. 設定方法
まずは aws-node のデフォルトの環境変数を確認します。aws-node は kube-system namespace で起動しています。
$ kubectl get daemonset -n kube-system
NAME         DESIRED   CURRENT   READY   UP-TO-DATE   AVAILABLE   NODE SELECTOR   AGE
aws-node     3         3         3       3            3           <none>          70m
kube-proxy   3         3         3       3            3           <none>          70m
環境変数は kubectl get daemonset で確認できます。
$ kubectl get daemonset aws-node -n kube-system -o jsonpath='{.spec.template.spec.containers[*].env}' | jq .
[
  {
    "name": "ADDITIONAL_ENI_TAGS",
    "value": "{}"
  },
  {
    "name": "AWS_VPC_CNI_NODE_PORT_SUPPORT",
    "value": "true"
  },
  {
    "name": "AWS_VPC_ENI_MTU",
    "value": "9001"
  },
  {
    "name": "AWS_VPC_K8S_CNI_CONFIGURE_RPFILTER",
    "value": "false"
  },
  {
    "name": "AWS_VPC_K8S_CNI_CUSTOM_NETWORK_CFG",
    "value": "false"
  },
  {
    "name": "AWS_VPC_K8S_CNI_EXTERNALSNAT",
    "value": "false"
  },
  {
    "name": "AWS_VPC_K8S_CNI_LOGLEVEL",
    "value": "DEBUG"
  },
  {
    "name": "AWS_VPC_K8S_CNI_LOG_FILE",
    "value": "/host/var/log/aws-routed-eni/ipamd.log"
  },
  {
    "name": "AWS_VPC_K8S_CNI_RANDOMIZESNAT",
    "value": "prng"
  },
  {
    "name": "AWS_VPC_K8S_CNI_VETHPREFIX",
    "value": "eni"
  },
  {
    "name": "AWS_VPC_K8S_PLUGIN_LOG_FILE",
    "value": "/var/log/aws-routed-eni/plugin.log"
  },
  {
    "name": "AWS_VPC_K8S_PLUGIN_LOG_LEVEL",
    "value": "DEBUG"
  },
  {
    "name": "DISABLE_INTROSPECTION",
    "value": "false"
  },
  {
    "name": "DISABLE_METRICS",
    "value": "false"
  },
  {
    "name": "DISABLE_NETWORK_RESOURCE_PROVISIONING",
    "value": "false"
  },
  {
    "name": "ENABLE_IPv4",
    "value": "true"
  },
  {
    "name": "ENABLE_IPv6",
    "value": "false"
  },
  {
    "name": "ENABLE_POD_ENI",
    "value": "false"
  },
  {
    "name": "ENABLE_PREFIX_DELEGATION",
    "value": "false"
  },
  {
    "name": "MY_NODE_NAME",
    "valueFrom": {
      "fieldRef": {
        "apiVersion": "v1",
        "fieldPath": "spec.nodeName"
      }
    }
  },
  {
    "name": "WARM_ENI_TARGET",
    "value": "1"
  },
  {
    "name": "WARM_PREFIX_TARGET",
    "value": "1"
  }
]
デフォルトでは WARM_ENI_TARGET=1 が設定されており、MAX_ENI, WARM_IP_TARGET, MINIMUM_IP_TARGET が設定されていないことがわかりました。
環境変数を変更する場合は以下のように kubectl set env コマンドを使用します。
$ kubectl set env daemonset aws-node -n kube-system <環境変数名>=<値>
daemonset.apps/aws-node env updated
では、それぞれの変数を変更した際の挙動を確認していきます。
4.2. WARM_ENI_TARGET
WARM_ENI_TARGET を 0 に設定してみます。
$ kubectl set env daemonset aws-node -n kube-system WARM_ENI_TARGET=0
daemonset.apps/aws-node env updated
値を確認します。
$ kubectl get daemonset aws-node -n kube-system -o jsonpath='{.spec.template.spec.containers[*].env}' | jq '.[] | select(.name == "WARM_ENI_TARGET")'
{
  "name": "WARM_ENI_TARGET",
  "value": "0"
}
WARM_ENI_TARGET が 0 に変更されたことが確認できました。5 分ぐらい経つと ENI が二つついていた Node から ENI がデタッチされ以下のような 3 ENI, 18 IP の構成になりました。

この状態で Pod を 100 個起動する deployment を起動してみます。
t3.medium の ENI 上限は 3、ENI あたりの IP 上限は 6 です。プライマリ IP アドレスは Node が使用するため、3 Node の場合は最大 45(5 * 3 * 3)Pod 起動できることになります。デフォルトで coredns の Pod が二つ起動しているため、43 Pod 起動できるはずです。
apiVersion: apps/v1
kind: Deployment
metadata:
  name: deployment
spec:
  replicas: 100
  selector:
    matchLabels:
      app: app
  template:
    metadata:
      labels:
        app: app
    spec:
      containers:
      - name: amazonlinux
        image: public.ecr.aws/amazonlinux/amazonlinux:latest
        command:
          - "bin/bash"
          - "-c"
          - "sleep 3600"
apply します。
$ kubectl apply -f test-deployment.yaml
deployment.apps/deployment created
想定通り 43 Pod 起動できました。残りの 57 Pod は Pending 状態になりました。
$ kubectl get deploy
NAME         READY    UP-TO-DATE   AVAILABLE   AGE
deployment   43/100   100          43          26m
$ kubectl get pod | grep -c Running
43
$ kubectl get pod | grep -c Pending
57
この時の Node の ENI,IP の状態は以下でした。
4.3. MAX_ENI
まずはデフォルト状態に戻すため、WARM_ENI_TARGET を 1 に設定します。
$ kubectl set env daemonset aws-node -n kube-system WARM_ENI_TARGET=1
daemonset.apps/aws-node env updated
これで元の 4 ENI, 24 IP の状態に戻りました。ここから MAX_ENI を 1 に設定してみます。
$ kubectl set env daemonset aws-node -n kube-system MAX_ENI=1
daemonset.apps/aws-node env updated
値を確認します。
$ kubectl get daemonset aws-node -n kube-system -o jsonpath='{.spec.template.spec.containers[*].env}' | jq '.[] | select(.name == "MAX_ENI")'
{
  "name": "MAX_ENI",
  "value": "1"
}
MAX_ENI が 1 に設定されたことが確認できました。しかし1時間待っても ENI の数は減りませんでした。
ドキュメントには記載を見つけられなかったのですが、WARM_ENI_TARGET,MAX_ENI を両方設定する場合は先に設定している方が強いような挙動でした。
| 設定 | Node1 の ENI 数 | Node2 の ENI 数 | Node3 の ENI 数 |
|---|---|---|---|
| WARM_ENI_TARGET=1 + MAX_ENI なし ⇨ WARM_ENI_TARGET=1 + MAX_ENI=1 | 2 ⇨ 2 | 1 ⇨ 1 | 1 ⇨ 1 |
| WARM_ENI_TARGET=0 + MAX_ENI=1 ⇨ WARM_ENI_TARGET=1 + MAX_ENI=1 | 1 ⇨ 1 | 1 ⇨ 1 | 1 ⇨ 1 |
WARM_ENI_TARGET=0, MAX_ENI=1 に設定すると、3 ENI, 18 IP の構成になったので、この状態で先ほどと同様に Pod を 100 個起動する deployment を起動してみます。MAX_ENI が 1 のため、13(5 * 3 - 2)Pod だけ起動するはずです。
$ kubectl apply -f test-deployment.yaml
deployment.apps/deployment created
想定通り 13 Pod 起動できました。
$ kubectl get deploy
NAME         READY    UP-TO-DATE   AVAILABLE   AGE
deployment   13/100   100          13          101s
この時の Node の ENI,IP の状態は以下でした。

4.4. WARM_IP_TARGET
まずはデフォルト状態に戻すため、WARM_ENI_TARGET を 1 に設定し、MAX_ENI を削除します。
$ kubectl set env daemonset aws-node -n kube-system WARM_ENI_TARGET=1
daemonset.apps/aws-node env updated
$ kubectl set env daemonset aws-node -n kube-system MAX_ENI-
daemonset.apps/aws-node env updated
これで元の 4 ENI, 24 IP の状態に戻りました。ここから WARM_IP_TARGET を 1 に設定してみます。
$ kubectl set env daemonset aws-node -n kube-system WARM_IP_TARGET=1
daemonset.apps/aws-node env updated
値を確認します。
$ kubectl get daemonset aws-node -n kube-system -o jsonpath='{.spec.template.spec.containers[*].env}' | jq '.[] | select(.name == "WARM_ENI_TARGET")'
{
  "name": "WARM_ENI_TARGET",
  "value": "1"
}
$ kubectl get daemonset aws-node -n kube-system -o jsonpath='{.spec.template.spec.containers[*].env}' | jq '.[] | select(.name == "WARM_IP_TARGET")'
{
  "name": "WARM_IP_TARGET",
  "value": "1"
}
WARM_IP_TARGET が 1 に設定されたことが確認できました。少し待つと以下のように余剰 IP が一つになりました。
なお、WARM_IP_TARGET を設定している場合は WARM_ENI_TARGET は無視されるとドキュメントに記載がありましたが、WARM_ENI_TARGET=1 により追加されていた ENI はデタッチされずにアタッチされたままでした。

一度 WARM_ENI_TARGET=0 に設定してから WARM_IP_TARGET=1 を設定すると以下のようになります。

この状態で 3 個の空き IP を全て使ってみます。
3 Pod 起動する deployment を起動すると以下のように3 個の余剰 IP が消費され、新たに 3 IP が追加されました。

先ほどと同様に Pod を 100 個起動する deployment を起動してみます。MAX_ENI は設定していないので上限の 43(5 * 3 * 3 - 2)Pod 起動するはずです。
$ kubectl apply -f test-deployment.yaml
deployment.apps/deployment created
想定通り 43 Pod 起動できました。
$ kubectl get deploy
NAME         READY    UP-TO-DATE   AVAILABLE   AGE
deployment   43/100   100          43          3m58s
4.5. MINIMUM_IP_TARGET
まずはデフォルト状態に戻すため、WARM_ENI_TARGET を 1 に設定し、WARM_IP_TARGET を削除します。
$ kubectl set env daemonset aws-node -n kube-system WARM_ENI_TARGET=1
daemonset.apps/aws-node env updated
$ kubectl set env daemonset aws-node -n kube-system WARM_IP_TARGET-
daemonset.apps/aws-node env updated
これで元の 4 ENI, 24 IP の状態に戻りました。ここから MINIMUM_IP_TARGET を 3 に設定してみます。
$ kubectl set env daemonset aws-node -n kube-system MINIMUM_IP_TARGET=3
daemonset.apps/aws-node env updated
値を確認します。
$ kubectl get daemonset aws-node -n kube-system -o jsonpath='{.spec.template.spec.containers[*].env}' | jq '.[] | select(.name == "WARM_ENI_TARGET")'
{
  "name": "WARM_ENI_TARGET",
  "value": "1"
}
$ kubectl get daemonset aws-node -n kube-system -o jsonpath='{.spec.template.spec.containers[*].env}' | jq '.[] | select(.name == "MINIMUM_IP_TARGET")'
{
  "name": "MINIMUM_IP_TARGET",
  "value": "3"
}
MINIMUM_IP_TARGET が 3 に設定されたことが確認できました。少し待つと以下のように ENI のセカンダリ IP が 3 個になりました。
今回もWARM_ENI_TARGET=1 により追加されていた ENI はデタッチされずにアタッチされたままだったので、一度 WARM_ENI_TARGET=0 に設定してから MINIMUM_IP_TARGET=3 を設定すると以下のようになります。

この状態で 7 個の空き IP を全て使ってみます。
7 Pod 起動する deployment を起動すると以下のように7 個の余剰 IP が消費されただけで、新たな IP は追加されませんでした。(余剰 IP はゼロの状態)

4.6. どの環境変数を使用するか
例えば以下要件の場合を考えます。
- 3 Node 構成
- Node のインスタンスサイズは t3.medium
- ENI 制限は 3、ENI あたりの IP 制限は 6(プライマリ IP 1 + セカンダリ IP 5)
- 常時起動する Pod は 11
- coredns x 2(異なる Node に起動)
- カスタム Pod x 9(各 Node に 3 個ずつ起動)
- つまり、常時使用するセカンダリ IP は 11
- カスタム Pod のデプロイはローリングアップデート
- 使用するセカンダリ IP は最大 20(coredns 用 2 + カスタム Pod 用 18)
- デプロイはなるべく早く終わらせたい(ENI のアタッチ時間を待ちたくないので常時 Pod 用に 20 IP は確保しておきたい)
まず、セカンダリ IP の最大が 20 ということは ENI が 4 個(セカンダリ IP 5 * 4 = 20)で足ります。そのため、MAX_ENI を 2 に設定(Cluster 合計で 6 個の ENI)します。WARM_ENI_TARGET は 0 に設定するか削除しておきます。オペミスや不具合により Pod が大量に起動したとしても MAX_ENI を 2 に設定しておけば最大 36 IP の消費ですみます。設定しない場合は最大 54 IP 使用してしまいます。
つぎに、常時使用するセカンダリ IP は 11 ということで、MINIMUM_IP_TARGET を 4 に設定します。4 に設定すると最低でも 12 個のセカンダリ IP を確保しておくことになります。
デプロイ時には追加で セカンダリ IP が 9 必要のため、WARM_IP_TARGET を 3 に設定します。3 に設定すると余剰 IP が 9 個になるのでデプロイ時に ENI のアタッチや IP のアサイン処理が発生しなくなります。
結論としては以下のようになります。
| WARM_ENI_TARGET | MAX_ENI | WARM_IP_TARGET | MINIMUM_IP_TARGET | 通常時 IP 数 | 最大 IP 数 |
|---|---|---|---|---|---|
| 0 or 未設定 | 2 | 3 | 4 | 24 | 36 |
5. まとめ
デフォルト状態だと EKS Cluster は多くの IP を使用するため IP の削減方法について整理しました。複数チームで VPC を共有している場合など、IP を節約したいケースはあるかと思います。
aws-node の環境変数は手動で設定しますが、再構築時や横展開する際に設定作業を忘れる事もあるので構成管理は必要です。が、良い方法が見つからず悩み中です。
6. 参考
Amazon EKS ネットワーク - Amazon EKS
ポッドネットワーキング (CNI) - Amazon EKS
Elastic Network Interface - Amazon Elastic Compute Cloud
amazon-vpc-cni-k8s/eni-and-ip-target.md at master · aws/amazon-vpc-cni-k8s · GitHub
Kubernetes のガベージコレクション
Kubernetes のガベージコレクション(GC) について整理し、挙動を確認しました。
- 1. Kubernetes のガベージコレクション
- 2. まとめ
- 3. 参考
1. Kubernetes のガベージコレクション
Kubernetes のガベージコレクションはクラスタリソースを掃除する以下仕組みの総称です。
- Failed 状態の Pod
- 終了した Job
- owner reference の無いオブジェクト
- 未使用のイメージ
- 未使用のコンテナ
- reclaimPolicy が Delete の StorageClass から動的にプロビジョニングされた PersistentVolume
- 失効または期限切れの CertificatesSigningRequest(CSR)
- 次のシナリオで削除された Node
- Node Lease オブジェクト
eksctl コマンドで EKS Cluster を作成する - YasuBlog の記事で作成した EKS Cluster を使用して検証してみました。
1.1. Failed 状態の Pod
まずは Pod のライフサイクルについて整理します。Pod のとりうるフェーズは以下の 5 種類です。
| フェーズ | 説明 |
|---|---|
| Pending | Pod がクラスタによって承認されたが、1 つ以上のコンテナが稼働する準備ができていない状態。 これには、スケジュールされるまでの時間やネットワーク経由でイメージをダウンロードするための時間などが含まれる。 |
| Running | Pod が Node にバインドされ、全てのコンテナが作成された状態。 少なくとも1つのコンテナが実行されているか、開始または再起動中。 |
| Succeeded | Pod 内の全てのコンテナが正常に終了し、再起動しない状態。 |
| Failed | Pod 内の全てのコンテナが終了し、少なくとも1つのコンテナが異常終了した状態。 つまり、コンテナが 0 以外のステータスで終了したか、システムによって終了された。 |
| Unknown | 何らかの理由により Pod の状態を取得できない。 このフェーズは通常は Node との通信エラーにより発生する。 |
Failed 状態になった Pod は、人またはコントローラーが明示的に削除するまで存在します。
コントロールプレーンは、終了状態の Pod(Succeeded または Failed フェーズを持つ Pod)の数が設定された閾値(kube-controller-manager の terminated-pod-gc-threshold)を超えたとき、それらのPodを削除します。
terminated-pod-gc-threshold のデフォルト値は 12,500 です。つまり Failed 状態の Pod が 12,500 個を超えたらコントロールプレーンによって自動で削除されます。(あまり無いユースケースかと思います)
12,500 個の Failed Pod を作成して検証するのは面倒なので、「Failed 状態になった Pod は、人またはコントローラーが明示的に削除するまで存在します。」の部分のみ確認します。
Failed は コンテナが 0 以外のステータスで終了したか、システムによって終了された という状態なので、終了コードが 1 となり終了後に再起動しない設定の以下 Pod を作成してみます。
apiVersion: v1
kind: Pod
metadata:
  name: test-pod
spec:
  containers:
    - name: amazonlinux
      image: public.ecr.aws/amazonlinux/amazonlinux:latest
      command:
        - "bin/bash"
        - "-c"
        - "exit 1"
  restartPolicy: Never
apply します。
$ kubectl apply -f test-pod.yaml
pod/test-pod created
Pod が作成されました。
$ kubectl get pod
NAME       READY   STATUS   RESTARTS   AGE
test-pod   0/1     Error    0          18s
exit 1 を実行しているため STATUS が Error になっています。restartPolicy: Never のため再起動もしません。この状態のまま変化はありませんでした。
describe で Pod の詳細を確認します。
$ kubectl describe pod test-pod
Name:         test-pod
Namespace:    default
Priority:     0
Node:         ip-10-0-102-214.ap-northeast-1.compute.internal/10.0.102.214
Start Time:   Wed, 23 Feb 2022 00:02:53 +0900
Labels:       <none>
Annotations:  kubernetes.io/psp: eks.privileged
Status:       Failed
IP:           10.0.102.139

~省略~
9 行目の通り、Status は Failed になっています。Failed Pod は人またはコントローラーが明示的に削除するまで存在する事が確認できました。
1.2. 終了した Job
TTL-after-finished controller が、終了した Job(Complete か Failed)を削除します。Job 終了から削除までの時間を .spec.ttlSecondsAfterFinished フィールドで指定します。この機能は 1.23 で stable になりました。
Job の終了後 10 秒経ったら削除される設定の以下 Job を作成してみます。6 行目に ttlSecondsAfterFinished を設定しています。
apiVersion: batch/v1
kind: Job
metadata:
  name: test-job
spec:
  ttlSecondsAfterFinished: 10
  template:
    spec:
      containers:
      - name: amazonlinux
        image: public.ecr.aws/amazonlinux/amazonlinux:latest
        command:
          - "bin/bash"
          - "-c"
          - "exit 0"
      restartPolicy: Never
apply します。
$ kubectl apply -f test-job.yaml
job.batch/test-job created
1 秒おきに get job を実行して 10 秒で削除されることを確認します。
$ while true; do date; kubectl get job; sleep 1; done;
2022年 2月23日 水曜日 00時28分03秒 JST
NAME       COMPLETIONS   DURATION   AGE
test-job   1/1           3s         4s
2022年 2月23日 水曜日 00時28分05秒 JST
NAME       COMPLETIONS   DURATION   AGE
test-job   1/1           3s         5s
2022年 2月23日 水曜日 00時28分06秒 JST
NAME       COMPLETIONS   DURATION   AGE
test-job   1/1           3s         7s
2022年 2月23日 水曜日 00時28分08秒 JST
NAME       COMPLETIONS   DURATION   AGE
test-job   1/1           3s         9s
2022年 2月23日 水曜日 00時28分09秒 JST
NAME       COMPLETIONS   DURATION   AGE
test-job   1/1           3s         10s
2022年 2月23日 水曜日 00時28分11秒 JST
NAME       COMPLETIONS   DURATION   AGE
test-job   1/1           3s         12s
2022年 2月23日 水曜日 00時28分13秒 JST
No resources found in default namespace.
2022年 2月23日 水曜日 00時28分14秒 JST
No resources found in default namespace.
コンテナ起動後、10 秒後に削除されて表示されなくなりました。
終了した Job が .spec.ttlSecondsAfterFinished フィールドで指定した時間後に削除されることを確認できました。
1.3. owner reference の無いオブジェクト
1.3.1. owner と従属オブジェクト
まずはオブジェクトの親子関係について整理します。
Kubernetes では、いくつかのオブジェクトは他のオブジェクトの owner です。例えば ReplicaSet により起動した Pod の owner はその ReplicaSet です。 owner に所有されているオブジェクトは従属オブジェクトと呼びます。
従属オブジェクトは metadata.ownerReferences フィールドで owner を示します。ownerReferences はオブジェクト名と UID で構成されます。ReplicaSet, DaemonSet, Deployment, Job, CronJob, ReplicationController の従属オブジェクトは Kubernetes が自動で ownerReferences を設定します。自動ではなくユーザがマニュアルで設定する事も可能ですが、通常はマニュアルで設定する必要はありません。
従属オブジェクトは metadata.ownerReferences.blockOwnerDeletion フィールドも持ちます。これは true か false を値に持つことができ、owner オブジェクトの削除をブロックするかどうかを制御できます。これは後述する foreground カスケード削除を明示的に指定した時のみ作用します。background カスケード削除(デフォルトの削除方法)の場合は意味のないフィールドとなります。なお、Kubernetes は自動で blockOwnerDeletion を true に設定します。こちらも自動ではなくユーザがマニュアルで設定する事が可能です。
例えば Deployment を foreground カスケード削除する場合、Pod, ReplicaSet は blockOwnerDeletion フィールドが true のため Pod は ReplicaSet, ReplicaSet は Deployment の削除をブロックします。つまり、Pod, ReplicaSet が削除された後に Deployment が削除されます。
では、Deployment を起動して Deployment,ReplicaSet,Pod の owner 関連のフィールドを確認します。
apiVersion: apps/v1
kind: Deployment
metadata:
  name: deployment
spec:
  replicas: 1
  selector:
    matchLabels:
      app: app
  template:
    metadata:
      labels:
        app: app
    spec:
      containers:
      - name: amazonlinux
        image: public.ecr.aws/amazonlinux/amazonlinux:latest
        command:
          - "bin/bash"
          - "-c"
          - "sleep 3600"
Deployment の uid を確認します。なお、Deployment は owner なので ownerReferences フィールドはありません。
$ kubectl get deploy deployment -o jsonpath='{.metadata.uid}'
1dee8bae-4a55-41c0-8a43-4b35dd4dbb24%
ReplicaSet の ownerReferences フィールドです。owner が Deployment になっていることがわかります。
$ kubectl get rs -o yaml | grep -i owner -A4
    ownerReferences:
    - apiVersion: apps/v1
      blockOwnerDeletion: true
      controller: true
      kind: Deployment
      name: deployment
      uid: 1dee8bae-4a55-41c0-8a43-4b35dd4dbb24
$ kubectl get rs deployment-6bb985c8c9 -o jsonpath='{.metadata.uid}'
450c9fea-f13e-462d-9320-509dc1a90cf9%
Pod の ownerReferences フィールドです。owner が ReplicaSet になっていることがわかります。
$ kubectl get pod -o yaml | grep -i owner -A4
    ownerReferences:
    - apiVersion: apps/v1
      blockOwnerDeletion: true
      controller: true
      kind: ReplicaSet
      name: deployment-6bb985c8c9
      uid: 450c9fea-f13e-462d-9320-509dc1a90cf9
続いて blockOwnerDeletion の挙動を確認します。Deployment を(foreground カスケード削除で)削除すると Pod -> ReplicaSet -> Deployment の順に削除されることを確認します。
時間がわかりやすいようにタイムスタンプを出力します。
$ gdate +"%Y-%m-%d %H:%M:%S.%3N"; kubectl delete deploy deployment --cascade=foreground; gdate +"%Y-%m-%d %H:%M:%S.%3N"
2022-02-26 21:25:14.747
deployment.apps "deployment" deleted
2022-02-26 21:25:46.899
get pod/rs/deploy のログは以下のようになりました。※ mac で実行しているため gdate コマンドを使用しています(mac のデフォルトの date コマンドだとミリ秒が出力できないため)
# Pod
$ kubectl  get pod -w | while read line; do echo -e "$(gdate +"%Y-%m-%d %H:%M:%S.%3N")\t $line"; done
2022-02-26 21:24:42.681     NAME                          READY   STATUS    RESTARTS   AGE
2022-02-26 21:24:42.684     deployment-6bb985c8c9-n8rj8   1/1     Running   0          16s
2022-02-26 21:25:14.994     deployment-6bb985c8c9-n8rj8   1/1     Terminating   0          48s
2022-02-26 21:25:45.815     deployment-6bb985c8c9-n8rj8   0/1     Terminating   0          79s
2022-02-26 21:25:46.800     deployment-6bb985c8c9-n8rj8   0/1     Terminating   0          80s
2022-02-26 21:25:46.808     deployment-6bb985c8c9-n8rj8   0/1     Terminating   0          80s
# ReplicaSet
$ kubectl  get rs -w | while read line; do echo -e "$(gdate +"%Y-%m-%d %H:%M:%S.%3N")\t $line"; done
2022-02-26 21:24:44.108     NAME                    DESIRED   CURRENT   READY   AGE
2022-02-26 21:24:44.110     deployment-6bb985c8c9   1         1         1       18s
2022-02-26 21:25:14.969     deployment-6bb985c8c9   1         1         1       48s
2022-02-26 21:25:14.979     deployment-6bb985c8c9   1         1         1       48s
2022-02-26 21:25:15.012     deployment-6bb985c8c9   1         0         0       48s
2022-02-26 21:25:46.863     deployment-6bb985c8c9   1         0         0       80s
# Deployment
$ kubectl get deploy -w | while read line; do echo -e "$(gdate +"%Y-%m-%d %H:%M:%S.%3N")\t $line"; done
2022-02-26 21:24:45.646     NAME         READY   UP-TO-DATE   AVAILABLE   AGE
2022-02-26 21:24:45.649     deployment   1/1     1            1           19s
2022-02-26 21:25:14.908     deployment   1/1     1            1           48s
2022-02-26 21:25:14.933     deployment   1/1     1            1           48s
2022-02-26 21:25:15.020     deployment   0/1     0            0           49s
2022-02-26 21:25:46.874     deployment   0/1     0            0           80s
2022-02-26 21:25:46.895     deployment   0/1     0            0           80s
Pod -> ReplicaSet -> Deployment の順に削除されていることを確認できました。(厳密には削除された時間は不明ですが、最後に出力された時間の順が Pod -> ReplicaSet -> Deployment になっています)
では、ここで Pod, ReplicaSet の blockOwnerDeletion フィールドを false にして同様に検証してみます。
まずは kubectl edit で blockOwnerDeletion を true から false に変更します。
# Pod
$ kubectl get pod
NAME                          READY   STATUS    RESTARTS   AGE
deployment-6bb985c8c9-8h9hh   1/1     Running   0          9m20s
$ kubectl edit pod deployment-6bb985c8c9-8h9hh
pod/deployment-6bb985c8c9-8h9hh edited
$ kubectl get pod -o yaml | grep -i owner -A4
    ownerReferences:
    - apiVersion: apps/v1
      blockOwnerDeletion: false
      controller: true
      kind: ReplicaSet
      name: deployment-6bb985c8c9
      uid: 14861de6-9073-42ee-ac13-1e87b1d263be
# ReplicaSet
$ kubectl get rs
NAME                    DESIRED   CURRENT   READY   AGE
deployment-6bb985c8c9   1         1         1       8m8s
$ kubectl edit rs deployment-6bb985c8c9
replicaset.apps/deployment-6bb985c8c9 edited
$ kubectl get rs -o yaml | grep -i owner -A4
    ownerReferences:
    - apiVersion: apps/v1
      blockOwnerDeletion: false
      controller: true
      kind: Deployment
      name: deployment
      uid: 9a411b52-54e7-4a8a-bb4e-09be999cdbec
それでは Deployment を削除します。
$ gdate +"%Y-%m-%d %H:%M:%S.%3N"; kubectl delete deploy deployment --cascade=foreground; gdate +"%Y-%m-%d %H:%M:%S.%3N"
2022-02-26 21:37:51.581
deployment.apps "deployment" deleted
2022-02-26 21:37:51.950
get pod/rs/deploy のログは以下のようになりました。
# Pod
$ kubectl  get pod -w | while read line; do echo -e "$(gdate +"%Y-%m-%d %H:%M:%S.%3N")\t $line"; done
2022-02-26 21:37:10.680     NAME                          READY   STATUS    RESTARTS   AGE
2022-02-26 21:37:10.683     deployment-6bb985c8c9-8h9hh   1/1     Running   0          9m57s
2022-02-26 21:37:51.955     deployment-6bb985c8c9-8h9hh   1/1     Terminating   0          10m
2022-02-26 21:38:22.868     deployment-6bb985c8c9-8h9hh   0/1     Terminating   0          11m
2022-02-26 21:38:28.068     deployment-6bb985c8c9-8h9hh   0/1     Terminating   0          11m
2022-02-26 21:38:28.075     deployment-6bb985c8c9-8h9hh   0/1     Terminating   0          11m
# ReplicaSet
$ kubectl  get rs -w | while read line; do echo -e "$(gdate +"%Y-%m-%d %H:%M:%S.%3N")\t $line"; done
2022-02-26 21:37:11.632     NAME                    DESIRED   CURRENT   READY   AGE
2022-02-26 21:37:11.635     deployment-6bb985c8c9   1         1         1       9m58s
2022-02-26 21:37:51.927     deployment-6bb985c8c9   1         1         1       10m
2022-02-26 21:37:51.934     deployment-6bb985c8c9   1         1         1       10m
2022-02-26 21:37:51.953     deployment-6bb985c8c9   1         1         1       10m
# Deployment
$ kubectl get deploy -w | while read line; do echo -e "$(gdate +"%Y-%m-%d %H:%M:%S.%3N")\t $line"; done
2022-02-26 21:37:12.989     NAME         READY   UP-TO-DATE   AVAILABLE   AGE
2022-02-26 21:37:12.992     deployment   1/1     1            1           9m59s
2022-02-26 21:37:51.865     deployment   1/1     1            1           10m
2022-02-26 21:37:51.889     deployment   1/1     1            1           10m
2022-02-26 21:37:51.933     deployment   1/1     1            1           10m
blockOwnerDeletion フィールドが false のため owner の削除はブロックされませんでした。そのため Deployment -> ReplicaSet -> Pod の順に削除されました。
true の時は delete deploy コマンドが返ってくるまでに 32 秒かかりましたが、false の時は Pod, ReplicaSet の削除を待たないので 1 秒未満で返ってきました。
1.3.2. finalizer
続いて finalizer について整理します。
finalizer とは、必要なリソースを誤って削除する事を防止するための機能です。Kubernetes にリソースの削除を命令すると、コントローラはリソースの finalizer ルールを処理します。
例えば、Pod が使用中の PersistentVolume(PV) を削除しようとすると、PV は Terminating ステータスとなりますが削除はすぐには行われません。なぜなら PV は kubernetes.io/pv-protection の finalizer を持っているからです。PV がどの Pod にもバウンドされなくなると finalizer がクリアされて PV が削除されます。
では、以下 manifest の PVC と Pod を作成して、PV の finalizer を確認してみます。
apiVersion: v1
kind: PersistentVolumeClaim
metadata:
  name: test-pvc
spec:
  storageClassName: gp2
  resources:
    requests:
      storage: 10G
  accessModes:
  - ReadWriteOnce
apiVersion: v1
kind: Pod
metadata:
  name: test-pvc-pod
spec:
  containers:
  - name: amazonlinux
    image: public.ecr.aws/amazonlinux/amazonlinux:latest
    command:
      - "bin/bash"
      - "-c"
      - "sleep 3600"
    volumeMounts:
    - name: hoge
      mountPath: /hoge
  volumes:
  - name: hoge
    persistentVolumeClaim:
      claimName: test-pvc
それぞれ apply して PV の finalizer を確認します。
$ kubectl apply -f test-pvc.yaml
persistentvolumeclaim/test-pvc created
$ kubectl apply -f test-pvc-pod.yaml
pod/test-pvc-pod created
$ kubectl get pv -o jsonpath='{.items[*].metadata.finalizers}'
["kubernetes.io/pv-protection"]%
kubernetes.io/pv-protection の finalizer があることを確認できました。この状態で PV を削除してみます。
$ kubectl get pv
NAME                                       CAPACITY   ACCESS MODES   RECLAIM POLICY   STATUS   CLAIM              STORAGECLASS   REASON   AGE
pvc-66312388-5700-472a-a75c-9a94c2a472d4   10Gi       RWO            Delete           Bound    default/test-pvc   gp2                     16s
$ kubectl delete pv pvc-66312388-5700-472a-a75c-9a94c2a472d4
persistentvolume "pvc-66312388-5700-472a-a75c-9a94c2a472d4" deleted
deleted と表示されたまま応答は返ってきませんでした。別ターミナルで get pv したら Terminating 状態になっていました。PV は削除されてないので、Pod にログインして PV がマウントされているディレクトリにファイルを作成する事もできました。
$ kubectl get pv
NAME                                       CAPACITY   ACCESS MODES   RECLAIM POLICY   STATUS        CLAIM              STORAGECLASS   REASON   AGE
pvc-66312388-5700-472a-a75c-9a94c2a472d4   10Gi       RWO            Delete           Terminating   default/test-pvc   gp2                     44s
$ kubectl get pod
NAME           READY   STATUS    RESTARTS   AGE
test-pvc-pod   1/1     Running   0          69s
$ kubectl exec -it test-pvc-pod -- /bin/bash
bash-4.2# touch /hoge/fuga
bash-4.2# ls -lh /hoge/fuga
-rw-r--r-- 1 root root 0 Feb 28 15:06 /hoge/fuga
kubernetes.io/pv-protection finalizer により PV が削除できないことが確認できました。
1.3.3. カスケード削除
続いてカスケード削除について整理します。
owner オブジェクトが削除されると、ガベージコレクションにより従属オブジェクトも自動で削除されます。従属オブジェクトの自動削除をカスケード削除と言います。 finalizer を使用して、ガベージコレクションがいつどのように従属オブジェクトを削除するかコントロールできます。
カスケード削除には foreground と background の二種類があります。削除のオプションとして orphan もあるので並べて記載します。
| タイプ | owner 削除時の挙動 |
|---|---|
| foreground | ・owner オブジェクトは deletion in progress ステータスになり、以下の状態となる。・オブジェクトに削除マークが付いた時間が metadata.deletionTimestamp フィールドにセットされる。・ metadata.finalizers フィールドに foregroundDeletion がセットされる。・削除処理が完了するまでオブジェクトは API から見える状態となる。 ・ deletion in progress ステータスに変わったら従属オブジェクトを削除する。全ての従属オブジェクトを削除したら owner オブジェクトを削除する。・カスケード削除の間、 ownerReference.blockOwnerDeletion=true フィールドを持つオブジェクトは owner の削除をブロックする。 |
| background | ・すぐに owner オブジェクトを削除し、従属オブジェクトをバックグラウンドで削除する。 ・Kubernetes はデフォルトで background を使う。 |
| orphan | ・owner オブジェクトだけ削除する ・ metadata.finalizers フィールドに orphan がセットされる・ownerReferences の無いオブジェクトは orphan(みなしご)オブジェクトと呼ばれる |
では、foreground カスケード削除の挙動を確認します。
上の blockOwnerDeletion の検証で未確認の部分のみ確認します。Deployment を --cascade=foreground で削除します。
$ kubectl gdate +"%Y-%m-%d %H:%M:%S.%3N"; kubectl delete deploy deployment --cascade=foreground; gdate +"%Y-%m-%d %H:%M:%S.%3N"
2022-02-26 22:39:00.299
deployment.apps "deployment" deleted
2022-02-26 22:39:32.592
削除中に別ターミナルで Deployment の metadata を確認します。
$ kubectl get deploy -o jsonpath='{.items[*].metadata.deletionTimestamp}'
2022-02-26T13:39:00Z%
$ kubectl get deploy -o jsonpath='{.items[*].metadata.finalizers}'
["foregroundDeletion"]%
削除命令を実行した時間が metadata.deletionTimestamp フィールドにセットされ、foregroundDeletion finalizer がセットされることを確認できました。
次は background カスケード削除を確認します。デフォルトで background になるため delete コマンドに特にオプションを追加する必要はありません。先ほどと同様にタイムスタンプを表示します。
$ gdate +"%Y-%m-%d %H:%M:%S.%3N"; kubectl delete deploy deployment; gdate +"%Y-%m-%d %H:%M:%S.%3N"
2022-02-26 22:47:23.343
deployment.apps "deployment" deleted
2022-02-26 22:47:23.604
get pod/rs/deploy の結果です。
# Pod
$ kubectl get pod -w | while read line; do echo -e "$(gdate +"%Y-%m-%d %H:%M:%S.%3N")\t $line"; done
2022-02-26 22:47:08.734     NAME                          READY   STATUS    RESTARTS   AGE
2022-02-26 22:47:08.739     deployment-6bb985c8c9-lj5rs   1/1     Running   0          8s
2022-02-26 22:47:23.594     deployment-6bb985c8c9-lj5rs   1/1     Terminating   0          23s
2022-02-26 22:47:54.449     deployment-6bb985c8c9-lj5rs   0/1     Terminating   0          54s
2022-02-26 22:47:58.114     deployment-6bb985c8c9-lj5rs   0/1     Terminating   0          58s
2022-02-26 22:47:58.120     deployment-6bb985c8c9-lj5rs   0/1     Terminating   0          58s
# ReplicaSet
$ kubectl get rs -w | while read line; do echo -e "$(gdate +"%Y-%m-%d %H:%M:%S.%3N")\t $line"; done
2022-02-26 22:47:10.540     NAME                    DESIRED   CURRENT   READY   AGE
2022-02-26 22:47:10.543     deployment-6bb985c8c9   1         1         1       11s
2022-02-26 22:47:23.578     deployment-6bb985c8c9   1         1         1       24s
# Deployment
$ kubectl get deploy -w | while read line; do echo -e "$(gdate +"%Y-%m-%d %H:%M:%S.%3N")\t $line"; done
2022-02-26 22:47:11.555     NAME         READY   UP-TO-DATE   AVAILABLE   AGE
2022-02-26 22:47:11.558     deployment   1/1     1            1           12s
2022-02-26 22:47:23.519     deployment   1/1     1            1           24s
background の場合はすぐに Deployment が削除されて、その後に ReplicaSet, Pod が削除された事が確認できました。なお、以下のように削除時に明示的に background を指定しても挙動は同じです。
kubectl delete deploy deployment --cascade=background
最後に orphan です。削除時に --cascade=orphan を与える事で owner だけ削除し、従属オブジェクトを削除しないようにできます。
$ kubectl delete deploy deployment --cascade=orphan
deployment.apps "deployment" deleted
# Pod
$ kubectl get pod
NAME                          READY   STATUS    RESTARTS   AGE
deployment-6bb985c8c9-jtbzh   1/1     Running   0          2m7s# ReplicaSet
# ReplicaSet
$ kubectl get rs
NAME                    DESIRED   CURRENT   READY   AGE
deployment-6bb985c8c9   1         1         1       2m8s
# Deployment
$ kubectl get deployment
No resources found in default namespace.
Deployment だけ削除されて、ReplicaSet, Pod は削除されない事が確認できました。
少し経つと ReplicaSet の ownerReferences フィールドが消えました。ReplicaSet はまだ生きているので Pod の ownerReferences はまだありました。
$ kubectl get rs -o jsonpath='{.items[*].metadata.ownerReferences}'
$ kubectl get pod -o jsonpath='{.items[*].metadata.ownerReferences}'
[{"apiVersion":"apps/v1","blockOwnerDeletion":true,"controller":true,"kind":"ReplicaSet","name":"deployment-6bb985c8c9","uid":"2c1258b9-6d78-40f7-9ca6-e19a0a12298c"}]%
1.4. 未使用のイメージ
1.4.1. 説明
kubelet は未使用のイメージを 5 分おきにガベージコレクションで削除しています。
※ https://github.com/kubernetes/kubernetes/blob/master/pkg/kubelet/kubelet.go#L172 に 5 分と定義されている
ガベージコレクションを実施するかどうかは、以下の変数によって決まります。
| 変数 | kubelet フラグ | 説明 | デフォルト値 |
|---|---|---|---|
| imageMinimumGCAge | なし | 未使用イメージが削除される前に経過すべき最小時間 | 2m |
| imageGCHighThresholdPercent | image-gc-high-threshold | イメージのガベージコレクションをトリガーするディスク使用量の割合(%) | 85 |
| imageGCLowThresholdPercent | image-gc-low-threshold | イメージのガベージコレクションが解放を試みるディスク使用量の割合(%) | 80 |
つまり、デフォルトでは、イメージが未使用になってから 2 分経ったらガベージコレクションの削除対象となります。 そして、ディスク使用量が 85% を超えたらディスク使用量が 80% になるまでイメージを削除します。最後に使用された時間に基づいて最も古いイメージから削除していきます。
1.4.2. EKS の設定値
EKS の場合の上記変数の値を確認します。Node の情報なので Kubernetes の API サーバから取得できます。
kubectl proxy コマンドでプロキシをローカルに起動すると API サーバにアクセスできます。
$ kubectl proxy
Starting to serve on 127.0.0.1:8001
デフォルトでローカルの 8001 ポートでプロキシが起動するので、別ターミナルで http://localhost:8001/api/v1/nodes/<Node 名>/proxy/configz にアクセスします。json なので jq で整形すると見やすいです。
$ kubectl get node
NAME                                              STATUS   ROLES    AGE    VERSION
ip-10-0-102-42.ap-northeast-1.compute.internal   Ready    <none>   24h   v1.21.5-eks-9017834
$ curl -sSL "http://localhost:8001/api/v1/nodes/ip-10-0-102-42.ap-northeast-1.compute.internal/proxy/configz" | jq .
{
  "kubeletconfig": {
    "enableServer": true,
    "syncFrequency": "1m0s",
    "fileCheckFrequency": "20s",
    "httpCheckFrequency": "20s",
    "address": "0.0.0.0",
    "port": 10250,
    "tlsCipherSuites": [
      "TLS_ECDHE_ECDSA_WITH_AES_128_GCM_SHA256",
      "TLS_ECDHE_RSA_WITH_AES_128_GCM_SHA256",
      "TLS_ECDHE_ECDSA_WITH_CHACHA20_POLY1305",
      "TLS_ECDHE_RSA_WITH_AES_256_GCM_SHA384",
      "TLS_ECDHE_RSA_WITH_CHACHA20_POLY1305",
      "TLS_ECDHE_ECDSA_WITH_AES_256_GCM_SHA384",
      "TLS_RSA_WITH_AES_256_GCM_SHA384",
      "TLS_RSA_WITH_AES_128_GCM_SHA256"
    ],
    "serverTLSBootstrap": true,
    "authentication": {
      "x509": {
        "clientCAFile": "/etc/kubernetes/pki/ca.crt"
      },
      "webhook": {
        "enabled": true,
        "cacheTTL": "2m0s"
      },
      "anonymous": {
        "enabled": false
      }
    },
    "authorization": {
      "mode": "Webhook",
      "webhook": {
        "cacheAuthorizedTTL": "5m0s",
        "cacheUnauthorizedTTL": "30s"
      }
    },
    "registryPullQPS": 5,
    "registryBurst": 10,
    "eventRecordQPS": 5,
    "eventBurst": 10,
    "enableDebuggingHandlers": true,
    "healthzPort": 10248,
    "healthzBindAddress": "127.0.0.1",
    "oomScoreAdj": -999,
    "clusterDomain": "cluster.local",
    "clusterDNS": [
      "172.20.0.10"
    ],
    "streamingConnectionIdleTimeout": "4h0m0s",
    "nodeStatusUpdateFrequency": "10s",
    "nodeStatusReportFrequency": "5m0s",
    "nodeLeaseDurationSeconds": 40,
    "imageMinimumGCAge": "2m0s",
    "imageGCHighThresholdPercent": 85,
    "imageGCLowThresholdPercent": 80,
    "volumeStatsAggPeriod": "1m0s",
    "cgroupRoot": "/",
    "cgroupsPerQOS": true,
    "cgroupDriver": "cgroupfs",
    "cpuManagerPolicy": "none",
    "cpuManagerReconcilePeriod": "10s",
    "memoryManagerPolicy": "None",
    "topologyManagerPolicy": "none",
    "topologyManagerScope": "container",
    "runtimeRequestTimeout": "2m0s",
    "hairpinMode": "hairpin-veth",
    "maxPods": 17,
    "podPidsLimit": -1,
    "resolvConf": "/etc/resolv.conf",
    "cpuCFSQuota": true,
    "cpuCFSQuotaPeriod": "100ms",
    "nodeStatusMaxImages": 50,
    "maxOpenFiles": 1000000,
    "contentType": "application/vnd.kubernetes.protobuf",
    "kubeAPIQPS": 5,
    "kubeAPIBurst": 10,
    "serializeImagePulls": false,
    "evictionHard": {
      "memory.available": "100Mi",
      "nodefs.available": "10%",
      "nodefs.inodesFree": "5%"
    },
    "evictionPressureTransitionPeriod": "5m0s",
    "enableControllerAttachDetach": true,
    "protectKernelDefaults": true,
    "makeIPTablesUtilChains": true,
    "iptablesMasqueradeBit": 14,
    "iptablesDropBit": 15,
    "featureGates": {
      "RotateKubeletServerCertificate": true
    },
    "failSwapOn": true,
    "containerLogMaxSize": "10Mi",
    "containerLogMaxFiles": 5,
    "configMapAndSecretChangeDetectionStrategy": "Watch",
    "kubeReserved": {
      "cpu": "70m",
      "ephemeral-storage": "1Gi",
      "memory": "442Mi"
    },
    "enforceNodeAllocatable": [
      "pods"
    ],
    "volumePluginDir": "/usr/libexec/kubernetes/kubelet-plugins/volume/exec/",
    "logging": {
      "format": "text"
    },
    "enableSystemLogHandler": true,
    "shutdownGracePeriod": "0s",
    "shutdownGracePeriodCriticalPods": "0s",
    "enableProfilingHandler": true,
    "enableDebugFlagsHandler": true
  }
}
59-61 行目にイメージのガベージコレクション関連のパラメータがあります。全てデフォルト値でした。Node のインスタンスタイプを変更しても値は同じでした。
1.4.3. 設定変更方法
デフォルト値だとディスク使用量が 85% に達するとガベージコレクションがトリガーされます。
サーバのディスク監視の閾値として warning は 80%, critical は 90% にしているケースがあったりすると思います。そのケースの場合は 80% を超えてアラートがなってもその時点では未使用イメージが自動で削除されないので手動で不要なデータを消すか、85% を超えてガベージコレクションがトリガーされるまで待つ必要があります。それは微妙なので imageGCHighThresholdPercent を 70%, imageGCLowThresholdPercent を 50% に変更してみます。
Node 上の設定ファイル(/etc/kubernetes/kubelet/kubelet-config.json や /etc/systemd/system/kubelet.service)を直接修正する事で設定変更が可能です。 Node 再作成時にも同様に設定されるようにするには、カスタム起動テンプレートかカスタム AMI を使用する必要があります。
Amazon EKS ワーカーノードを設定して特定のディスク使用率でイメージキャッシュをクリーンアップする
今回は、起動テンプレートのユーザデータに以下を記載することで設定を変更しました。
if ! grep -q imageGCHighThresholdPercent /etc/kubernetes/kubelet/kubelet-config.json;
then
    sed -i '/"apiVersion*/a \ \ "imageGCHighThresholdPercent": 70,' /etc/kubernetes/kubelet/kubelet-config.json
fi
if ! grep -q imageGCLowThresholdPercent /etc/kubernetes/kubelet/kubelet-config.json;
then
    sed -i '/"imageGCHigh*/a \ \ "imageGCLowThresholdPercent": 50,' /etc/kubernetes/kubelet/kubelet-config.json
fi
systemctl restart kubelet
設定が変更されていることを確認しました。
$ curl -sSL "http://localhost:8001/api/v1/nodes/ip-10-0-102-160.ap-northeast-1.compute.internal/proxy/configz" | jq . | grep imageGC
    "imageGCHighThresholdPercent": 70,
    "imageGCLowThresholdPercent": 50,
1.5. 未使用のコンテナ
kubelet は未使用のコンテナを 1 分おきにガベージコレクションで削除しています。
※ https://github.com/kubernetes/kubernetes/blob/master/pkg/kubelet/kubelet.go#L170 に 1 分と定義されている
完了したコンテナは以下変数に基づいて最も古いものから順に削除されます。
| 変数 | 説明 | デフォルト値 |
|---|---|---|
| MinAge | ・完了したコンテナが削除される前に経過すべき最小時間 ・0 に設定すると無効 |
0 |
| MaxPerPodContainer | ・Pod が持つことができる dead 状態のコンテナの最大値 ・0 未満に設定すると無効 |
1 |
| MaxContainers | ・クラスタが持つことができる dead 状態のコンテナの最大値 ・0 未満に設定すると無効 |
-1 |
つまり、デフォルトでは、コンテナが完了するとすぐに削除対象となり、1 分以内にガベージコレクションにより削除が実行されます。
MaxPerPodContainer と MaxContainers はコンフリクトするケースがあります。Pod あたりの dead コンテナ数の合計がクラスタあたりの dead コンテナ数を超えるようなケースです。この場合、コンフリクトを修正するため kubelet は MaxPerPodContainer を調整します。(MaxContainers が優先される)
なお、設定確認方法はわかりませんでした。(API で取得した Node 情報や Node 上のファイルからは確認できなかった)
1.6. reclaimPolicy が Delete の StorageClass から動的にプロビジョニングされた PersistentVolume
まず、StorageClass の reclaimPolicy とは、PersistentVolumeClaim(PVC) が削除された際に PersistentVolume(PV)を削除するか残すかを指定するパラメータです。削除の場合は Delete 、残す場合は Retain を指定します。デフォルトは Delete です。
PV が削除されると、AWS EBS/GCE PD/Azure Disk/Tencent CBS などの外部ボリュームも同様に削除されます。
では、PVC を削除して PV, EBS が自動で削除されることを確認します。
まずは EKS でデフォルトで使用できる StorageClass を確認します。
$ kubectl get storageclass -o yaml
apiVersion: v1
items:
- apiVersion: storage.k8s.io/v1
  kind: StorageClass
  metadata:
    annotations:
      kubectl.kubernetes.io/last-applied-configuration: |
        {"apiVersion":"storage.k8s.io/v1","kind":"StorageClass","metadata":{"annotations":{"storageclass.kubernetes.io/is-default-class":"true"},"name":"gp2"},"parameters":{"fsType":"ext4","type":"gp2"},"provisioner":"kubernetes.io/aws-ebs","volumeBindingMode":"WaitForFirstConsumer"}
      storageclass.kubernetes.io/is-default-class: "true"
    creationTimestamp: "2022-02-28T08:29:50Z"
    name: gp2
    resourceVersion: "254"
    uid: c97d773f-a438-4d3b-aee4-a9f9d660647f
  parameters:
    fsType: ext4
    type: gp2
  provisioner: kubernetes.io/aws-ebs
  reclaimPolicy: Delete
  volumeBindingMode: WaitForFirstConsumer
kind: List
metadata:
  resourceVersion: ""
  selfLink: ""
gp2 の StorageClass がデフォルトで用意されており、reclaimPolicy は Delete になっているのでこちらを使用します。
以下 manifest の PVC を作成します。
apiVersion: v1
kind: PersistentVolumeClaim
metadata:
  name: test-pvc
spec:
  storageClassName: gp2
  resources:
    requests:
      storage: 10G
  accessModes:
  - ReadWriteOnce
apply して PVC が作成されることを確認します。
$ kubectl apply -f test-pvc.yaml
persistentvolumeclaim/test-pvc created
$ kubectl get pvc
NAME       STATUS    VOLUME   CAPACITY   ACCESS MODES   STORAGECLASS   AGE
test-pvc   Pending                                      gp2            41s¨
PVC を関連付けた以下 manifest の Pod を作成します。
apiVersion: v1
kind: Pod
metadata:
  name: test-pvc-pod
spec:
  containers:
  - name: amazonlinux
    image: public.ecr.aws/amazonlinux/amazonlinux:latest
    command:
      - "bin/bash"
      - "-c"
      - "sleep 3600"
    volumeMounts:
    - name: hoge
      mountPath: /hoge
  volumes:
  - name: hoge
    persistentVolumeClaim:
      claimName: test-pvc
apply して Pod,PV が作成されることを確認します。
$ kubectl apply -f test-pvc-pod.yaml
pod/test-pvc-pod created
$ kubectl get pod
NAME           READY   STATUS    RESTARTS   AGE
test-pvc-pod   1/1     Running   0          24s
$ kubectl get pv
NAME                                       CAPACITY   ACCESS MODES   RECLAIM POLICY   STATUS   CLAIM              STORAGECLASS   REASON   AGE
pvc-8369a57f-a42c-43b8-98a2-d39ed34af8fb   10Gi       RWO            Delete           Bound    default/test-pvc   gp2                     19s
指定したサイズ 10GB の EBS が作成されていることを確認します。
%aws ec2 describe-volumes --filters "Name=size,Values=10"
{
    "Volumes": [
        {
            "Attachments": [],
            "AvailabilityZone": "ap-northeast-1a",
            "CreateTime": "2022-02-28T14:45:40.745000+00:00",
            "Encrypted": false,
            "Size": 10,
            "SnapshotId": "",
            "State": "available",
            "VolumeId": "vol-0bd96ea93c9f4c2b7",
            "Iops": 100,
            "Tags": [
                {
                    "Key": "Name",
                    "Value": "kubernetes-dynamic-pvc-f71826f1-0721-429e-a73d-df4afad32da0"
                },
                {
                    "Key": "kubernetes.io/cluster/ekstest",
                    "Value": "owned"
                },
                {
                    "Key": "kubernetes.io/created-for/pvc/name",
                    "Value": "test-pvc"
                },
                {
                    "Key": "kubernetes.io/created-for/pv/name",
                    "Value": "pvc-f71826f1-0721-429e-a73d-df4afad32da0"
                },
                {
                    "Key": "kubernetes.io/created-for/pvc/namespace",
                    "Value": "default"
                }
            ],
            "VolumeType": "gp2",
            "MultiAttachEnabled": false
        }
    ]
}
リソースの準備ができたので PVC を削除したいのですが、上で説明した通り PV には kubernetes.io/pv-protection finalizer があり Pod が Bound されていると PV を削除できないため、先に Pod を削除しておきます。
# Pod 削除
$ kubectl delete pod test-pvc-pod
pod "test-pvc-pod" deleted
# PVC 確認
$ kubectl get pvc
NAME       STATUS   VOLUME                                     CAPACITY   ACCESS MODES   STORAGECLASS   AGE
test-pvc   Bound    pvc-f71826f1-0721-429e-a73d-df4afad32da0   10Gi       RWO            gp2            2m15s
# PV 確認
$ kubectl get pv
NAME                                       CAPACITY   ACCESS MODES   RECLAIM POLICY   STATUS   CLAIM              STORAGECLASS   REASON   AGE
pvc-f71826f1-0721-429e-a73d-df4afad32da0   10Gi       RWO            Delete           Bound    default/test-pvc   gp2                     2m8s
PVC と PV だけになったので、PVC を削除してみます。
$ kubectl delete pvc test-pvc
persistentvolumeclaim "test-pvc" deleted
$ kubectl get pv
No resources found
$ aws ec2 describe-volumes --filters "Name=size,Values=10"
{
    "Volumes": []
}
PV,EBS が共に削除されたことを確認できました。
1.7. 失効または期限切れの CertificatesSigningRequest(CSR)
Kubernetes の API サーバは X.509 クライアント証明書による認証をサポートしており、証明書を作成するためには Kubernetes の CSR オブジェクトが必要となります。 失効または有効期限切れの CSR オブジェクトはガベージコレクションにより削除されます。
CSR を作成するケースはあまり無い気がするので検証は割愛します。
なお、ガベージコレクションのドキュメントに記載されている「Stale or expired CertificateSigningRequests (CSRs)」のリンクは 404 エラーになります。
https://kubernetes.io/reference/access-authn-authz/certificate-signing-requests/#request-signing-process
1.8. 次のシナリオで削除された Node
cloud controller manager とは、Kubernetes が AWS/GCP 等のクラウドと連携するためのコンポーネントです。例えば ingress を作成すると AWS ALB を作成するといった処理を行っています。
EKS 等のマネージドサービスを使う場合は気にする必要はないので検証は割愛します。
1.9 Node Lease オブジェクト
Kubernetes ではクラスタが各 Node の可用性を判断し、障害時には何かアクションを起こせるように Node がクラスタにハートビートを送信しています。Lease はそのハートビート用のオブジェクトの一つです。
kube-node-lease namespace に各 Node ごとの Lease オブジェクトが保存されています。
kubelet はデフォルトでは 10 秒間隔で Lease オブジェクトの作成と更新を行います。更新に失敗した場合、200 ミリ秒で開始し上限を 7 秒としたエクスポネンシャルバックオフを使用してリトライします。
実際の Lease オブジェクトを確認してみます。
$ kubectl get node
NAME                                              STATUS   ROLES    AGE     VERSION
ip-10-0-101-200.ap-northeast-1.compute.internal   Ready    <none>   5m38s   v1.21.5-eks-9017834
ip-10-0-102-225.ap-northeast-1.compute.internal   Ready    <none>   5m51s   v1.21.5-eks-9017834
ip-10-0-103-131.ap-northeast-1.compute.internal   Ready    <none>   5m48s   v1.21.5-eks-9017834
$ kubectl get lease -n kube-node-lease
NAME                                              HOLDER                                            AGE
ip-10-0-101-200.ap-northeast-1.compute.internal   ip-10-0-101-200.ap-northeast-1.compute.internal   5m46s
ip-10-0-102-225.ap-northeast-1.compute.internal   ip-10-0-102-225.ap-northeast-1.compute.internal   5m59s
ip-10-0-103-131.ap-northeast-1.compute.internal   ip-10-0-103-131.ap-northeast-1.compute.internal   5m56s
$ kubectl describe lease ip-10-0-101-200.ap-northeast-1.compute.internal -n kube-node-lease
Name:         ip-10-0-101-200.ap-northeast-1.compute.internal
Namespace:    kube-node-lease
Labels:       <none>
Annotations:  <none>
API Version:  coordination.k8s.io/v1
Kind:         Lease
Metadata:
  Creation Timestamp:  2022-02-28T08:42:48Z
  Managed Fields:
    API Version:  coordination.k8s.io/v1
    Fields Type:  FieldsV1
    fieldsV1:
      f:metadata:
        f:ownerReferences:
          .:
          k:{"uid":"16da548f-1128-4c0a-9f00-499a815c7146"}:
            .:
            f:apiVersion:
            f:kind:
            f:name:
            f:uid:
      f:spec:
        f:holderIdentity:
        f:leaseDurationSeconds:
        f:renewTime:
    Manager:    kubelet
    Operation:  Update
    Time:       2022-02-28T08:42:48Z
  Owner References:
    API Version:     v1
    Kind:            Node
    Name:            ip-10-0-101-200.ap-northeast-1.compute.internal
    UID:             16da548f-1128-4c0a-9f00-499a815c7146
  Resource Version:  3197
  UID:               1a81eed3-8df4-43cf-ab32-e753b6e7b65f
Spec:
  Holder Identity:         ip-10-0-101-200.ap-northeast-1.compute.internal
  Lease Duration Seconds:  40
  Renew Time:              2022-02-28T08:49:16.077127Z
Events:                    <none>
Node ごとに Lease オブジェクトがあることが確認できました。
更新頻度を確認します。
$ kubectl get lease ip-10-0-101-200.ap-northeast-1.compute.internal -n kube-node-lease -o yaml -o jsonpath='{.spec.renewTime}'
2022-02-28T08:55:02.308638Z%
$ kubectl get lease ip-10-0-101-200.ap-northeast-1.compute.internal -n kube-node-lease -o yaml -o jsonpath='{.spec.renewTime}'
2022-02-28T08:55:12.608059Z%
$ kubectl get lease ip-10-0-101-200.ap-northeast-1.compute.internal -n kube-node-lease -o yaml -o jsonpath='{.spec.renewTime}'
2022-02-28T08:55:22.722818Z%
10 秒間隔で更新されていることが確認できました。
では、この Lease オブジェクトがどのようにガベージコレクションによって削除されるかというと、
ガベージコレクションのドキュメントには「Node lease オブジェクト」とあるだけで説明がないので何がどのように削除されるのか不明でした。
※以前削除した Node の Lease オブジェクトが 100 日以上残っていたので Node を削除しても Lease オブジェクトは削除されなさそうです
2. まとめ
Kubernetes のガベージコレクションについて整理しました。量が多いですね。
EKS 等のマネージドサービスの場合はあまり気にする点はなかったです。が、kubelet の変数(イメージ GC の閾値等)はもっと柔軟に変更できるようになると嬉しいですね。
あと、公式ドキュメントのリンクが切れてたり情報が少なかったり古い場合があったのが微妙でした。
3. 参考
Garbage Collection | Kubernetes
kube-controller-manager | Kubernetes
Automatic Clean-up for Finished Jobs | Kubernetes
Owners and Dependents | Kubernetes
Use Cascading Deletion in a Cluster | Kubernetes
Kubelet Configuration (v1beta1) | Kubernetes
Persistent Volumes | Kubernetes
Kubernetes の標準出力と標準エラー出力
Kubernetes では、コンテナの標準出力/標準エラー出力ログを kubectl logs コマンドで取得できます。実際にどのファイルに標準出力/標準エラー出力ログが出力されて、ローテートはどういう設定になっているのか整理しました。
1. ログの保存場所
まずは標準出力/標準エラー出力ログの保存場所です。
コンテナが標準出力/標準エラー出力に出力したログは Node に保存されます。実体のファイルとシンボリックリンクの構成は以下です。
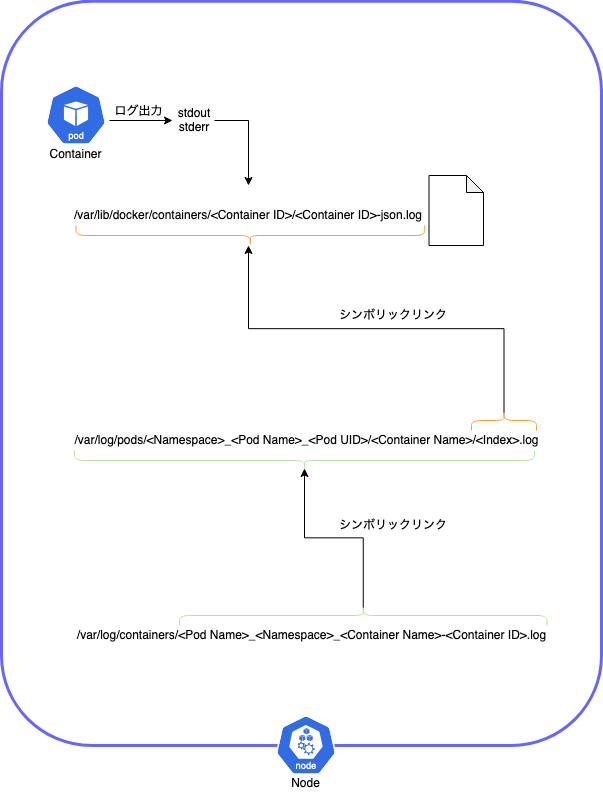
整理すると以下になります。
| # | ログ | 説明 |
|---|---|---|
| ① | /var/lib/docker/containers/< Container ID >/< Container ID >-json.log | ・コンテナの stdout/stderr に出力されたログが保存される実体のファイル ・起動中の Pod のログのみ保存 ・終了した Pod のログは消える ・コンテナが再起動した場合、再起動前のコンテナのログは消えない ・保存されるのは 2 世代分のコンテナ(起動中のコンテナと再起動前のコンテナのログのみ保存) |
| ② | /var/log/pods/< Namespace >_< Pod Name >_< Pod UID >/< Container Name >/< Index >.log | ・①のファイルへのシンボリックリンク ・0.log が現在起動中のコンテナのログのリンク ・1.log が一つ前に起動していたコンテナのログのリンク ・ kubectl logs コマンドは API Server 経由で /var/log/pods にアクセスしている |
| ③ | /var/log/containers/< Pod Name >_< Namespace >_< Container Name >-< Container ID >.log | ・②のファイルへのシンボリックリンク |
実際のログです。
@Node $ ls -lh /var/log/pods/kube-system_coredns-76f4967988-pkkx9_1ab7cf50-3781-4576-8a4d-d918e321ee64/coredns/*
lrwxrwxrwx 1 root root 165  2月 15 14:07 /var/log/pods/kube-system_coredns-76f4967988-pkkx9_1ab7cf50-3781-4576-8a4d-d918e321ee64/coredns/0.log -> /var/lib/docker/containers/52d7283862b0b64d6bdfc7dc4dce964bb3ca284ec3048325dbb7e5d61a1a00e3/52d7283862b0b64d6bdfc7dc4dce964bb3ca284ec3048325dbb7e5d61a1a00e3-json.log
lrwxrwxrwx 1 root root 165  2月 15 15:17 /var/log/pods/kube-system_coredns-76f4967988-pkkx9_1ab7cf50-3781-4576-8a4d-d918e321ee64/coredns/1.log -> /var/lib/docker/containers/a402cbab8d63b90c3d76f87579fe73bca77a2bffae2d5e0b3bd1617a1dbc037b/a402cbab8d63b90c3d76f87579fe73bca77a2bffae2d5e0b3bd1617a1dbc037b-json.log
@Node $ ls -lh /var/log/containers/coredns-76f4967988-pkkx9_kube-system_coredns-*
lrwxrwxrwx 1 root root 101  2月 15 14:07 /var/log/containers/coredns-76f4967988-pkkx9_kube-system_coredns-52d7283862b0b64d6bdfc7dc4dce964bb3ca284ec3048325dbb7e5d61a1a00e3.log -> /var/log/pods/kube-system_coredns-76f4967988-pkkx9_1ab7cf50-3781-4576-8a4d-d918e321ee64/coredns/0.log
lrwxrwxrwx 1 root root 101  2月 15 15:17 /var/log/containers/coredns-76f4967988-pkkx9_kube-system_coredns-a402cbab8d63b90c3d76f87579fe73bca77a2bffae2d5e0b3bd1617a1dbc037b.log -> /var/log/pods/kube-system_coredns-76f4967988-pkkx9_1ab7cf50-3781-4576-8a4d-d918e321ee64/coredns/1.log
※ Pod の UID は kubectl get pods -n <Namespace> <Pod Name> -o jsonpath='{.metadata.uid}' で確認可能
2. コンテナログのローテート、世代
ログが増え続けると Node のディスクが逼迫するので、ローテートと削除の設定が必要です。Kubernetes では /etc/docker/daemon.json でそれらを設定しています。
| オプション | 説明 |
|---|---|
log-opts.max-size |
・ログをローテートするファイルサイズ ・単位はキロバイト(k)/メガバイト(m)/ギガバイト(g) |
log-opts.max-file |
・ログの世代数 ・max-size が設定されていない場合は無効 |
例えば、max-size:100m,max-file:10 の場合、一つのコンテナが最大 1 GB のログを保存する状態になります。最初に記載した通り、Pod としては 2 世代のコンテナのログを保存するため最大 2 GB になります。Node のディスクをサイジングする際はこれらを考慮する必要があります。
※ kubelet フラグにも同様の意味の containerLogMaxSize と containerLogMaxFiles がありますが、検証したところ /etc/docker/daemon.json の log-opts に設定されている値でローテート、削除されていました
3. 検証
3.1. 検証環境構築
eksctl コマンドで EKS Cluster を作成する - YasuBlog の記事で作成した EKS Cluster を使用します。
3.2. EKS の設定値
max-size/max-file は Node 上の /etc/docker/daemon.json で確認できます。
@Node $ cat /etc/docker/daemon.json
{
  "bridge": "none",
  "log-driver": "json-file",
  "log-opts": {
    "max-size": "10m",
    "max-file": "10"
  },
  "live-restore": true,
  "max-concurrent-downloads": 10,
  "default-ulimits": {
    "memlock": {
      "Hard": -1,
      "Name": "memlock",
      "Soft": -1
    }
  }
}
max-size が 10m, max-file が 10 に設定されています。
インスタンスタイプ毎の設定値を確認してみました。Node のリソース量に関わらず固定値が設定されているようです。
| インスタンスタイプ | max-size | max-file |
|---|---|---|
| t3.small | 10m | 10 |
| t3.medium | 10m | 10 |
| m5.large | 10m | 10 |
| m5.xlarge | 10m | 10 |
3.3. 挙動確認
つづいて実際の挙動を確認してみます。
3.3.1. ローテートと世代
まずはシンプルな Pod を起動します。
apiVersion: apps/v1
kind: Deployment
metadata:
  name: deployment
spec:
  replicas: 1
  selector:
    matchLabels:
      app: app
  template:
    metadata:
      labels:
        app: app
    spec:
      containers:
      - name: amazonlinux
        image: public.ecr.aws/amazonlinux/amazonlinux:latest
        command:
          - "bin/bash"
          - "-c"
          - "sleep 3600"
コンテナ ID を確認します。
$ kubectl get pods -o wide
NAME                          READY   STATUS    RESTARTS   AGE   IP            NODE                                              NOMINATED NODE   READINESS GATES
deployment-6bb985c8c9-p7b5w   1/1     Running   0          114s   10.0.102.47   ip-10-0-102-148.ap-northeast-1.compute.internal   <none>           <none>
$ kubectl describe pod deployment-6bb985c8c9-7xmm4 | grep 'Container ID'
    Container ID:  docker://057fc611f5c416c77a00cfb02e24714b52e75af0c14c42ed11c58d42ca115ea7
Node 上のログを確認します。
@Node $ ls -lh /var/lib/docker/containers/057fc611f5c416c77a00cfb02e24714b52e75af0c14c42ed11c58d42ca115ea7/
合計 12K
-rw-r----- 1 root root    0  2月 16 14:55 057fc611f5c416c77a00cfb02e24714b52e75af0c14c42ed11c58d42ca115ea7-json.log
drwx------ 2 root root    6  2月 16 14:55 checkpoints
-rw------- 1 root root 4.8K  2月 16 14:55 config.v2.json
-rw-r--r-- 1 root root 2.1K  2月 16 14:55 hostconfig.json
drwx--x--- 2 root root    6  2月 16 14:55 mounts
@Node $ ls -lh /var/log/pods/default_deployment-6bb985c8c9-p7b5w_ef8acb63-8389-47d6-aad8-c2976eac3665/amazonlinux/
合計 0
lrwxrwxrwx 1 root root 165  2月 16 14:55 0.log -> /var/lib/docker/containers/057fc611f5c416c77a00cfb02e24714b52e75af0c14c42ed11c58d42ca115ea7/057fc611f5c416c77a00cfb02e24714b52e75af0c14c42ed11c58d42ca115ea7-json.log
標準出力/標準エラー出力に何も出力していないので、上記の通りサイズが 0 のファイルが一つだけあります。この状態で Pod にログインし、標準出力に大量にログを出力してみます。
$ kubectl exec -it deployment-6bb985c8c9-p7b5w -- /bin/bash
@Pod $ while true;do cat /etc/services > /proc/1/fd/1;done
Node 上のログを確認します。
@Node $ ls -lh /var/lib/docker/containers/057fc611f5c416c77a00cfb02e24714b52e75af0c14c42ed11c58d42ca115ea7/
合計 90M
-rw-r----- 1 root root 2.6M  2月 16 14:59 057fc611f5c416c77a00cfb02e24714b52e75af0c14c42ed11c58d42ca115ea7-json.log
-rw-r----- 1 root root 9.6M  2月 16 14:59 057fc611f5c416c77a00cfb02e24714b52e75af0c14c42ed11c58d42ca115ea7-json.log.1
-rw-r----- 1 root root 9.6M  2月 16 14:59 057fc611f5c416c77a00cfb02e24714b52e75af0c14c42ed11c58d42ca115ea7-json.log.2
-rw-r----- 1 root root 9.6M  2月 16 14:59 057fc611f5c416c77a00cfb02e24714b52e75af0c14c42ed11c58d42ca115ea7-json.log.3
-rw-r----- 1 root root 9.6M  2月 16 14:59 057fc611f5c416c77a00cfb02e24714b52e75af0c14c42ed11c58d42ca115ea7-json.log.4
-rw-r----- 1 root root 9.6M  2月 16 14:59 057fc611f5c416c77a00cfb02e24714b52e75af0c14c42ed11c58d42ca115ea7-json.log.5
-rw-r----- 1 root root 9.6M  2月 16 14:59 057fc611f5c416c77a00cfb02e24714b52e75af0c14c42ed11c58d42ca115ea7-json.log.6
-rw-r----- 1 root root 9.6M  2月 16 14:59 057fc611f5c416c77a00cfb02e24714b52e75af0c14c42ed11c58d42ca115ea7-json.log.7
-rw-r----- 1 root root 9.6M  2月 16 14:59 057fc611f5c416c77a00cfb02e24714b52e75af0c14c42ed11c58d42ca115ea7-json.log.8
-rw-r----- 1 root root 9.6M  2月 16 14:59 057fc611f5c416c77a00cfb02e24714b52e75af0c14c42ed11c58d42ca115ea7-json.log.9
drwx------ 2 root root    6  2月 16 14:55 checkpoints
-rw------- 1 root root 4.8K  2月 16 14:55 config.v2.json
-rw-r--r-- 1 root root 2.1K  2月 16 14:55 hostconfig.json
drwx--x--- 2 root root    6  2月 16 14:55 mounts
@Node $ ls -lh /var/log/pods/default_deployment-6bb985c8c9-p7b5w_ef8acb63-8389-47d6-aad8-c2976eac3665/amazonlinux/
合計 0
lrwxrwxrwx 1 root root 165  2月 16 14:55 0.log -> /var/lib/docker/containers/057fc611f5c416c77a00cfb02e24714b52e75af0c14c42ed11c58d42ca115ea7/057fc611f5c416c77a00cfb02e24714b52e75af0c14c42ed11c58d42ca115ea7-json.log
max-size/max-file の設定通り、ログサイズが 10M でローテートされ、10 世代保存されている事が確認できました。/var/log/pods の 0.log は常に最新のファイルのシンボリックリンクになっています。
3.3.2. コンテナ再起動
上記の状態で、Node 上で docker stop を実行してコンテナを再起動してみます。
@Node $ docker ps | grep amazonlinux
057fc611f5c4   public.ecr.aws/amazonlinux/amazonlinux                                       "bin/bash -c 'sleep …"   5 minutes ago    Up 5 minutes              k8s_amazonlinux_deployment-6bb985c8c9-p7b5w_default_ef8acb63-8389-47d6-aad8-c2976eac3665_0
@Node $ docker stop 057fc611f5c4
057fc611f5c4
$ kubectl get pods -o wide
NAME                          READY   STATUS    RESTARTS   AGE     IP            NODE                                              NOMINATED NODE   READINESS GATES
deployment-6bb985c8c9-p7b5w   1/1     Running   1          6m15s   10.0.102.47   ip-10-0-102-148.ap-northeast-1.compute.internal   <none>           <none>
$ kubectl describe pod deployment-6bb985c8c9-p7b5w | grep 'Container ID'
    Container ID:  docker://89f425cce426a87fad882cfc5f091b3f87dca4942bd5c9f9fbde69fc217ea476
コンテナを再起動したので Pod の RESTARTS が 0 から 1 に変わり、コンテナ ID も変わりました。
Node 上のログを確認します。
# 旧コンテナ
@Node $ ls -lh /var/lib/docker/containers/057fc611f5c416c77a00cfb02e24714b52e75af0c14c42ed11c58d42ca115ea7/
合計 89M
-rw-r----- 1 root root 2.6M  2月 16 15:01 057fc611f5c416c77a00cfb02e24714b52e75af0c14c42ed11c58d42ca115ea7-json.log
-rw-r----- 1 root root 9.6M  2月 16 14:59 057fc611f5c416c77a00cfb02e24714b52e75af0c14c42ed11c58d42ca115ea7-json.log.1
-rw-r----- 1 root root 9.6M  2月 16 14:59 057fc611f5c416c77a00cfb02e24714b52e75af0c14c42ed11c58d42ca115ea7-json.log.2
-rw-r----- 1 root root 9.6M  2月 16 14:59 057fc611f5c416c77a00cfb02e24714b52e75af0c14c42ed11c58d42ca115ea7-json.log.3
-rw-r----- 1 root root 9.6M  2月 16 14:59 057fc611f5c416c77a00cfb02e24714b52e75af0c14c42ed11c58d42ca115ea7-json.log.4
-rw-r----- 1 root root 9.6M  2月 16 14:59 057fc611f5c416c77a00cfb02e24714b52e75af0c14c42ed11c58d42ca115ea7-json.log.5
-rw-r----- 1 root root 9.6M  2月 16 14:59 057fc611f5c416c77a00cfb02e24714b52e75af0c14c42ed11c58d42ca115ea7-json.log.6
-rw-r----- 1 root root 9.6M  2月 16 14:59 057fc611f5c416c77a00cfb02e24714b52e75af0c14c42ed11c58d42ca115ea7-json.log.7
-rw-r----- 1 root root 9.6M  2月 16 14:59 057fc611f5c416c77a00cfb02e24714b52e75af0c14c42ed11c58d42ca115ea7-json.log.8
-rw-r----- 1 root root 9.6M  2月 16 14:59 057fc611f5c416c77a00cfb02e24714b52e75af0c14c42ed11c58d42ca115ea7-json.log.9
drwx------ 2 root root    6  2月 16 14:55 checkpoints
-rw------- 1 root root 4.8K  2月 16 15:01 config.v2.json
-rw-r--r-- 1 root root 2.1K  2月 16 15:01 hostconfig.json
drwx--x--- 2 root root    6  2月 16 14:55 mounts
# 新コンテナ
@Node $ ls -lh /var/lib/docker/containers/89f425cce426a87fad882cfc5f091b3f87dca4942bd5c9f9fbde69fc217ea476/
合計 12K
-rw-r----- 1 root root    0  2月 16 15:01 89f425cce426a87fad882cfc5f091b3f87dca4942bd5c9f9fbde69fc217ea476-json.log
drwx------ 2 root root    6  2月 16 15:01 checkpoints
-rw------- 1 root root 4.8K  2月 16 15:01 config.v2.json
-rw-r--r-- 1 root root 2.1K  2月 16 15:01 hostconfig.json
drwx--x--- 2 root root    6  2月 16 15:01 mounts
@Node $ ls -lh /var/log/pods/default_deployment-6bb985c8c9-p7b5w_ef8acb63-8389-47d6-aad8-c2976eac3665/amazonlinux/
合計 0
lrwxrwxrwx 1 root root 165  2月 16 14:55 0.log -> /var/lib/docker/containers/057fc611f5c416c77a00cfb02e24714b52e75af0c14c42ed11c58d42ca115ea7/057fc611f5c416c77a00cfb02e24714b52e75af0c14c42ed11c58d42ca115ea7-json.log
lrwxrwxrwx 1 root root 165  2月 16 15:01 1.log -> /var/lib/docker/containers/89f425cce426a87fad882cfc5f091b3f87dca4942bd5c9f9fbde69fc217ea476/89f425cce426a87fad882cfc5f091b3f87dca4942bd5c9f9fbde69fc217ea476-json.log
旧コンテナ、新コンテナともにログが存在している事が確認できました。/var/log/pods の方は 0.log が旧コンテナにリンクし、1.log が新コンテナにリンクしてます。
3.3.3. Pod 削除
上記の状態で Pod を削除してみます。
$ kubectl delete pod deployment-6bb985c8c9-p7b5w
pod "deployment-6bb985c8c9-p7b5w" deleted
@Node $  ls -lh /var/lib/docker/containers/057fc611f5c416c77a00cfb02e24714b52e75af0c14c42ed11c58d42ca115ea7/
ls: /var/lib/docker/containers/057fc611f5c416c77a00cfb02e24714b52e75af0c14c42ed11c58d42ca115ea7/ にアクセスできません: No such file or directory
@Node $  ls -lh /var/lib/docker/containers/89f425cce426a87fad882cfc5f091b3f87dca4942bd5c9f9fbde69fc217ea476/
ls: /var/lib/docker/containers/89f425cce426a87fad882cfc5f091b3f87dca4942bd5c9f9fbde69fc217ea476/ にアクセスできません: No such file or directory
@Node $  ls -lh /var/log/pods/default_deployment-6bb985c8c9-p7b5w_ef8acb63-8389-47d6-aad8-c2976eac3665/amazonlinux/
合計 0
Pod を削除するとログも全て消える事が確認できました。
3.4. 設定変更
最後に max-size/max-file の変更方法です。
Node 上の /etc/docker/daemon.json を修正して docker デーモンを再起動する事で設定変更が可能です。
Node 再作成時にも同様に設定されるように、カスタム起動テンプレートかカスタム AMI を使用する必要があります。
例えば、max-size を 100m、max-file を 5 にしたい場合は、カスタム起動テンプレートのユーザデータに以下のようなコードを追加する事で設定変更が可能です。
sed -i -e 's/"max-size".*/"max-size": "100m",/g' /etc/docker/daemon.json
sed -i -e 's/"max-file".*/"max-file": "5"/g' /etc/docker/daemon.json
systemctl restart docker
個人的には AWS マネージドという事は AWS が良かれと思って設計した値なのでユーザ側がカスタマイズする必要は無いと思っています。
4. まとめ
コンテナの標準出力/標準エラー出力ログまわりについて整理してみました。EKS 等のマネージドサービスの場合は特別な要件がない限り設定値は変更しなくて良いと思います。
5. 参考
Logging Architecture | Kubernetes
ロギング・ドライバの設定 — Docker-docs-ja 1.9.0b ドキュメント
EKS Cluster のバージョンアップ
Kubernetes と EKS のバージョンの整理と、EKS Cluster のバージョンアップ手順について整理しました。
1. Kubernetes のバージョン
まずは Kubernetes のバージョンについて整理します。
- バージョンは
x.y.z形式で表現され、x はメジャーバージョン、y はマイナーバージョン、z はパッチバージョンを指す - 最新 3 つのマイナーバージョンのみサポート
- 2022/02/08 時点では 1.23,1.22,1.21 のみサポート
- 4 ヶ月に一回の頻度で新しいマイナーバージョンがリリースされる
- だいたい月に一回の頻度で新しいパッチバージョンがリリースされる
- 各マイナーバージョンのサポート期間は一年(1.18 以前は 9 ヶ月)
- 一年経つと 2 ヶ月間のメンテナンスモードに入る
- セキュリティや重大なコンポーネントの問題が発生した際はメンテナンスモード中もパッチがリリースされる
- メンテナンスモードが終了すると EOL となり、パッチはリリースされなくなる
- メンテナンスモードと EOL は毎月 28 日としている(全ての月にある日のため)
- 直近のマイナーバージョンリリース
| マイナーバージョン | リリース日 | メンテナンスモードに入る日 | EOL |
|---|---|---|---|
| 1.24 | 2022/4 予定 | ||
| 1.23 | 2021/12/7 | 2022/12/28 | 2023/2/28 |
| 1.22 | 2021/8/4 | 2022/8/28 | 2022/10/28 |
| 1.21 | 2021/4/8 | 2022/4/28 | 2022/6/28 |
| 1.20 | 2020/12/8 | 2021/12/28 | 2022/2/28 |
理想はタイムリーに 4 ヶ月に一回、最低でも年に一回は Kubernetes Cluster のバージョンアップが必要となります。
2. EKS のバージョン
つづいて EKS のバージョンについて整理します。
- 2022/02/08 時点でサポートされている Kubernetes バージョンは
1.21.2,1.20.7,1.19.8,1.18.16 - Kubernetes バージョンは、Amazon EKS で最初に利用可能になってから 14 か月間は完全にサポートされる
- Kubernetes 側でサポートを終了していても EKS にバックポートされる
- 特定のマイナーバージョンのサポート終了日については、サポート終了日の最低 60 日前に AWS Personal Health Dashboard に通知される
- サポート終了日の挙動
- 少なくとも 4 つの Kubernetes バージョンをサポートするよう努めている
- 直近のリリース
| Kubernetes バージョン | Kubernetes リリース日 | EKS リリース日 | EKS のサポート終了日 |
|---|---|---|---|
| 1.23 | 2021/12/7 | 未定 | 未定 |
| 1.22 | 2021/8/4 | 2022/3 予定 | 2023/5 |
| 1.21 | 2021/4/8 | 2021/7/19 | 2023/2 |
| 1.20 | 2020/12/8 | 2021/5/18 | 2022/7 |
| 1.19 | 2020/8/26 | 2021/2/16 | 2022/4 |
| 1.18 | 2020/3/23 | 2020/10/13 | 2022/2/18 |
- 特別な要件がない限り最新バージョンで Cluster を作成する事を推奨
- 新しいバージョンがリリースされたら速やかに Cluster をバージョンアップする事を推奨
- 実績としては、Kubernetes の新しいマイナーバージョンがリリースされて EKS がそのバージョンをサポートするまでに半年ぐらいかかっている
- バージョンアップについて
- Master のバージョンアップ中にダウンタイムは発生しない
- Master のバージョンアップ後、ロールバックはできない
- Master のバージョンアップ後は、EKS アドオン(VPC CNI、CoreDNS、および kube-proxy アドオン)と Node を手動でバージョンアップする必要がある
- バージョンアップ前の Master と Node の Kubernetes バージョンは同じにする必要がある
- Cluster 作成時に指定したサブネット内に、2~3 の空き IP アドレスが必要
- 一回にバージョンアップできるマイナーバージョンは一つのみ(例えば 1.20 から 1.22 に上げたい場合は、最初に 1.21 に更新した後に 1.22 に更新する必要がある)
- バージョンアップするとカスタム設定が上書きされる場合がある
3. EKS Cluster のバージョンアップ
バージョンアップ方法としては以下 3 パターンがあります。
| # | 方法 | pros | cons |
|---|---|---|---|
| ① | Master/NodeGroup 共に In Place | ・公式ドキュメントに記載の方法 ・作業がシンプルで簡単 |
・EKS アドオンの更新が必要 ・NodeGroup をロールバックできない ・更新中は見守るしかできない(EKS が自動で更新するため Pod の停止/起動タイミングをコントロールできない) |
| ② | Master は In Place、NodeGroup は Blue/Green | ・NodeGroup をロールバックできる ・Pod の停止/起動タイミングをコントロールできる |
・EKS アドオンの更新が必要 ・①より作業が多い |
| ③ | Cluster を Blue/Green | ・Master/NodeGroup 共にロールバックできる ・EKS アドオンの更新が不要 |
・作業が複雑になる ・CI/CD で参照しているクラスタエンドポイントの移行 ・StatefulSet 等のステートフルなデータの移行 ・アプリのエンドポイント切り替えの考慮等 |
①より②の方が安心、③は面倒、という事で今回は②の方法で検証します。バージョンは 1.20 から 1.21 に上げます。
3.1. EKS Cluster 作成
まずは 1.20 バージョンの EKS Cluster を作成します。
eksctl コマンドで EKS Cluster を作成する - YasuBlog の記事で作成した yaml を以下のように一部変更して Cluster を作成し、EKS アドオンをインストールします。
---
apiVersion: eksctl.io/v1alpha5
kind: ClusterConfig

metadata:
  name: ekstest
  region: ap-northeast-1
  version: "1.20"

vpc:
  id: "vpc-063b58ff16344acfd"
  subnets:
    public:
      ap-northeast-1a:
          id: "subnet-06324dcadf5706acb"
      ap-northeast-1c:
          id: "subnet-048cad38a6c49de67"
      ap-northeast-1d:
          id: "subnet-0bb85370bb4b4528d"

managedNodeGroups:
  - name: managed-ng-20
    instanceType: t3.medium
    desiredCapacity: 3
    volumeSize: 30
    availabilityZones: ["ap-northeast-1a", "ap-northeast-1c", "ap-northeast-1d"]
    maxPodsPerNode: 20
    ssh:
      allow: true
      publicKeyName: ekstest
EKS アドオンインストール後のバージョンは以下です。
$ eksctl get addon --cluster ekstest
NAME        VERSION         STATUS  ISSUES  IAMROLE                                             UPDATE AVAILABLE
coredns     v1.8.3-eksbuild.1 ACTIVE  0
kube-proxy  v1.20.7-eksbuild.1    ACTIVE  0
vpc-cni     v1.10.1-eksbuild.1    ACTIVE  0  arn:aws:iam::544880603668:role/eksctl-ekstest-addon-iamserviceaccount-kube-Role1-A4OVEJ0N035E
EKS アドオンのバージョンは Kubernetes バージョンごとに異なります。Kubernetes をバージョンアップすると手動でアドオンをバージョンアップする必要があり、今回のケースだと CoreDNS と kube-proxy が手動更新対象となります。
| EKS アドオン | Kubernetes 1.20 | Kubernetes 1.21 |
|---|---|---|
| VPC CNI | 1.10.1-eksbuild.1 | 1.10.1-eksbuild.1 |
| CoreDNS | 1.8.3 | 1.8.4 |
| kube-proxy | 1.20.4-eksbuild.2 | 1.21.2-eksbuild.2 |
3.2. ワークロード作成
本番環境で何も起動していない Cluster をバージョンアップするケースはないと思うので、検証用に適当な Deployment と StatefulSet を起動します。
deployment 用 yaml
apiVersion: apps/v1
kind: Deployment
metadata:
  name: deployment
spec:
  replicas: 3
  selector:
    matchLabels:
      app: app
  template:
    metadata:
      labels:
        app: app
    spec:
      containers:
      - name: amazonlinux
        image: public.ecr.aws/amazonlinux/amazonlinux:latest
        command:
          - "bin/bash"
          - "-c"
          - "sleep 3600"
statefulset 用 yaml
apiVersion: apps/v1
kind: StatefulSet
metadata:
  name: statefulset
spec:
  serviceName: statefulset-a
  replicas: 3
  selector:
    matchLabels:
      app: stateful-app
  template:
    metadata:
      labels:
        app: stateful-app
    spec:
      containers:
      - name: amazonlinux
        image: public.ecr.aws/amazonlinux/amazonlinux:latest
        command:
          - "bin/bash"
          - "-c"
          - "sleep 3600"
        volumeMounts:
        - name: hoge
          mountPath: /hoge
  volumeClaimTemplates:
  - metadata:
      name: hoge
    spec:
      accessModes:
      - ReadWriteOnce
      resources:
        requests:
          storage: 10G
それぞれ起動します。
$ kubectl apply -f test-deployment.yaml
deployment.apps/deployment created
$ kubectl apply -f test-statefulset.yaml
statefulset.apps/statefulset created
$ kubectl get pods -o wide
NAME                          READY   STATUS    RESTARTS   AGE   IP             NODE                                              NOMINATED NODE   READINESS GATES
deployment-6bb985c8c9-2nxzb   1/1     Running   0          94s   10.0.102.164   ip-10-0-102-121.ap-northeast-1.compute.internal   <none>           <none>
deployment-6bb985c8c9-m8kvw   1/1     Running   0          94s   10.0.103.40    ip-10-0-103-198.ap-northeast-1.compute.internal   <none>           <none>
deployment-6bb985c8c9-x6nhz   1/1     Running   0          94s   10.0.101.46    ip-10-0-101-193.ap-northeast-1.compute.internal   <none>           <none>
statefulset-0                 1/1     Running   0          56s   10.0.101.77    ip-10-0-101-193.ap-northeast-1.compute.internal   <none>           <none>
statefulset-1                 1/1     Running   0          29s   10.0.102.72    ip-10-0-102-121.ap-northeast-1.compute.internal   <none>           <none>
statefulset-2                 1/1     Running   0          15s   10.0.103.217   ip-10-0-103-198.ap-northeast-1.compute.internal   <none>           <none>
以下のような構成が作成できました。
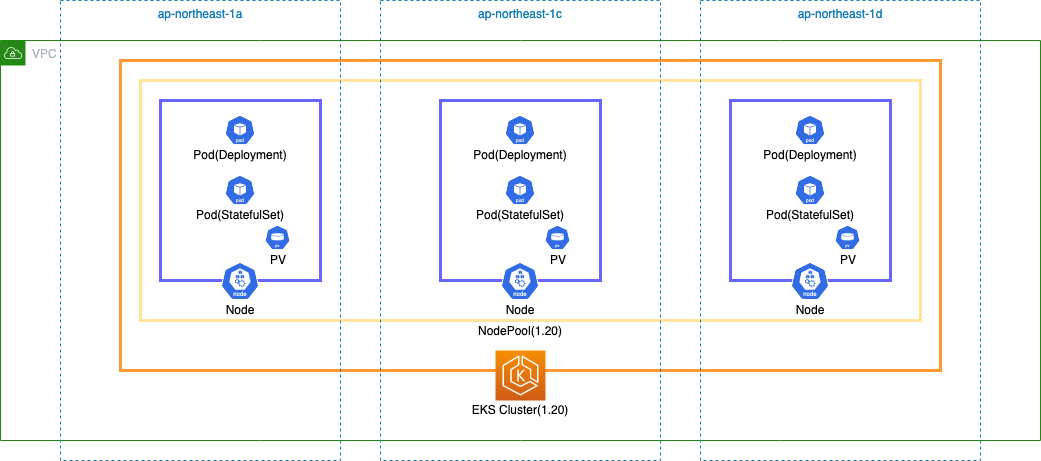
3.3. バージョンアップ
作成した 1.20 の Cluster を 1.21 にバージョンアップします。
3.3.1. バージョン確認
まずは Master と Node の Kubernetes バージョンが揃っていることを確認します。ズレている場合は Node のバージョンをあげて Master に合わせる必要があります。
# Master のバージョン確認
$ kubectl version --short
Client Version: v1.21.3
Server Version: v1.20.11-eks-f17b81
# Node のバージョン確認
$ kubectl get nodes
NAME                                              STATUS   ROLES    AGE     VERSION
ip-10-0-101-193.ap-northeast-1.compute.internal   Ready    <none>   48m   v1.20.11-eks-f17b81
ip-10-0-102-121.ap-northeast-1.compute.internal   Ready    <none>   48m   v1.20.11-eks-f17b81
ip-10-0-103-198.ap-northeast-1.compute.internal   Ready    <none>   48m   v1.20.11-eks-f17b81
3.3.2. ポッドセキュリティポリシーの確認
つづいて、Pod のセキュリティポリシーを確認します。ここはエラーが出なければ OK のようです。
$ kubectl get psp eks.privileged
NAME             PRIV   CAPS   SELINUX    RUNASUSER   FSGROUP    SUPGROUP   READONLYROOTFS   VOLUMES
eks.privileged   true   *      RunAsAny   RunAsAny    RunAsAny   RunAsAny   false            *
3.3.3. Master のバージョンアップ
EKS は、eksctl, マネジメントコンソール、AWS CLI の 3 パターンの方法でバージョンアップできます。今回は eksctl を使用します。
まずは eksctl のバージョンを確認します。0.77.0 以降が必要です。
$ eksctl version
0.71.0
# 低いためバージョンアップ
$ brew upgrade eksctl && brew link --overwrite eksctl
$ eksctl version
0.82.0
upgrade cluster コマンドを実行します。Master が現在のバージョンより 1 つ後のマイナーバージョンに更新されます。
$ eksctl upgrade cluster --name ekstest --approve
2022-02-13 17:30:35 [ℹ]  eksctl version 0.82.0
2022-02-13 17:30:35 [ℹ]  using region ap-northeast-1
2022-02-13 17:30:36 [ℹ]  will upgrade cluster "ekstest" control plane from current version "1.20" to "1.21"
2022-02-13 17:30:38 [ℹ]  waiting for requested "VersionUpdate" in cluster "ekstest" to succeed
2022-02-13 17:30:55 [ℹ]  waiting for requested "VersionUpdate" in cluster "ekstest" to succeed

~省略~

2022-02-13 17:58:24 [ℹ]  waiting for requested "VersionUpdate" in cluster "ekstest" to succeed
2022-02-13 17:58:43 [ℹ]  waiting for requested "VersionUpdate" in cluster "ekstest" to succeed
2022-02-13 17:58:44 [✔]  cluster "ekstest" control plane has been upgraded to version "1.21"
2022-02-13 17:58:44 [ℹ]  you will need to follow the upgrade procedure for all of nodegroups and add-ons
2022-02-13 17:58:45 [ℹ]  re-building cluster stack "eksctl-ekstest-cluster"
2022-02-13 17:58:45 [✔]  all resources in cluster stack "eksctl-ekstest-cluster" are up-to-date
2022-02-13 17:58:45 [ℹ]  checking security group configuration for all nodegroups
2022-02-13 17:58:45 [ℹ]  all nodegroups have up-to-date cloudformation templates
# Master のバージョン確認
$ kubectl version --short
Client Version: v1.21.3
Server Version: v1.21.5-eks-bc4871b
Master を 1.20 から 1.21 に更新するのに 30 分ほどかかりました。
Master をバージョンアップすると EKS アドオンの UPDATE AVAILABLE 列に新しいバージョンが表示されます。今回の場合だと CoreDNS と kube-proxy の新しいバージョンが利用可能なことがわかります。
$ eksctl get addon --cluster ekstest
2022-02-13 18:05:12 [ℹ]  eksctl version 0.82.0
2022-02-13 18:05:12 [ℹ]  using region ap-northeast-1
2022-02-13 18:05:12 [ℹ]  Kubernetes version "1.21" in use by cluster "ekstest"
2022-02-13 18:05:12 [ℹ]  getting all addons
2022-02-13 18:05:14 [ℹ]  to see issues for an addon run `eksctl get addon --name <addon-name> --cluster <cluster-name>`
NAME        VERSION         STATUS  ISSUES  IAMROLE                                             UPDATE AVAILABLE
coredns     v1.8.3-eksbuild.1 ACTIVE  0                                                  v1.8.4-eksbuild.1
kube-proxy  v1.20.7-eksbuild.1    ACTIVE  0                                                  v1.21.2-eksbuild.2
vpc-cni     v1.10.1-eksbuild.1    ACTIVE  0  arn:aws:iam::544880603668:role/eksctl-ekstest-addon-iamserviceaccount-kube-Role1-A4OVEJ0N035E
3.3.4. 新 NodeGroup の作成
つづいて Node 側のバージョンアップです。流れとしては新しいバージョンの NodeGroup を作成して Pod を移行した後に 旧 NodeGroup を削除します。
まずは既存の NodeGroup を確認します。
$ eksctl get nodegroup --cluster ekstest
2022-02-13 17:32:47 [ℹ]  eksctl version 0.82.0
2022-02-13 17:32:47 [ℹ]  using region ap-northeast-1
CLUSTER NODEGROUP   STATUS  CREATED         MIN SIZE    MAX SIZE    DESIRED CAPACITY    INSTANCE TYPE   IMAGE ID    ASG NAME
ekstest managed-ng-20   ACTIVE  2022-02-13T07:39:38Z    3      3      3          t3.medium   AL2_x86_64  eks-48bf7902-e8cc-5e14-42af-54c664189abe
つづいて新しいバージョン(1.21)の NodeGroup を作成します。設定は既存(1.20)の NodeGroup と同じにします。create nodegroup コマンドにバージョンを指定するオプションはなく、Master と同じバージョンの NodeGroup が作成されるようです。
$ eksctl create nodegroup --cluster ekstest --region ap-northeast-1 --name managed-ng-21 --node-type t3.medium --nodes 3 --nodes-min 3 --nodes-max 3 --ssh-access --ssh-public-key ekstest
2022-02-13 18:10:07 [ℹ]  eksctl version 0.82.0
2022-02-13 18:10:07 [ℹ]  using region ap-northeast-1
2022-02-13 18:10:07 [ℹ]  will use version 1.21 for new nodegroup(s) based on control plane version
2022-02-13 18:10:08 [ℹ]  nodegroup "managed-ng-21" will use "" [AmazonLinux2/1.21]
2022-02-13 18:10:08 [ℹ]  using EC2 key pair %!q(*string=<nil>)
2022-02-13 18:10:09 [ℹ]  1 existing nodegroup(s) (managed-ng-20) will be excluded
2022-02-13 18:10:09 [ℹ]  1 nodegroup (managed-ng-21) was included (based on the include/exclude rules)
2022-02-13 18:10:09 [ℹ]  will create a CloudFormation stack for each of 1 managed nodegroups in cluster "ekstest"
2022-02-13 18:10:10 [ℹ]
2 sequential tasks: { fix cluster compatibility, 1 task: { 1 task: { create managed nodegroup "managed-ng-21" } }
}
2022-02-13 18:10:10 [ℹ]  checking cluster stack for missing resources
2022-02-13 18:10:10 [ℹ]  cluster stack has all required resources
2022-02-13 18:10:11 [ℹ]  building managed nodegroup stack "eksctl-ekstest-nodegroup-managed-ng-21"
2022-02-13 18:10:11 [ℹ]  deploying stack "eksctl-ekstest-nodegroup-managed-ng-21"
2022-02-13 18:10:11 [ℹ]  waiting for CloudFormation stack "eksctl-ekstest-nodegroup-managed-ng-21"
2022-02-13 18:10:27 [ℹ]  waiting for CloudFormation stack "eksctl-ekstest-nodegroup-managed-ng-21"

~省略~

2022-02-13 18:13:46 [ℹ]  waiting for CloudFormation stack "eksctl-ekstest-nodegroup-managed-ng-21"
2022-02-13 18:14:04 [ℹ]  waiting for CloudFormation stack "eksctl-ekstest-nodegroup-managed-ng-21"
2022-02-13 18:14:04 [ℹ]  no tasks
2022-02-13 18:14:04 [✔]  created 0 nodegroup(s) in cluster "ekstest"
2022-02-13 18:14:05 [ℹ]  nodegroup "managed-ng-21" has 3 node(s)
2022-02-13 18:14:05 [ℹ]  node "ip-10-0-101-208.ap-northeast-1.compute.internal" is ready
2022-02-13 18:14:05 [ℹ]  node "ip-10-0-102-86.ap-northeast-1.compute.internal" is ready
2022-02-13 18:14:05 [ℹ]  node "ip-10-0-103-214.ap-northeast-1.compute.internal" is ready
2022-02-13 18:14:05 [ℹ]  waiting for at least 3 node(s) to become ready in "managed-ng-21"
2022-02-13 18:14:05 [ℹ]  nodegroup "managed-ng-21" has 3 node(s)
2022-02-13 18:14:05 [ℹ]  node "ip-10-0-101-208.ap-northeast-1.compute.internal" is ready
2022-02-13 18:14:05 [ℹ]  node "ip-10-0-102-86.ap-northeast-1.compute.internal" is ready
2022-02-13 18:14:05 [ℹ]  node "ip-10-0-103-214.ap-northeast-1.compute.internal" is ready
2022-02-13 18:14:05 [✔]  created 1 managed nodegroup(s) in cluster "ekstest"
2022-02-13 18:14:05 [ℹ]  checking security group configuration for all nodegroups
2022-02-13 18:14:05 [ℹ]  all nodegroups have up-to-date cloudformation templates
# 作成されている事を確認
$ eksctl get nodegroup --cluster ekstest
2022-02-13 18:14:20 [ℹ]  eksctl version 0.82.0
2022-02-13 18:14:20 [ℹ]  using region ap-northeast-1
CLUSTER NODEGROUP   STATUS  CREATED         MIN SIZE    MAX SIZE    DESIRED CAPACITY    INSTANCE TYPE   IMAGE ID    ASG NAME
ekstest managed-ng-20   ACTIVE  2022-02-13T07:39:38Z    3      3      3          t3.medium   AL2_x86_64  eks-48bf7902-e8cc-5e14-42af-54c664189abe
ekstest managed-ng-21   ACTIVE  2022-02-13T09:11:10Z    3      3      3          t3.medium   AL2_x86_64  eks-managed-ng-21-6cbf792c-cfa3-8215-20ef-7eae8033569f
# Node のバージョンを確認
$ kubectl get nodes
NAME                                              STATUS   ROLES    AGE   VERSION
ip-10-0-101-193.ap-northeast-1.compute.internal   Ready    <none>   93m   v1.20.11-eks-f17b81
ip-10-0-101-208.ap-northeast-1.compute.internal   Ready    <none>   85s   v1.21.5-eks-9017834
ip-10-0-102-121.ap-northeast-1.compute.internal   Ready    <none>   93m   v1.20.11-eks-f17b81
ip-10-0-102-86.ap-northeast-1.compute.internal    Ready    <none>   85s   v1.21.5-eks-9017834
ip-10-0-103-198.ap-northeast-1.compute.internal   Ready    <none>   93m   v1.20.11-eks-f17b81
ip-10-0-103-214.ap-northeast-1.compute.internal   Ready    <none>   87s   v1.21.5-eks-9017834
新しい NodeGroup の作成に 4 分ほどかかりました。以下の構成が作成できました。
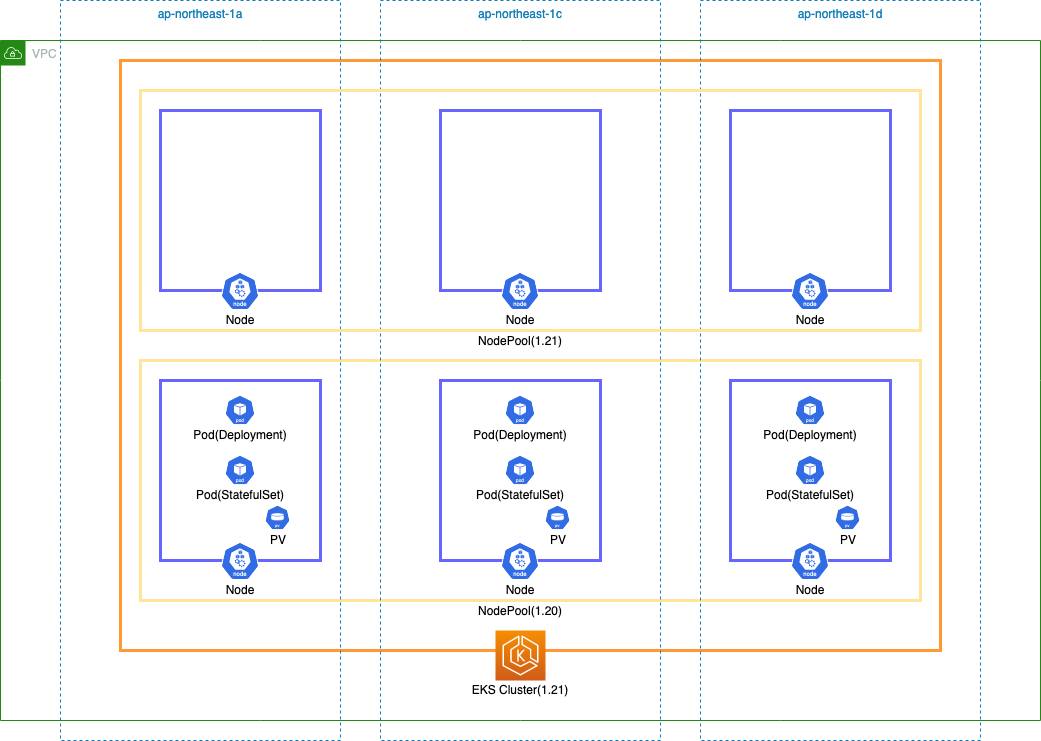
3.3.5. Pod の移行
旧 Node を drain して Pod を新 Node で起動させます。NodeGroup をまるごと drain する事も可能ですがちょっと怖いので Node を 1 台ずつ drain します。
※ drain は Pod に SIGTERM を送るため、SIGTERM を受けて正常に終了するように作られているアプリケーションが前提となります
# Node の確認
$ kubectl get nodes
NAME                                              STATUS   ROLES    AGE   VERSION
ip-10-0-101-193.ap-northeast-1.compute.internal   Ready    <none>   93m   v1.20.11-eks-f17b81
ip-10-0-101-208.ap-northeast-1.compute.internal   Ready    <none>   85s   v1.21.5-eks-9017834
ip-10-0-102-121.ap-northeast-1.compute.internal   Ready    <none>   93m   v1.20.11-eks-f17b81
ip-10-0-102-86.ap-northeast-1.compute.internal    Ready    <none>   85s   v1.21.5-eks-9017834
ip-10-0-103-198.ap-northeast-1.compute.internal   Ready    <none>   93m   v1.20.11-eks-f17b81
ip-10-0-103-214.ap-northeast-1.compute.internal   Ready    <none>   87s   v1.21.5-eks-9017834
# Pod の確認(全て 1.20 の Node で起動)
$ kubectl get pods -o wide
NAME                          READY   STATUS    RESTARTS   AGE   IP             NODE                                              NOMINATED NODE   READINESS GATES
deployment-6bb985c8c9-2nxzb   1/1     Running   0          25m   10.0.102.164   ip-10-0-102-121.ap-northeast-1.compute.internal   <none>           <none>
deployment-6bb985c8c9-m8kvw   1/1     Running   0          25m   10.0.103.40    ip-10-0-103-198.ap-northeast-1.compute.internal   <none>           <none>
deployment-6bb985c8c9-x6nhz   1/1     Running   0          25m   10.0.101.46    ip-10-0-101-193.ap-northeast-1.compute.internal   <none>           <none>
statefulset-0                 1/1     Running   0          25m   10.0.101.77    ip-10-0-101-193.ap-northeast-1.compute.internal   <none>           <none>
statefulset-1                 1/1     Running   0          24m   10.0.102.72    ip-10-0-102-121.ap-northeast-1.compute.internal   <none>           <none>
statefulset-2                 1/1     Running   0          24m   10.0.103.217   ip-10-0-103-198.ap-northeast-1.compute.internal   <none>           <none>
# 1.20 の Node を一台ずつ drain
$ kubectl drain ip-10-0-102-121.ap-northeast-1.compute.internal --ignore-daemonsets --delete-emptydir-data
node/ip-10-0-102-121.ap-northeast-1.compute.internal cordoned
WARNING: ignoring DaemonSet-managed Pods: kube-system/aws-node-pgfsx, kube-system/kube-proxy-mfxsj
evicting pod default/statefulset-1
evicting pod default/deployment-6bb985c8c9-2nxzb
pod/deployment-6bb985c8c9-2nxzb evicted
pod/statefulset-1 evicted
node/ip-10-0-102-121.ap-northeast-1.compute.internal evicted
$ kubectl drain ip-10-0-101-193.ap-northeast-1.compute.internal --ignore-daemonsets --delete-emptydir-data
$ kubectl drain ip-10-0-103-198.ap-northeast-1.compute.internal --ignore-daemonsets --delete-emptydir-data
# Node の確認
$ kubectl get nodes
NAME                                              STATUS                     ROLES    AGE    VERSION
ip-10-0-101-193.ap-northeast-1.compute.internal   Ready,SchedulingDisabled   <none>   105m   v1.20.11-eks-f17b81
ip-10-0-101-208.ap-northeast-1.compute.internal   Ready                      <none>   13m    v1.21.5-eks-9017834
ip-10-0-102-121.ap-northeast-1.compute.internal   Ready,SchedulingDisabled   <none>   105m   v1.20.11-eks-f17b81
ip-10-0-102-86.ap-northeast-1.compute.internal    Ready                      <none>   13m    v1.21.5-eks-9017834
ip-10-0-103-198.ap-northeast-1.compute.internal   Ready,SchedulingDisabled   <none>   105m   v1.20.11-eks-f17b81
ip-10-0-103-214.ap-northeast-1.compute.internal   Ready                      <none>   14m    v1.21.5-eks-9017834
# Pod の確認
$ kubectl get pods -o wide
NAME                          READY   STATUS    RESTARTS   AGE     IP             NODE                                              NOMINATED NODE   READINESS GATES
deployment-6bb985c8c9-9sp8k   1/1     Running   0          66s     10.0.103.177   ip-10-0-103-214.ap-northeast-1.compute.internal   <none>           <none>
deployment-6bb985c8c9-ccbms   1/1     Running   0          2m34s   10.0.102.231   ip-10-0-102-86.ap-northeast-1.compute.internal    <none>           <none>
deployment-6bb985c8c9-d656x   1/1     Running   0          3m46s   10.0.101.182   ip-10-0-101-208.ap-northeast-1.compute.internal   <none>           <none>
statefulset-0                 1/1     Running   0          3m14s   10.0.101.12    ip-10-0-101-208.ap-northeast-1.compute.internal   <none>           <none>
statefulset-1                 1/1     Running   0          118s    10.0.102.206   ip-10-0-102-86.ap-northeast-1.compute.internal    <none>           <none>
statefulset-2                 1/1     Running   0          30s     10.0.103.105   ip-10-0-103-214.ap-northeast-1.compute.internal   <none>           <none>
全ての Pod が新 Node で起動しました。
3.3.6. 旧 NodeGroup の削除
旧 Node 上で動く Pod がなくなったので旧 NodeGroup を削除します。
$ eksctl delete nodegroup --cluster ekstest --region ap-northeast-1 --name managed-ng-20
2022-02-13 18:28:34 [ℹ]  eksctl version 0.82.0
2022-02-13 18:28:34 [ℹ]  using region ap-northeast-1
2022-02-13 18:28:34 [ℹ]  1 nodegroup (managed-ng-20) was included (based on the include/exclude rules)
2022-02-13 18:28:34 [ℹ]  will drain 1 nodegroup(s) in cluster "ekstest"
2022-02-13 18:28:34 [!]  ignoring DaemonSet-managed Pods: kube-system/aws-node-plgkj, kube-system/kube-proxy-x9b6h
2022-02-13 18:28:34 [!]  ignoring DaemonSet-managed Pods: kube-system/aws-node-pgfsx, kube-system/kube-proxy-mfxsj
2022-02-13 18:28:34 [!]  ignoring DaemonSet-managed Pods: kube-system/aws-node-qswdg, kube-system/kube-proxy-fzk28
2022-02-13 18:28:34 [✔]  drained all nodes: [ip-10-0-101-193.ap-northeast-1.compute.internal ip-10-0-102-121.ap-northeast-1.compute.internal ip-10-0-103-198.ap-northeast-1.compute.internal]
2022-02-13 18:28:34 [ℹ]  will delete 1 nodegroups from cluster "ekstest"
2022-02-13 18:28:35 [ℹ]  1 task: { 1 task: { delete nodegroup "managed-ng-20" [async] } }
2022-02-13 18:28:35 [ℹ]  will delete stack "eksctl-ekstest-nodegroup-managed-ng-20"
2022-02-13 18:28:35 [ℹ]  will delete 0 nodegroups from auth ConfigMap in cluster "ekstest"
2022-02-13 18:28:35 [✔]  deleted 1 nodegroup(s) from cluster "ekstest"
# 削除されている事を確認
$ eksctl get nodegroup --cluster ekstest
2022-02-13 18:32:50 [ℹ]  eksctl version 0.82.0
2022-02-13 18:32:50 [ℹ]  using region ap-northeast-1
CLUSTER NODEGROUP   STATUS  CREATED         MIN SIZE    MAX SIZE    DESIRED CAPACITY    INSTANCE TYPE   IMAGE ID    ASG NAME
ekstest managed-ng-21   ACTIVE  2022-02-13T09:11:10Z    3      3      3          t3.medium   AL2_x86_64  eks-managed-ng-21-6cbf792c-cfa3-8215-20ef-7eae8033569f
# Node のバージョンを確認
$ kubectl get nodes
NAME                                              STATUS   ROLES    AGE   VERSION
ip-10-0-101-208.ap-northeast-1.compute.internal   Ready    <none>   19m   v1.21.5-eks-9017834
ip-10-0-102-86.ap-northeast-1.compute.internal    Ready    <none>   19m   v1.21.5-eks-9017834
ip-10-0-103-214.ap-northeast-1.compute.internal   Ready    <none>   19m   v1.21.5-eks-9017834
Master と Node のバージョンが 1.21 になりました。
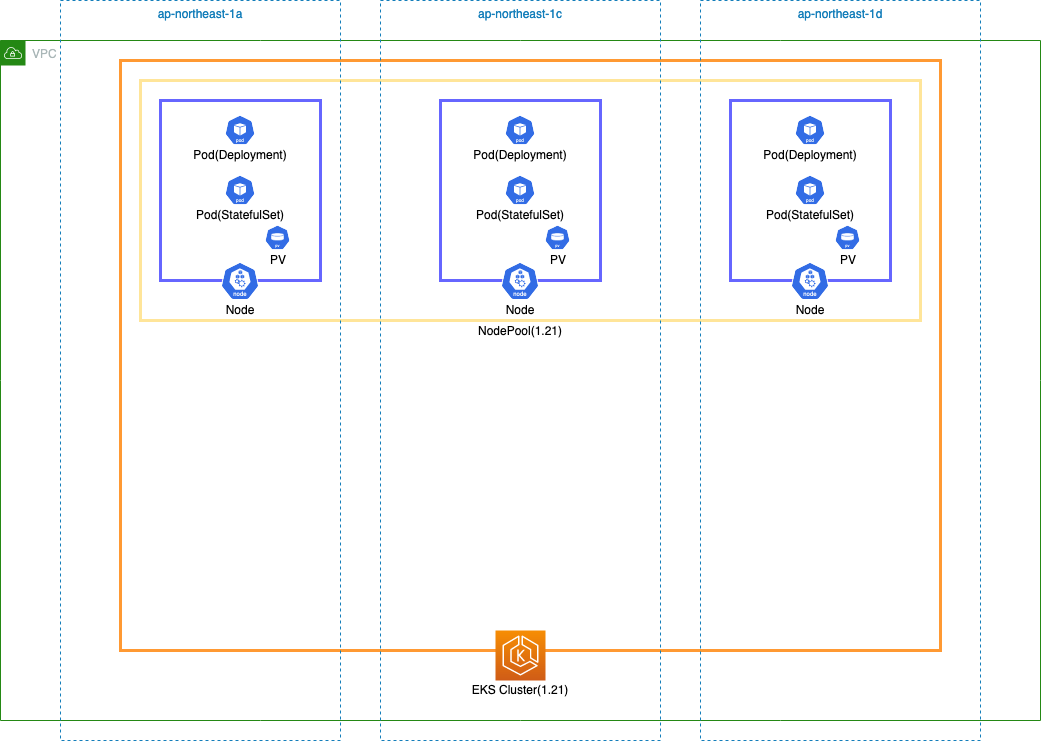
3.2.7. EKS アドオンの更新
最後に EKS アドオンをバージョンアップします。
# バージョン確認
$ eksctl get addon --cluster ekstest
2022-02-13 18:34:06 [ℹ]  eksctl version 0.82.0
2022-02-13 18:34:06 [ℹ]  using region ap-northeast-1
2022-02-13 18:34:06 [ℹ]  Kubernetes version "1.21" in use by cluster "ekstest"
2022-02-13 18:34:06 [ℹ]  getting all addons
2022-02-13 18:34:08 [ℹ]  to see issues for an addon run `eksctl get addon --name <addon-name> --cluster <cluster-name>`
NAME        VERSION         STATUS  ISSUES  IAMROLE                                             UPDATE AVAILABLE
coredns     v1.8.3-eksbuild.1 ACTIVE  0                                                  v1.8.4-eksbuild.1
kube-proxy  v1.20.7-eksbuild.1    ACTIVE  0                                                  v1.21.2-eksbuild.2
vpc-cni     v1.10.1-eksbuild.1    ACTIVE  0  arn:aws:iam::544880603668:role/eksctl-ekstest-addon-iamserviceaccount-kube-Role1-A4OVEJ0N035E
# CoreDNS バージョンアップ
$ eksctl update addon --name coredns --version v1.8.4-eksbuild.1 --cluster ekstest --force
2022-02-13 18:34:51 [ℹ]  Kubernetes version "1.21" in use by cluster "ekstest"
2022-02-13 18:34:52 [ℹ]  new version provided v1.8.4-eksbuild.1
2022-02-13 18:34:52 [ℹ]  updating addon
# kube-proxy バージョンアップ
$ eksctl update addon --name kube-proxy --version v1.21.2-eksbuild.2 --cluster ekstest --force
2022-02-13 18:35:26 [ℹ]  Kubernetes version "1.21" in use by cluster "ekstest"
2022-02-13 18:35:27 [ℹ]  new version provided v1.21.2-eksbuild.2
2022-02-13 18:35:27 [ℹ]  updating addon
# バージョン確認
$ eksctl get addon --cluster ekstest
2022-02-13 18:36:14 [ℹ]  eksctl version 0.82.0
2022-02-13 18:36:14 [ℹ]  using region ap-northeast-1
2022-02-13 18:36:14 [ℹ]  Kubernetes version "1.21" in use by cluster "ekstest"
2022-02-13 18:36:14 [ℹ]  getting all addons
2022-02-13 18:36:16 [ℹ]  to see issues for an addon run `eksctl get addon --name <addon-name> --cluster <cluster-name>`
NAME        VERSION         STATUS  ISSUES  IAMROLE                                             UPDATE AVAILABLE
coredns     v1.8.4-eksbuild.1 ACTIVE  0
kube-proxy  v1.21.2-eksbuild.2    ACTIVE  0
vpc-cni     v1.10.1-eksbuild.1    ACTIVE  0  arn:aws:iam::544880603668:role/eksctl-ekstest-addon-iamserviceaccount-kube-Role1-A4OVEJ0N035E
4. まとめ
本番環境を想定するとバージョンアップ方法は Master は In Place, Node は Blue/Green が安全かと思います。
今回は検証のため単純な Deployment と StatefulSet が起動している Cluster で検証したので簡単でしたが、実際の本番環境で実施する場合は結構怖い作業ですね。何かにハマるケースもあるかと思います。
5. 参考
Kubernetesバージョンとバージョンスキューサポートポリシー | Kubernetes
website/patch-releases.md at main · kubernetes/website · GitHub
Kubernetes の Eviction
Kubernetes の Eviction について整理し、実際の挙動を確認しました。
1. Eviction
Eviction とは、Node のリソースを確保するために kubelet が Pod を終了する事です。
kubelet は定期的に Node のリソースを監視しており、空きリソースが閾値(Eviction Threshold)を下回るとPod を Evict します。

具体的には Eviction Signal と Eviction Threshold を比較して Pod を Evict するかどうかを判断します。
Eviction Signal とは、ある特定時点での特定リソースの状態です。
| Eviction Signal | 説明 |
|---|---|
| memory.available | 空きメモリ |
| nodefs.available | (ローカルディスク、emptyDir,ログストレージ等に使われる)メインのファイルシステムの空き容量 |
| nodefs.inodesFree | (ローカルディスク、emptyDir,ログストレージ等に使われる)メインのファイルシステムの空き inode 量 |
| imagefs.available | (コンテナランタイムがコンテナイメージとコンテナ書き込み可能レイヤーを格納するために使用する)オプションのファイルシステムの空き容量 |
| imagefs.inodesFree | (コンテナランタイムがコンテナイメージとコンテナ書き込み可能レイヤーを格納するために使用する)オプションのファイルシステムの空き inode 量 |
| pid.available | 空き pid |
なお、Eviction Signal の監視間隔は kubelet フラグ --housekeeping-interval で設定可能です。デフォルトでは 10 秒です。
Eviction Threshold には soft と hard があります。
| Eviction Threshold | Eviction Signal が Eviction Threshold を下回った際の挙動 | デフォルト値 |
|---|---|---|
| eviction-soft | ・Pod に SIGTERM が送られる ・SIGTERM 後、Pod に設定された terminationGracePeriodSeconds または kubelete に設定された --eviction-max-pod-grace-period の短い方の時間を待った後に SIGKILL が送られる・Evict 対象になってから Evict を実行するまでの時間を --eviction-soft-grace-period で設定できる例えば eviction-soft-grace-period=memory.available=1m30s を設定した場合、Pod が Evict 対象になってから 1分30秒後に Pod に SIGTERM が送られる |
なし |
| eviction-hard | ・Pod に SIGKILL が送られる | memory.available<100Mi nodefs.available<10% imagefs.available<15% nodefs.inodesFree<5% |
続いて、どのように Evict 対象の Pod を選定しているかという点ですが、以下の基準で決まります。
- requests を超えてリソースを使用しているか
- Pod に設定されている Pod Priority
- requests を超えている量がより多いもの
結果的には、次の順序で Pod をランク付けして Evict します。簡単に言うと requests/limits の両方とも設定していない Pod が最初に Evict されます。
- requests を超えてリソースを使用している BestEffort または Burstable の Pod
- requests を超えていない Guaranteed または Burstable の Pod
※ requests/BestEffort/Burstable/Guaranteed については Kubernetes のリソース制限とその挙動確認 - YasuBlog に整理しています
2. Eviction 発生後の挙動
Pod が Evict されると Node の Condition が変化し Taint が付与されます。 Taint とは直訳すると「汚れ」の意味で、Taint が付与された Node には Pod をスケジュールさせないといった使い方ができます。
Node Condition と Eviction Signal のマッピングは以下です。Eviction が発生していない状態ではそれぞれの Node Condition は False です。Eviction が発生すると True に変わります。
| Node Condition | Eviction Signal | 説明 |
|---|---|---|
| MemoryPressure | memory.available | Node で使用可能なメモリが Eviction Threshold を満たした |
| DiskPressure | nodefs.available nodefs.inodesFree imagefs.available imagefs.inodesFree |
Node の root or image ファイルシステム の 使用可能ディスク量 or inode が Eviction Threshold を満たした |
| PIDPressure | pid.available | Node で使用可能なプロセス ID が Eviction Threshold を満たした |
なお、Node Condition の更新間隔は kubelet フラグ --node-status-update-frequency で設定可能です。デフォルトでは 10 秒です。
Node Condition が True になる事により付与される Taint は以下です。
| Node Condition | Taint |
|---|---|
| MemoryPressure | node.kubernetes.io/memory-pressure:NoSchedule |
| DiskPressure | node.kubernetes.io/disk-pressure:NoSchedule |
| PIDPressure | node.kubernetes.io/pid-pressure:NoSchedule |
例えば、Deployment や StatefulSet の場合は Pod が Evict されると新しい Pod が起動してきます。すぐに Pod が起動するとまたすぐに Evict される事になり、Pod 作成 -> Evict が繰り返し発生する事になります。これを防ぐために Node Condition を変更するまでのタイムラグを --eviction-pressure-transition-period フラグで設定可能です。デフォルトでは 5 分です。
3. 検証
3.1. 検証環境構築
eksctl コマンドで EKS Cluster を作成する - YasuBlog で作成した EKS Cluster を使用します。
3.2. EKS の 設定値
まずは eviction-soft/eviction-hard の確認方法です。Node の情報なので Kubernetes の API サーバから取得できます。
kubectl proxy コマンドでプロキシをローカルに起動すると API サーバにアクセスできます。
$ kubectl proxy
Starting to serve on 127.0.0.1:8001
デフォルトでローカルの 8001 ポートでプロキシが起動するので、別ターミナルで http://localhost:8001/api/v1/nodes/<Node 名>/proxy/configz にアクセスします。json なので jq で整形すると見やすいです。
$ kubectl get node
NAME                                              STATUS   ROLES    AGE    VERSION
ip-10-0-101-27.ap-northeast-1.compute.internal    Ready    <none>   19m   v1.21.5-eks-9017834
ip-10-0-102-128.ap-northeast-1.compute.internal   Ready    <none>   20m   v1.21.5-eks-9017834
ip-10-0-103-229.ap-northeast-1.compute.internal   Ready    <none>   19m   v1.21.5-eks-9017834
$ curl -sSL "http://localhost:8001/api/v1/nodes/ip-10-0-101-27.ap-northeast-1.compute.internal/proxy/configz" | jq .
{
  "kubeletconfig": {
    "enableServer": true,
    "syncFrequency": "1m0s",
    "fileCheckFrequency": "20s",
    "httpCheckFrequency": "20s",
    "address": "0.0.0.0",
    "port": 10250,
    "tlsCipherSuites": [
      "TLS_ECDHE_ECDSA_WITH_AES_128_GCM_SHA256",
      "TLS_ECDHE_RSA_WITH_AES_128_GCM_SHA256",
      "TLS_ECDHE_ECDSA_WITH_CHACHA20_POLY1305",
      "TLS_ECDHE_RSA_WITH_AES_256_GCM_SHA384",
      "TLS_ECDHE_RSA_WITH_CHACHA20_POLY1305",
      "TLS_ECDHE_ECDSA_WITH_AES_256_GCM_SHA384",
      "TLS_RSA_WITH_AES_256_GCM_SHA384",
      "TLS_RSA_WITH_AES_128_GCM_SHA256"
    ],
    "serverTLSBootstrap": true,
    "authentication": {
      "x509": {
        "clientCAFile": "/etc/kubernetes/pki/ca.crt"
      },
      "webhook": {
        "enabled": true,
        "cacheTTL": "2m0s"
      },
      "anonymous": {
        "enabled": false
      }
    },
    "authorization": {
      "mode": "Webhook",
      "webhook": {
        "cacheAuthorizedTTL": "5m0s",
        "cacheUnauthorizedTTL": "30s"
      }
    },
    "registryPullQPS": 5,
    "registryBurst": 10,
    "eventRecordQPS": 5,
    "eventBurst": 10,
    "enableDebuggingHandlers": true,
    "healthzPort": 10248,
    "healthzBindAddress": "127.0.0.1",
    "oomScoreAdj": -999,
    "clusterDomain": "cluster.local",
    "clusterDNS": [
      "172.20.0.10"
    ],
    "streamingConnectionIdleTimeout": "4h0m0s",
    "nodeStatusUpdateFrequency": "10s",
    "nodeStatusReportFrequency": "5m0s",
    "nodeLeaseDurationSeconds": 40,
    "imageMinimumGCAge": "2m0s",
    "imageGCHighThresholdPercent": 85,
    "imageGCLowThresholdPercent": 80,
    "volumeStatsAggPeriod": "1m0s",
    "cgroupRoot": "/",
    "cgroupsPerQOS": true,
    "cgroupDriver": "cgroupfs",
    "cpuManagerPolicy": "none",
    "cpuManagerReconcilePeriod": "10s",
    "memoryManagerPolicy": "None",
    "topologyManagerPolicy": "none",
    "topologyManagerScope": "container",
    "runtimeRequestTimeout": "2m0s",
    "hairpinMode": "hairpin-veth",
    "maxPods": 17,
    "podPidsLimit": -1,
    "resolvConf": "/etc/resolv.conf",
    "cpuCFSQuota": true,
    "cpuCFSQuotaPeriod": "100ms",
    "nodeStatusMaxImages": 50,
    "maxOpenFiles": 1000000,
    "contentType": "application/vnd.kubernetes.protobuf",
    "kubeAPIQPS": 5,
    "kubeAPIBurst": 10,
    "serializeImagePulls": false,
    "evictionHard": {
      "memory.available": "100Mi",
      "nodefs.available": "10%",
      "nodefs.inodesFree": "5%"
    },
    "evictionPressureTransitionPeriod": "5m0s",
    "enableControllerAttachDetach": true,
    "protectKernelDefaults": true,
    "makeIPTablesUtilChains": true,
    "iptablesMasqueradeBit": 14,
    "iptablesDropBit": 15,
    "featureGates": {
      "RotateKubeletServerCertificate": true
    },
    "failSwapOn": true,
    "containerLogMaxSize": "10Mi",
    "containerLogMaxFiles": 5,
    "configMapAndSecretChangeDetectionStrategy": "Watch",
    "kubeReserved": {
      "cpu": "70m",
      "ephemeral-storage": "1Gi",
      "memory": "442Mi"
    },
    "enforceNodeAllocatable": [
      "pods"
    ],
    "volumePluginDir": "/usr/libexec/kubernetes/kubelet-plugins/volume/exec/",
    "logging": {
      "format": "text"
    },
    "enableSystemLogHandler": true,
    "shutdownGracePeriod": "0s",
    "shutdownGracePeriodCriticalPods": "0s",
    "enableProfilingHandler": true,
    "enableDebugFlagsHandler": true
  }
}
86 行目から 90 行目に eviction-hard が表示されています。eviction-soft は設定されていません。
91 行目から evictionPressureTransitionPeriod がデフォルトの 5 分に設定されていることもわかります。
なお、API サーバではなく Node にログインして設定ファイルから値を確認する事も可能です。
@node$ cat /etc/kubernetes/kubelet/kubelet-config.json
{
  "kind": "KubeletConfiguration",
  "apiVersion": "kubelet.config.k8s.io/v1beta1",
  "address": "0.0.0.0",
  "authentication": {
    "anonymous": {
      "enabled": false
    },
    "webhook": {
      "cacheTTL": "2m0s",
      "enabled": true
    },
    "x509": {
      "clientCAFile": "/etc/kubernetes/pki/ca.crt"
    }
  },
  "authorization": {
    "mode": "Webhook",
    "webhook": {
      "cacheAuthorizedTTL": "5m0s",
      "cacheUnauthorizedTTL": "30s"
    }
  },
  "clusterDomain": "cluster.local",
  "hairpinMode": "hairpin-veth",
  "readOnlyPort": 0,
  "cgroupDriver": "cgroupfs",
  "cgroupRoot": "/",
  "featureGates": {
    "RotateKubeletServerCertificate": true
  },
  "protectKernelDefaults": true,
  "serializeImagePulls": false,
  "serverTLSBootstrap": true,
  "tlsCipherSuites": [
    "TLS_ECDHE_ECDSA_WITH_AES_128_GCM_SHA256",
    "TLS_ECDHE_RSA_WITH_AES_128_GCM_SHA256",
    "TLS_ECDHE_ECDSA_WITH_CHACHA20_POLY1305",
    "TLS_ECDHE_RSA_WITH_AES_256_GCM_SHA384",
    "TLS_ECDHE_RSA_WITH_CHACHA20_POLY1305",
    "TLS_ECDHE_ECDSA_WITH_AES_256_GCM_SHA384",
    "TLS_RSA_WITH_AES_256_GCM_SHA384",
    "TLS_RSA_WITH_AES_128_GCM_SHA256"
  ],
  "maxPods": 20,
  "clusterDNS": [
    "172.20.0.10"
  ],
  "evictionHard": {
    "memory.available": "100Mi",
    "nodefs.available": "10%",
    "nodefs.inodesFree": "5%"
  },
  "kubeReserved": {
    "cpu": "70m",
    "ephemeral-storage": "1Gi",
    "memory": "442Mi"
  }
}
インスタンスタイプ毎の設定値を確認してみました。Node のリソース量に関わらず固定値が設定されているようです。
| インスタンスタイプ | eviction-soft | eviction-hard |
|---|---|---|
| t3.small | なし | memory.available: 100Mi nodefs.available: 10% nodefs.inodesFree: 5% |
| t3.medium | なし | memory.available: 100Mi nodefs.available: 10% nodefs.inodesFree: 5% |
| m5.large | なし | memory.available: 100Mi nodefs.available: 10% nodefs.inodesFree: 5% |
| m5.xlarge | なし | memory.available: 100Mi nodefs.available: 10% nodefs.inodesFree: 5% |
3.3. 設定変更
AWS マネージドではないセルフマネージド NodeGroup の場合は以下の通り設定できそうです。
Customizing kubelet configuration - eksctl
AWS マネージドの場合は yaml での設定方法は見つかりませんでした。Node 上の設定ファイル(/etc/kubernetes/kubelet/kubelet-config.json や /etc/systemd/system/kubelet.service)を直接修正する事で設定変更が可能です。 Node 再作成時にも同様に設定されるように、カスタム起動テンプレートかカスタム AMI を使用する必要があります。
Amazon EKS ワーカーノードを設定して特定のディスク使用率でイメージキャッシュをクリーンアップする
個人的には AWS マネージドという事は AWS が良かれと思って設計した値なのでユーザ側がカスタマイズする必要は無いと思っています。
3.4. Eviction を発生させる
メモリ制限をかけない Pod を起動して空きメモリが eviction-hard の閾値である 100Mi 以下になった際の挙動を確認します。
以下の manifest で deployment を起動します。
apiVersion: apps/v1
kind: Deployment
metadata:
  name: deployment-a
spec:
  replicas: 1
  selector:
    matchLabels:
      app: app-a
  template:
    metadata:
      labels:
        app: app-a
    spec:
      containers:
      - name: amazonlinux
        image: public.ecr.aws/amazonlinux/amazonlinux:latest
        command:
          - "bin/bash"
          - "-c"
          - "sleep 3600"
Pod が起動している事を確認します。
$ kubectl get pod -o wide
NAME                            READY   STATUS    RESTARTS   AGE     IP            NODE                                              NOMINATED NODE   READINESS GATES
deployment-a-75979d4477-ssffj   1/1     Running   0          13s     10.0.103.15   ip-10-0-101-27.ap-northeast-1.compute.internal   <none>           <none>
Eviction が発生する前の Node の状態を確認します。
$ kubectl describe node ip-10-0-101-27.ap-northeast-1.compute.internal
Name:               ip-10-0-101-27.ap-northeast-1.compute.internal
Roles:              <none>
Labels:             alpha.eksctl.io/cluster-name=ekstest
                    alpha.eksctl.io/nodegroup-name=managed-ng
                    beta.kubernetes.io/arch=amd64
                    beta.kubernetes.io/instance-type=t3.medium
                    beta.kubernetes.io/os=linux
                    eks.amazonaws.com/capacityType=ON_DEMAND
                    eks.amazonaws.com/nodegroup=managed-ng
                    eks.amazonaws.com/nodegroup-image=ami-0b49509d917c6649b
                    eks.amazonaws.com/sourceLaunchTemplateId=lt-0e28d03ab5eb48995
                    eks.amazonaws.com/sourceLaunchTemplateVersion=1
                    failure-domain.beta.kubernetes.io/region=ap-northeast-1
                    failure-domain.beta.kubernetes.io/zone=ap-northeast-1a
                    kubernetes.io/arch=amd64
                    kubernetes.io/hostname=ip-10-0-101-27.ap-northeast-1.compute.internal
                    kubernetes.io/os=linux
                    node.kubernetes.io/instance-type=t3.medium
                    topology.kubernetes.io/region=ap-northeast-1
                    topology.kubernetes.io/zone=ap-northeast-1a
Annotations:        node.alpha.kubernetes.io/ttl: 0
                    volumes.kubernetes.io/controller-managed-attach-detach: true
CreationTimestamp:  Wed, 02 Feb 2022 22:56:40 +0900
Taints:             <none>
Unschedulable:      false
Lease:
  HolderIdentity:  ip-10-0-101-27.ap-northeast-1.compute.internal
  AcquireTime:     <unset>
  RenewTime:       Wed, 02 Feb 2022 23:34:49 +0900
Conditions:
  Type             Status  LastHeartbeatTime                 LastTransitionTime                Reason                       Message
  ----             ------  -----------------                 ------------------                ------                       -------
  MemoryPressure   False   Wed, 02 Feb 2022 23:31:12 +0900   Wed, 02 Feb 2022 22:56:38 +0900   KubeletHasSufficientMemory   kubelet has sufficient memory available
  DiskPressure     False   Wed, 02 Feb 2022 23:31:12 +0900   Wed, 02 Feb 2022 22:56:38 +0900   KubeletHasNoDiskPressure     kubelet has no disk pressure
  PIDPressure      False   Wed, 02 Feb 2022 23:31:12 +0900   Wed, 02 Feb 2022 22:56:38 +0900   KubeletHasSufficientPID      kubelet has sufficient PID available
  Ready            True    Wed, 02 Feb 2022 23:31:12 +0900   Wed, 02 Feb 2022 22:57:11 +0900   KubeletReady                 kubelet is posting ready status
Addresses:
  InternalIP:   10.0.101.27
  ExternalIP:   54.250.92.70
  Hostname:     ip-10-0-101-27.ap-northeast-1.compute.internal
  InternalDNS:  ip-10-0-101-27.ap-northeast-1.compute.internal
Capacity:
  attachable-volumes-aws-ebs:  25
  cpu:                         2
  ephemeral-storage:           31444972Ki
  hugepages-1Gi:               0
  hugepages-2Mi:               0
  memory:                      3967460Ki
  pods:                        17
Allocatable:
  attachable-volumes-aws-ebs:  25
  cpu:                         1930m
  ephemeral-storage:           27905944324
  hugepages-1Gi:               0
  hugepages-2Mi:               0
  memory:                      3412452Ki
  pods:                        17
System Info:
  Machine ID:                 ec21395734297aab934fe1f5ab059326
  System UUID:                ec213957-3429-7aab-934f-e1f5ab059326
  Boot ID:                    ed9c469c-a158-4b4c-a677-8f6688cc53a0
  Kernel Version:             5.4.172-90.336.amzn2.x86_64
  OS Image:                   Amazon Linux 2
  Operating System:           linux
  Architecture:               amd64
  Container Runtime Version:  docker://20.10.7
  Kubelet Version:            v1.21.5-eks-9017834
  Kube-Proxy Version:         v1.21.5-eks-9017834
ProviderID:                   aws:///ap-northeast-1a/i-07d2e46ad433eeb9d
Non-terminated Pods:          (3 in total)
  Namespace                   Name                             CPU Requests  CPU Limits  Memory Requests  Memory Limits  Age
  ---------                   ----                             ------------  ----------  ---------------  -------------  ---
  default                     deployment-a-75979d4477-ssffj    0 (0%)        0 (0%)      0 (0%)           0 (0%)         4m30s
  kube-system                 aws-node-b7xfp                   25m (1%)      0 (0%)      0 (0%)           0 (0%)         38m
  kube-system                 kube-proxy-qqzbs                 100m (5%)     0 (0%)      0 (0%)           0 (0%)         38m
Allocated resources:
  (Total limits may be over 100 percent, i.e., overcommitted.)
  Resource                    Requests   Limits
  --------                    --------   ------
  cpu                         125m (6%)  0 (0%)
  memory                      0 (0%)     0 (0%)
  ephemeral-storage           0 (0%)     0 (0%)
  hugepages-1Gi               0 (0%)     0 (0%)
  hugepages-2Mi               0 (0%)     0 (0%)
  attachable-volumes-aws-ebs  0          0
Events:
  Type    Reason                   Age                From        Message
  ----    ------                   ----               ----        -------
  Normal  Starting                 38m                kubelet     Starting kubelet.
  Normal  NodeHasSufficientMemory  38m (x2 over 38m)  kubelet     Node ip-10-0-101-27.ap-northeast-1.compute.internal status is now: NodeHasSufficientMemory
  Normal  NodeHasNoDiskPressure    38m (x2 over 38m)  kubelet     Node ip-10-0-101-27.ap-northeast-1.compute.internal status is now: NodeHasNoDiskPressure
  Normal  NodeHasSufficientPID     38m (x2 over 38m)  kubelet     Node ip-10-0-101-27.ap-northeast-1.compute.internal status is now: NodeHasSufficientPID
  Normal  NodeAllocatableEnforced  38m                kubelet     Updated Node Allocatable limit across pods
  Normal  Starting                 38m                kube-proxy  Starting kube-proxy.
  Normal  NodeReady                37m                kubelet     Node ip-10-0-101-27.ap-northeast-1.compute.internal status is now: NodeReady
34 行目の通り MemoryPressure は False です。また 25 行目から Taint が何も付与されていないことがわかります。
では、Pod にメモリ負荷をかけるため、Pod にログインして yes コマンドを実行します。
$ kubectl exec -it deployment-a-75979d4477-ssffj -- /bin/bash
@pod$ /dev/null < $(yes) &
@pod$ /dev/null < $(yes) &
@pod$ /dev/null < $(yes) &
@pod$ /dev/null < $(yes) &
@pod$ /dev/null < $(yes) &
しばらくすると Pod が Evict されて他の Node で再起動しました。
$ kubectl get pod -o wide
NAME                            READY   STATUS    RESTARTS   AGE     IP            NODE                                              NOMINATED NODE   READINESS GATES
deployment-a-75979d4477-2n8mt   0/1     Evicted   0          112s    <none>        ip-10-0-101-27.ap-northeast-1.compute.internal    <none>           <none>
deployment-a-75979d4477-6ls9v   1/1     Running   0          111s    10.0.103.15   ip-10-0-103-229.ap-northeast-1.compute.internal   <none>           <none>
最初に Pod が起動していた Node の状態を確認します。
$ kubectl describe node ip-10-0-101-27.ap-northeast-1.compute.internal
Name:               ip-10-0-101-27.ap-northeast-1.compute.internal

~省略~

CreationTimestamp:  Wed, 02 Feb 2022 22:56:40 +0900
Taints:             node.kubernetes.io/memory-pressure:NoSchedule
Unschedulable:      false
Lease:
  HolderIdentity:  ip-10-0-101-27.ap-northeast-1.compute.internal
  AcquireTime:     <unset>
  RenewTime:       Wed, 02 Feb 2022 23:35:09 +0900
Conditions:
  Type             Status  LastHeartbeatTime                 LastTransitionTime                Reason                         Message
  ----             ------  -----------------                 ------------------                ------                         -------
  MemoryPressure   True    Wed, 02 Feb 2022 23:35:04 +0900   Wed, 02 Feb 2022 23:35:04 +0900   KubeletHasInsufficientMemory   kubelet has insufficient memory available
  DiskPressure     False   Wed, 02 Feb 2022 23:35:04 +0900   Wed, 02 Feb 2022 22:56:38 +0900   KubeletHasNoDiskPressure       kubelet has no disk pressure
  PIDPressure      False   Wed, 02 Feb 2022 23:35:04 +0900   Wed, 02 Feb 2022 22:56:38 +0900   KubeletHasSufficientPID        kubelet has sufficient PID available
  Ready            True    Wed, 02 Feb 2022 23:35:04 +0900   Wed, 02 Feb 2022 22:57:11 +0900   KubeletReady                   kubelet is posting ready status

~省略~

Events:
  Type     Reason                     Age                From        Message
  ----     ------                     ----               ----        -------
  Normal   Starting                   38m                kubelet     Starting kubelet.
  Normal   NodeHasSufficientMemory    38m (x2 over 38m)  kubelet     Node ip-10-0-101-27.ap-northeast-1.compute.internal status is now: NodeHasSufficientMemory
  Normal   NodeHasNoDiskPressure      38m (x2 over 38m)  kubelet     Node ip-10-0-101-27.ap-northeast-1.compute.internal status is now: NodeHasNoDiskPressure
  Normal   NodeHasSufficientPID       38m (x2 over 38m)  kubelet     Node ip-10-0-101-27.ap-northeast-1.compute.internal status is now: NodeHasSufficientPID
  Normal   NodeAllocatableEnforced    38m                kubelet     Updated Node Allocatable limit across pods
  Normal   Starting                   38m                kube-proxy  Starting kube-proxy.
  Normal   NodeReady                  38m                kubelet     Node ip-10-0-101-27.ap-northeast-1.compute.internal status is now: NodeReady
  Warning  EvictionThresholdMet       17s                kubelet     Attempting to reclaim memory
  Normal   NodeHasInsufficientMemory  14s                kubelet     Node ip-10-0-101-27.ap-northeast-1.compute.internal status is now: NodeHasInsufficientMemory
MemorryPressure が True になり、Taint に node.kubernetes.io/memory-pressure:NoSchedule が付与されました。NoSchedule が付与されると Pod をスケジュールできなくなります。(Pod に合致する toleration がない場合)
しばらくして再度確認すると Taint がなくなって MemoryPressure が False に戻っていました。Condition の 更新時間は LastTransitionTime の列で確認できますが、evictionPressureTransitionPeriod の設定通り 5 分後に更新されたことがわかります。
yasu eviction %k describe node ip-10-0-101-27.ap-northeast-1.compute.internal
Name:               ip-10-0-101-27.ap-northeast-1.compute.internal

~省略~

CreationTimestamp:  Wed, 02 Feb 2022 22:56:40 +0900
Taints:             <none>
Unschedulable:      false
Lease:
  HolderIdentity:  ip-10-0-101-27.ap-northeast-1.compute.internal
  AcquireTime:     <unset>
  RenewTime:       Wed, 02 Feb 2022 23:47:27 +0900
Conditions:
  Type             Status  LastHeartbeatTime                 LastTransitionTime                Reason                       Message
  ----             ------  -----------------                 ------------------                ------                       -------
  MemoryPressure   False   Wed, 02 Feb 2022 23:45:08 +0900   Wed, 02 Feb 2022 23:40:05 +0900   KubeletHasSufficientMemory   kubelet has sufficient memory available
  DiskPressure     False   Wed, 02 Feb 2022 23:45:08 +0900   Wed, 02 Feb 2022 22:56:38 +0900   KubeletHasNoDiskPressure     kubelet has no disk pressure
  PIDPressure      False   Wed, 02 Feb 2022 23:45:08 +0900   Wed, 02 Feb 2022 22:56:38 +0900   KubeletHasSufficientPID      kubelet has sufficient PID available
  Ready            True    Wed, 02 Feb 2022 23:45:08 +0900   Wed, 02 Feb 2022 22:57:11 +0900   KubeletReady                 kubelet is posting ready status

~省略~

Events:
  Type     Reason                     Age                  From        Message
  ----     ------                     ----                 ----        -------
  Normal   Starting                   50m                  kubelet     Starting kubelet.
  Normal   NodeHasNoDiskPressure      50m (x2 over 50m)    kubelet     Node ip-10-0-101-27.ap-northeast-1.compute.internal status is now: NodeHasNoDiskPressure
  Normal   NodeHasSufficientPID       50m (x2 over 50m)    kubelet     Node ip-10-0-101-27.ap-northeast-1.compute.internal status is now: NodeHasSufficientPID
  Normal   NodeAllocatableEnforced    50m                  kubelet     Updated Node Allocatable limit across pods
  Normal   Starting                   50m                  kube-proxy  Starting kube-proxy.
  Normal   NodeReady                  50m                  kubelet     Node ip-10-0-101-27.ap-northeast-1.compute.internal status is now: NodeReady
  Warning  EvictionThresholdMet       12m                  kubelet     Attempting to reclaim memory
  Normal   NodeHasInsufficientMemory  12m                  kubelet     Node ip-10-0-101-27.ap-northeast-1.compute.internal status is now: NodeHasInsufficientMemory
  Normal   NodeHasSufficientMemory    7m25s (x3 over 50m)  kubelet     Node ip-10-0-101-27.ap-northeast-1.compute.internal status is now: NodeHasSufficientMemory
4. まとめ
Eviction まわりの挙動を確認してみました。EKS 等のマネージドサービスの場合は特別な要件がない限り設定値は変更しなくて良いと思います。
5. 参考
Node-pressure Eviction | Kubernetes
Kubernetes の kube-reserved と system-reserved
Kubernetes のシステム用に割り当てられるリソースについて整理し、実際の挙動を確認しました。
1. Pod に割り当て可能なリソース
まずは、Kubernetes 上で Pod が使えるリソースについて整理します。
Node 上では OS, Kubernetes が動いており、その上で Pod が動いているため Pod が Node のリソースを全て使用すると問題(OS 全体に影響が出る、Kubernetes 自体が動作しなくなる等)が発生します。 それを回避するため、OS, Kubernetes 用リソース kube-reserved, system-reserved と、Node の最低空きリソース eviction-threshold があります。
Pod に割り当てられるリソースは Node のリソース量から、kube-reserved,system-reserved,eviction-threshold を引いた分になります。
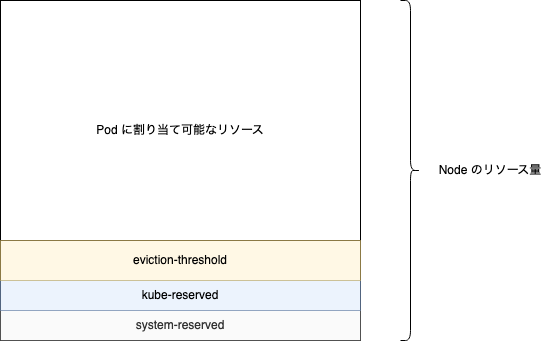
本記事では kube-reserved,system-reserved についてまとめています。eviction-threshold については別の記事でまとめます。
2. cgroup
kube-reserved,system-reserved の説明に cgroup が出てくるため、cgroup について簡単に整理します。
cgroup とは Control Group の略で、プロセスをグループ化し CPU やメモリ等のリソースをグループ毎に制限する Linux カーネルの機能です。
cgroupfs という仮想ファイルシステム上で cgroup を操作します。cgroupfs は /sys/fs/cgroup にマウントされています。
eksctl コマンドで EKS Cluster を作成する - YasuBlog の記事で作成した EKS Node で確認すると cgroupfs が /sys/fs/cgroup にマウントされている事が確認できます。
$ df -h
ファイルシス   サイズ  使用  残り 使用% マウント位置
devtmpfs         1.9G     0  1.9G    0% /dev
tmpfs            1.9G     0  1.9G    0% /dev/shm
tmpfs            1.9G  760K  1.9G    1% /run
tmpfs            1.9G     0  1.9G    0% /sys/fs/cgroup
/dev/nvme0n1p1    30G  2.7G   28G    9% /
tmpfs            388M     0  388M    0% /run/user/1000

~省略~

$ mount -l | grep cgroup
tmpfs on /sys/fs/cgroup type tmpfs (ro,nosuid,nodev,noexec,mode=755)
cgroup on /sys/fs/cgroup/systemd type cgroup (rw,nosuid,nodev,noexec,relatime,xattr,release_agent=/usr/lib/systemd/systemd-cgroups-agent,name=systemd)
cgroup on /sys/fs/cgroup/memory type cgroup (rw,nosuid,nodev,noexec,relatime,memory)
cgroup on /sys/fs/cgroup/cpuset type cgroup (rw,nosuid,nodev,noexec,relatime,cpuset)
cgroup on /sys/fs/cgroup/devices type cgroup (rw,nosuid,nodev,noexec,relatime,devices)
cgroup on /sys/fs/cgroup/cpu,cpuacct type cgroup (rw,nosuid,nodev,noexec,relatime,cpu,cpuacct)
cgroup on /sys/fs/cgroup/perf_event type cgroup (rw,nosuid,nodev,noexec,relatime,perf_event)
cgroup on /sys/fs/cgroup/net_cls,net_prio type cgroup (rw,nosuid,nodev,noexec,relatime,net_cls,net_prio)
cgroup on /sys/fs/cgroup/pids type cgroup (rw,nosuid,nodev,noexec,relatime,pids)
cgroup on /sys/fs/cgroup/blkio type cgroup (rw,nosuid,nodev,noexec,relatime,blkio)
cgroup on /sys/fs/cgroup/hugetlb type cgroup (rw,nosuid,nodev,noexec,relatime,hugetlb)
cgroup on /sys/fs/cgroup/freezer type cgroup (rw,nosuid,nodev,noexec,relatime,freezer)
/sys/fs/cgroup 配下のファイルで cgroup を管理しています。
$ ls /sys/fs/cgroup/
blkio  cpu  cpu,cpuacct  cpuacct  cpuset  devices  freezer  hugetlb  memory  net_cls  net_cls,net_prio  net_prio  perf_event  pids  systemd
例えば、/sys/fs/cgroup/cpu/tasks に記載されたプロセス(PID)の CPU リソース は /sys/fs/cgroup/cpu/cpu.shares に記載された 1024 に制限されます。※ CPU share は CPU の相対値
$ cat /sys/fs/cgroup/cpu/tasks
1
2
3
4
6
8

~省略~

$ cat /sys/fs/cgroup/cpu/cpu.shares
1024
cgroup を追加する際はディレクトリを作成します。test という cgroup を作成してみます。
$ mkdir /sys/fs/cgroup/cpu/test
ディレクトリを作成するとその配下に自動でファイルが作成されます。
$ ls /sys/fs/cgroup/cpu/test
cgroup.clone_children  cgroup.procs  cpu.cfs_period_us  cpu.cfs_quota_us  cpu.rt_period_us  cpu.rt_runtime_us  cpu.shares  cpu.stat  cpuacct.stat  cpuacct.usage  cpuacct.usage_all  cpuacct.usage_percpu  cpuacct.usage_percpu_sys  cpuacct.usage_percpu_user  cpuacct.usage_sys  cpuacct.usage_user  notify_on_release  tasks
例えば tasks に 2000、cpu.share に 512 を記載すると PID 2000 のプロセスの CPU share を 512 に制限する事になります。
$ cat /sys/fs/cgroup/cpu/test/tasks
2000
$ cat /sys/fs/cgroup/cpu/test/cpu.shares
512
コンテナは OS から見たらただのプロセスなのでこのようにリソースを制限出来ます。
なお、systemd-cgls コマンドで cgroup 階層全体が表示されます。
$ systemd-cgls
├─   1 /usr/lib/systemd/systemd --switched-root --system --deserialize 21
├─2913 bpfilter_umh
├─kubepods
│ └─burstable
│   ├─pod2a7eefa0-6719-4cac-82f4-6b7d58d54635
│   │ ├─510f73e18aa7dac452276e74f7acfd7087f44562eae619e05654bae567f5b460
│   │ │ ├─4276 bash /app/entrypoint.sh
│   │ │ ├─4327 ./aws-k8s-agent
│   │ │ └─4328 tee -i aws-k8s-agent.log
│   │ └─e7101431d6f2cad771a0d30c81101d06475c2b4dad6b033eaf58093e636679a8
│   │   └─3585 /pause
│   ├─pode895364f-3e61-48db-93cc-b0f8daefaa55
│   │ ├─c63c43b9ab660f4e2cab66f576e1a3208b6b97d659c0666c7c2c342daeecef8e
│   │ │ └─4891 /coredns -conf /etc/coredns/Corefile
│   │ └─aa5779e764f7fbfe68948de0ce425e7e03b2c5a2082586f6eb94e9a29b4670a3
│   │   └─4587 /pause
│   ├─poddd65f1eb-593a-4882-bb86-9f453fc1a1d2
│   │ ├─0d51784c7ac2cdc9a013d19d79a5617c27c6d4f86c3dfc28c7517f96eb9c8743
│   │ │ └─3637 /pause
│   │ └─cb2b42771c6e91de40b0cddde1e57677f5c112fa013fd9c601fa960e2e9d785d
│   │   └─3876 kube-proxy --v=2 --config=/var/lib/kube-proxy-config/config
│   └─podab6c28cc-525a-4fd2-9a69-07720eeed5ee
│     ├─73c143c3c6b7706e3ef2e45b57ca0d6484b9679ba1920c095ba3c1b9025892b2
│     │ └─4626 /pause
│     └─8dd43dd500d50180b3d287d96be60c1aa341dff864c9ce1903825dfeae6a7c04
│       └─4925 /coredns -conf /etc/coredns/Corefile
├─user.slice
│ └─user-1000.slice
│   ├─session-4.scope
│   │ ├─28624 sshd: ec2-user [priv]
│   │ ├─28655 sshd: ec2-user@pts/1
│   │ ├─28656 -bash
│   │ ├─28700 sudo -s
│   │ ├─28701 /bin/bash
│   │ └─29383 systemd-cgls
│   └─session-1.scope
│     ├─5724 sshd: ec2-user [priv]
│     ├─5779 sshd: ec2-user@pts/0
│     ├─5794 -bash
│     ├─7556 sudo -s
│     ├─7557 /bin/bash
│     ├─8704 systemd-cgls
│     └─8705 less
└─system.slice
  ├─rngd.service
  │ └─1875 /sbin/rngd -f --fill-watermark=0 --exclude=jitter
  ├─irqbalance.service
  │ └─1853 /usr/sbin/irqbalance --foreground
  ├─amazon-ssm-agent.service
  │ ├─2361 /usr/bin/amazon-ssm-agent
  │ └─2518 /usr/bin/ssm-agent-worker
  ├─containerd.service
  │ ├─2781 /usr/bin/containerd
  │ ├─3545 /usr/bin/containerd-shim-runc-v2 -namespace moby -id e7101431d6f2c...
  │ ├─3546 /usr/bin/containerd-shim-runc-v2 -namespace moby -id 0d51784c7ac2c...
  │ ├─3856 /usr/bin/containerd-shim-runc-v2 -namespace moby -id cb2b42771c6e9...
  │ ├─4257 /usr/bin/containerd-shim-runc-v2 -namespace moby -id 510f73e18aa7d...
  │ ├─4528 /usr/bin/containerd-shim-runc-v2 -namespace moby -id aa5779e764f7f...
  │ ├─4530 /usr/bin/containerd-shim-runc-v2 -namespace moby -id 73c143c3c6b77...
  │ ├─4826 /usr/bin/containerd-shim-runc-v2 -namespace moby -id c63c43b9ab660...
  │ └─4844 /usr/bin/containerd-shim-runc-v2 -namespace moby -id 8dd43dd500d50...
  ├─systemd-udevd.service
  │ └─1305 /usr/lib/systemd/systemd-udevd
  ├─system-serial\x2dgetty.slice
  │ └─serial-getty@ttyS0.service
  │   └─2377 /sbin/agetty --keep-baud 115200,38400,9600 ttyS0 vt220
  ├─docker.service
  │ └─2870 /usr/bin/dockerd -H fd:// --containerd=/run/containerd/containerd....
  ├─chronyd.service
  │ └─1861 /usr/sbin/chronyd
  ├─auditd.service
  │ └─1826 /sbin/auditd
  ├─kubelet.service
  │ └─3054 /usr/bin/kubelet --cloud-provider aws --config /etc/kubernetes/kub...
  ├─systemd-journald.service
  │ └─1284 /usr/lib/systemd/systemd-journald
  ├─sshd.service
  │ └─2423 /usr/sbin/sshd -D
  ├─crond.service
  │ └─2376 /usr/sbin/crond -n
  ├─gssproxy.service
  │ └─1887 /usr/sbin/gssproxy -D
  ├─rsyslog.service
  │ └─2367 /usr/sbin/rsyslogd -n
  ├─rpcbind.service
  │ └─1851 /sbin/rpcbind -w
  ├─network.service
  │ ├─2087 /sbin/dhclient -q -lf /var/lib/dhclient/dhclient--eth0.lease -pf /...
  │ └─2122 /sbin/dhclient -6 -nw -lf /var/lib/dhclient/dhclient6--eth0.lease ...
  ├─lvm2-lvmetad.service
  │ └─1302 /usr/sbin/lvmetad -f
  ├─postfix.service
  │ ├─ 2268 /usr/libexec/postfix/master -w
  │ ├─ 2270 qmgr -l -t unix -u
  │ └─13892 pickup -l -t unix -u
  ├─dbus.service
  │ └─1857 /usr/bin/dbus-daemon --system --address=systemd: --nofork --nopidf...
  ├─system-getty.slice
  │ └─getty@tty1.service
  │   └─2373 /sbin/agetty --noclear tty1 linux
  └─systemd-logind.service
    └─1864 /usr/lib/systemd/systemd-logind
3. kube-reserved/system-reserved
公式ドキュメント Reserve Compute Resources for System Daemons | Kubernetes には以下のように記載されています。(意訳)
| 項目 | 概要 |
|---|---|
| kube-reserved | ・kubelet や container runtime, node problem detector などの Kubernetes system daemon 用に確保されるリソース ・Pod として動く system deamon は対象外 ・CPU/メモリ/エフェメラルストレージ/PID 数 を指定可能 ・kubelet フラグ例 --kube-reserved=cpu=100m,memory=100Mi,ephemeral-storage=1Gi,pid=1000・Kubernetes system daemon に --kube-reserved を強制するには --enforce-node-allocatable=kube-reserved と --kube-reserved-cgroup=<cgroup> が必要 |
| system-reserved | ・sshd や udev などの OS system daemon 用に確保されるリソース ・カーネルメモリは Pod に割り当てられないためカーネル用のメモリも確保した方がよい ・ユーザのログインセッション用リソースを確保する事も推奨(systemd の世界では user.slice) ・CPU/メモリ/エフェメラルストレージ/PID 数 を指定可能 ・kubelet フラグ例 --system-reserved=cpu=100m,memory=100Mi,ephemeral-storage=1Gi,pid=1000・OS system daemon に --system-reserved を強制するには --enforce-node-allocatable=system-reserved と --system-reserved-cgroup=<cgroup> が必要 |
「Kubernetes/OS system daemon に --kube-reserved/--system-reserved を強制するには --enforce-node-allocatable=kube-reserved/system-reserved と --kube-reserved-cgroup/--systemreserved-cgroup=<cgroup> が必要」がいまいちピンと来なかったです。
--kube-reserved/--system-reserved だけでは Kubernetes/OS system daemon 用にリソースが確保されて強制はされない?
他にも、Kubernetes/OS が設定値以上使おうとするとどうなるのか?推奨値はあるのか?
などなど気になる点が多いため検証してみました。
4. 検証
4.1. 検証環境構築
eksctl コマンドで EKS Cluster を作成する - YasuBlog で作成した EKS Cluster を使用します。
4.2. EKS の kube-reserved/system-reserved 設定値
まずは kube-reserved/system-reserved の確認方法です。Node の情報なので Kubernetes の API サーバから取得できます。
kubectl proxy コマンドでプロキシをローカルに起動すると API サーバにアクセスできます。
$ kubectl proxy
Starting to serve on 127.0.0.1:8001
デフォルトでローカルの 8001 ポートでプロキシが起動するので、別ターミナルで http://localhost:8001/api/v1/nodes/<Node 名>/proxy/configz にアクセスします。json なので jq で整形すると見やすいです。
$ kubectl get node
NAME                                              STATUS   ROLES    AGE    VERSION
ip-10-0-101-249.ap-northeast-1.compute.internal   Ready    <none>   2m36s   v1.21.5-eks-bc4871b
ip-10-0-102-241.ap-northeast-1.compute.internal   Ready    <none>   2m27s   v1.21.5-eks-bc4871b
ip-10-0-103-143.ap-northeast-1.compute.internal   Ready    <none>   2m12s   v1.21.5-eks-bc4871b
$ curl -sSL "http://localhost:8001/api/v1/nodes/ip-10-0-101-249.ap-northeast-1.compute.internal/proxy/configz" | jq .
{
  "kubeletconfig": {
    "enableServer": true,
    "syncFrequency": "1m0s",
    "fileCheckFrequency": "20s",
    "httpCheckFrequency": "20s",
    "address": "0.0.0.0",
    "port": 10250,
    "tlsCipherSuites": [
      "TLS_ECDHE_ECDSA_WITH_AES_128_GCM_SHA256",
      "TLS_ECDHE_RSA_WITH_AES_128_GCM_SHA256",
      "TLS_ECDHE_ECDSA_WITH_CHACHA20_POLY1305",
      "TLS_ECDHE_RSA_WITH_AES_256_GCM_SHA384",
      "TLS_ECDHE_RSA_WITH_CHACHA20_POLY1305",
      "TLS_ECDHE_ECDSA_WITH_AES_256_GCM_SHA384",
      "TLS_RSA_WITH_AES_256_GCM_SHA384",
      "TLS_RSA_WITH_AES_128_GCM_SHA256"
    ],
    "serverTLSBootstrap": true,
    "authentication": {
      "x509": {
        "clientCAFile": "/etc/kubernetes/pki/ca.crt"
      },
      "webhook": {
        "enabled": true,
        "cacheTTL": "2m0s"
      },
      "anonymous": {
        "enabled": false
      }
    },
    "authorization": {
      "mode": "Webhook",
      "webhook": {
        "cacheAuthorizedTTL": "5m0s",
        "cacheUnauthorizedTTL": "30s"
      }
    },
    "registryPullQPS": 5,
    "registryBurst": 10,
    "eventRecordQPS": 5,
    "eventBurst": 10,
    "enableDebuggingHandlers": true,
    "healthzPort": 10248,
    "healthzBindAddress": "127.0.0.1",
    "oomScoreAdj": -999,
    "clusterDomain": "cluster.local",
    "clusterDNS": [
      "172.20.0.10"
    ],
    "streamingConnectionIdleTimeout": "4h0m0s",
    "nodeStatusUpdateFrequency": "10s",
    "nodeStatusReportFrequency": "5m0s",
    "nodeLeaseDurationSeconds": 40,
    "imageMinimumGCAge": "2m0s",
    "imageGCHighThresholdPercent": 85,
    "imageGCLowThresholdPercent": 80,
    "volumeStatsAggPeriod": "1m0s",
    "cgroupRoot": "/",
    "cgroupsPerQOS": true,
    "cgroupDriver": "cgroupfs",
    "cpuManagerPolicy": "none",
    "cpuManagerReconcilePeriod": "10s",
    "memoryManagerPolicy": "None",
    "topologyManagerPolicy": "none",
    "topologyManagerScope": "container",
    "runtimeRequestTimeout": "2m0s",
    "hairpinMode": "hairpin-veth",
    "maxPods": 17,
    "podPidsLimit": -1,
    "resolvConf": "/etc/resolv.conf",
    "cpuCFSQuota": true,
    "cpuCFSQuotaPeriod": "100ms",
    "nodeStatusMaxImages": 50,
    "maxOpenFiles": 1000000,
    "contentType": "application/vnd.kubernetes.protobuf",
    "kubeAPIQPS": 5,
    "kubeAPIBurst": 10,
    "serializeImagePulls": false,
    "evictionHard": {
      "memory.available": "100Mi",
      "nodefs.available": "10%",
      "nodefs.inodesFree": "5%"
    },
    "evictionPressureTransitionPeriod": "5m0s",
    "enableControllerAttachDetach": true,
    "protectKernelDefaults": true,
    "makeIPTablesUtilChains": true,
    "iptablesMasqueradeBit": 14,
    "iptablesDropBit": 15,
    "featureGates": {
      "RotateKubeletServerCertificate": true
    },
    "failSwapOn": true,
    "containerLogMaxSize": "10Mi",
    "containerLogMaxFiles": 5,
    "configMapAndSecretChangeDetectionStrategy": "Watch",
    "kubeReserved": {
      "cpu": "70m",
      "ephemeral-storage": "1Gi",
      "memory": "442Mi"
    },
    "enforceNodeAllocatable": [
      "pods"
    ],
    "volumePluginDir": "/usr/libexec/kubernetes/kubelet-plugins/volume/exec/",
    "logging": {
      "format": "text"
    },
    "enableSystemLogHandler": true,
    "shutdownGracePeriod": "0s",
    "shutdownGracePeriodCriticalPods": "0s",
    "enableProfilingHandler": true,
    "enableDebugFlagsHandler": true
  }
}
104 行目から 108 行目に kube-reserved が表示されています。
kubeReservedCgroup/systemReservedCgroup が無いため、--kube-reserved-cgroup/--system-reserved-cgroup が設定されていない事がわかります。
また、enforceNodeAllocatable は pods のみ設定されています。(kube-reserved/system-reserved は設定されていない)
なお、API サーバではなく Node にログインして設定ファイルから値を確認する事も可能です。
@node$ cat /etc/kubernetes/kubelet/kubelet-config.json
{
  "kind": "KubeletConfiguration",
  "apiVersion": "kubelet.config.k8s.io/v1beta1",
  "address": "0.0.0.0",
  "authentication": {
    "anonymous": {
      "enabled": false
    },
    "webhook": {
      "cacheTTL": "2m0s",
      "enabled": true
    },
    "x509": {
      "clientCAFile": "/etc/kubernetes/pki/ca.crt"
    }
  },
  "authorization": {
    "mode": "Webhook",
    "webhook": {
      "cacheAuthorizedTTL": "5m0s",
      "cacheUnauthorizedTTL": "30s"
    }
  },
  "clusterDomain": "cluster.local",
  "hairpinMode": "hairpin-veth",
  "readOnlyPort": 0,
  "cgroupDriver": "cgroupfs",
  "cgroupRoot": "/",
  "featureGates": {
    "RotateKubeletServerCertificate": true
  },
  "protectKernelDefaults": true,
  "serializeImagePulls": false,
  "serverTLSBootstrap": true,
  "tlsCipherSuites": [
    "TLS_ECDHE_ECDSA_WITH_AES_128_GCM_SHA256",
    "TLS_ECDHE_RSA_WITH_AES_128_GCM_SHA256",
    "TLS_ECDHE_ECDSA_WITH_CHACHA20_POLY1305",
    "TLS_ECDHE_RSA_WITH_AES_256_GCM_SHA384",
    "TLS_ECDHE_RSA_WITH_CHACHA20_POLY1305",
    "TLS_ECDHE_ECDSA_WITH_AES_256_GCM_SHA384",
    "TLS_RSA_WITH_AES_256_GCM_SHA384",
    "TLS_RSA_WITH_AES_128_GCM_SHA256"
  ],
  "maxPods": 20,
  "clusterDNS": [
    "172.20.0.10"
  ],
  "evictionHard": {
    "memory.available": "100Mi",
    "nodefs.available": "10%",
    "nodefs.inodesFree": "5%"
  },
  "kubeReserved": {
    "cpu": "70m",
    "ephemeral-storage": "1Gi",
    "memory": "442Mi"
  }
インスタンスタイプ毎の設定値を確認してみました。Node のリソース量から自動で計算されているようです。
| インスタンスタイプ | kube-reserved | system-reserved | kube-reserved-cgroup | system-reserved-cgroup |
|---|---|---|---|---|
| t3.small | cpu:70m memory:376Mi ephemeral-storage:1Gi |
なし | なし | なし |
| t3.medium | cpu:70m memory:442Mi ephemeral-storage:1Gi |
なし | なし | なし |
| m5.large | cpu:80m memory:574Mi ephemeral-storage:1Gi |
なし | なし | なし |
| m5.xlarge | cpu:80m memory:893Mi ephemeral-storage:1Gi |
なし | なし | なし |
4.3. 設定値変更
AWS マネージドではないセルフマネージド NodeGroup の場合は以下の通り設定できそうです。
Customizing kubelet configuration - eksctl
AWS マネージドの場合は yaml での設定方法は見つかりませんでした。Node 上の設定ファイル(/etc/kubernetes/kubelet/kubelet-config.json や /etc/systemd/system/kubelet.service)を直接修正する事で設定変更が可能です。 Node 再作成時にも同様に設定されるように、カスタム起動テンプレートかカスタム AMI を使用する必要があります。
Amazon EKS ワーカーノードを設定して特定のディスク使用率でイメージキャッシュをクリーンアップする
個人的には AWS マネージドという事は AWS が良かれと思って設計した値なのでユーザ側がカスタマイズする必要は無いと思っています。
4.4. --enforce-node-allocatable/--kube-reserved-cgroup/--system-reserved-cgroup 無しの場合の制限
EKS のデフォルト状態(--enforce-node-allocatable と --kube-reserved-cgroup/--system-reserved-cgroup が設定されていない状態)での制限を確認します。
検証用 Node(t3.medium)の設定値は以下です。
| cpu | memory | ephemeral-storage | |
|---|---|---|---|
| kube-reserved | 70m | 442Mi | 1Gi |
| system-reserved | なし | なし | なし |
Kubernetes system daemon 用に cpu 70M, memory 442Mi, ephemeral-storage 1Gi が確保されています。最初に記載した通り、Pod に割り当てられるリソース = Node - (kube-reserved + system-reserved + eviction-threshold) のため、「確保されている」と言えると思います。
ただし、--enforce-node-allocatable と --kube-reserved-cgroup/--system-reserved-cgroup が設定されていないため強制はされていないはずです。
cpu.shares に 70m 、memory.limit_in_bytes に 442Mi が設定されている cgroup の有無を確認しましたが存在しなかったので確かに「強制されていない(リソースを制限していない)」という事がわかります。同様に --system-reserved を設定して検証しても同じ結果でした。
@node$ find /sys/fs/cgroup/ -type f -name 'cpu.shares' -exec cat {} \; | sort | uniq
102
1024
128
1976
2
25
@node$ find /sys/fs/cgroup/ -type f -name 'memory.limit_in_bytes' -exec cat {} \; | sort | uniq
3135741952
9223372036854771712
つまり、--kube-reserved/--system-reserved は Kubernetes 用とか OS 用とか関係なく、単純に Pod に割り当てられない領域として確保しているだけという事になります。これは --kube-reserved と --system-reserved が同じ意味を表しているという事になるかと思います。※--enforce-node-allocatable と --kube-reserved-cgroup/--system-reserved-cgroup が無い場合
マネージドサービスの EKS が --system-reserved を設定していない理由はこれかと思います。--kube-reserved 一つ設定しておけば Kubernetes/OS 用のリソースとして確保できるからです。(--kube-reserved と --system-reserved が同じ意味なので --system-reserved を設定する必要がない)
当然ですが、リソースを制限しているわけではないので、Kubernetes/OS が --kube-reserved/--system-reserved に設定されている値より多くのリソースを使用する事が可能です。
4.5. --enforce-node-allocatable/--kube-reserved-cgroup/--system-reserved-cgroup ありの場合の制限
まずは --kube-reserved-cgroup に設定する cgroup を作成します。プロセスは dockerd を設定します。
@node$ # find /sys/fs/cgroup/ -maxdepth 1 ! -type l -exec mkdir {}/K8s \;
mkdir: ディレクトリ `/sys/fs/cgroup//K8s` を作成できません: Read-only file system
@node$ pgrep -fl dockerd
2877 dockerd
@node$ find /sys/fs/cgroup/ -type d -name K8s -exec sh -c 'echo 2877 > {}/tasks' \;
sh: 0 行: echo: 書き込みエラー: No space left on device
systemd-cgls で cgroup を確認します。
@node$ systemd-cgls
├─   1 /usr/lib/systemd/systemd --switched-root --system --deserialize 21
├─2986 bpfilter_umh
├─kubepods
│ └─burstable
│   ├─pode887cc03-8c8a-47fe-94ce-77f75b71b7e2
│   │ ├─5724c33afacf82531d99d78fcea7b5b07b54105d2729b20953eb3e6a3da9dcfb
│   │ │ └─3674 /pause
│   │ └─b263bef8f5b3aff3df5430cc05551a42d72ffbd93a8e56ed10b3b2e854f2f160
│   │   ├─4309 bash /app/entrypoint.sh
│   │   ├─4357 ./aws-k8s-agent
│   │   └─4358 tee -i aws-k8s-agent.log
│   └─pod637abaec-5fc8-4855-9952-ac08730384df
│     ├─1ed3616be7204d70dda58c0ac3a6060fd26b6d595b0a832604cb9b5b777bb91e
│     │ └─3629 /pause
│     └─f703824f768510f7b8dfd989c8f64d8784cb201d7fe81949a000baed59c869c3
│       └─3911 kube-proxy --v=2 --config=/var/lib/kube-proxy-config/config
├─user.slice
│ └─user-1000.slice
│   └─session-1.scope
│     ├─4928 sshd: ec2-user [priv]
│     ├─5012 sshd: ec2-user@pts/0
│     ├─5036 -bash
│     ├─5058 sudo -s
│     ├─5060 /bin/bash
│     ├─5640 systemd-cgls
│     └─5641 less
├─system.slice
│ ├─rngd.service
│ │ └─1866 /sbin/rngd -f --fill-watermark=0 --exclude=jitter
│ ├─irqbalance.service
│ │ └─1853 /usr/sbin/irqbalance --foreground
│ ├─amazon-ssm-agent.service
│ │ ├─2363 /usr/bin/amazon-ssm-agent
│ │ └─2519 /usr/bin/ssm-agent-worker
│ ├─containerd.service
│ │ ├─2800 /usr/bin/containerd
│ │ ├─3577 /usr/bin/containerd-shim-runc-v2 -namespace moby -id 1ed3616be7204d70dda58c0ac3a6060fd26b6d595b0a832604cb9b5b777bb91e -address /run/containerd/containerd.sock
│ │ ├─3578 /usr/bin/containerd-shim-runc-v2 -namespace moby -id 5724c33afacf82531d99d78fcea7b5b07b54105d2729b20953eb3e6a3da9dcfb -address /run/containerd/containerd.sock
│ │ ├─3887 /usr/bin/containerd-shim-runc-v2 -namespace moby -id f703824f768510f7b8dfd989c8f64d8784cb201d7fe81949a000baed59c869c3 -address /run/containerd/containerd.sock
│ │ └─4279 /usr/bin/containerd-shim-runc-v2 -namespace moby -id b263bef8f5b3aff3df5430cc05551a42d72ffbd93a8e56ed10b3b2e854f2f160 -address /run/containerd/containerd.sock
│ ├─systemd-udevd.service
│ │ └─1686 /usr/lib/systemd/systemd-udevd
│ ├─system-serial\x2dgetty.slice
│ │ └─serial-getty@ttyS0.service
│ │   └─2375 /sbin/agetty --keep-baud 115200,38400,9600 ttyS0 vt220
│ ├─docker.service
│ │ └─2877 /usr/bin/dockerd -H fd:// --containerd=/run/containerd/containerd.sock
│ ├─chronyd.service
│ │ └─1884 /usr/sbin/chronyd
│ ├─auditd.service
│ │ └─1827 /sbin/auditd
│ ├─kubelet.service
│ │ └─3146 /usr/bin/kubelet --cloud-provider aws --config /etc/kubernetes/kubelet/kubelet-config.json --kubeconfig /var/lib/kubelet/kubeconfig --container-runtime docker --network-plugin cni --node-ip=10.0.102.145 --pod-infra-container-image=602401143452.dkr.ecr.ap-northe
│ ├─systemd-journald.service
│ │ └─1285 /usr/lib/systemd/systemd-journald
│ ├─sshd.service
│ │ └─2416 /usr/sbin/sshd -D
│ ├─crond.service
│ │ └─2373 /usr/sbin/crond -n
│ ├─gssproxy.service
│ │ └─1888 /usr/sbin/gssproxy -D
│ ├─rsyslog.service
│ │ └─2365 /usr/sbin/rsyslogd -n
│ ├─rpcbind.service
│ │ └─1867 /sbin/rpcbind -w
│ ├─network.service
│ │ ├─2087 /sbin/dhclient -q -lf /var/lib/dhclient/dhclient--eth0.lease -pf /var/run/dhclient-eth0.pid eth0
│ │ └─2123 /sbin/dhclient -6 -nw -lf /var/lib/dhclient/dhclient6--eth0.lease -pf /var/run/dhclient6-eth0.pid eth0
│ ├─lvm2-lvmetad.service
│ │ └─1301 /usr/sbin/lvmetad -f
│ ├─postfix.service
│ │ ├─2285 /usr/libexec/postfix/master -w
│ │ ├─2286 pickup -l -t unix -u
│ │ └─2287 qmgr -l -t unix -u
│ ├─dbus.service
│ │ └─1860 /usr/bin/dbus-daemon --system --address=systemd: --nofork --nopidfile --systemd-activation
│ ├─system-getty.slice
│ │ └─getty@tty1.service
│ │   └─2374 /sbin/agetty --noclear tty1 linux
│ └─systemd-logind.service
│   └─1864 /usr/lib/systemd/systemd-logind
└─K8s
  └─2877 /usr/bin/dockerd -H fd:// --containerd=/run/containerd/containerd.sock
dockerd servcie 用 cgroup の K8s が作成されている事がわかります。cgroup K8s のリソースが --kube-reserved に設定した値で制限されるように etc/systemd/system/kubelet.service を修正して kubelet を再起動します。
@node$ cat /etc/systemd/system/kubelet.service
[Unit]
Description=Kubernetes Kubelet
Documentation=https://github.com/kubernetes/kubernetes
After=docker.service iptables-restore.service
Requires=docker.service

[Service]
ExecStartPre=/sbin/iptables -P FORWARD ACCEPT -w 5
ExecStart=/usr/bin/kubelet --cloud-provider aws \
    --config /etc/kubernetes/kubelet/kubelet-config.json \
    --kubeconfig /var/lib/kubelet/kubeconfig \
    --container-runtime docker \
    --network-plugin cni $KUBELET_ARGS $KUBELET_EXTRA_ARGS \
    --enforce-node-allocatable=pods,kube-reserved \
    --kube-reserved-cgroup=/K8s

Restart=always
RestartSec=5
KillMode=process

[Install]
WantedBy=multi-user.target
@node$ systemctl daemon-reload
@node$ systemctl restart kubelet
kubelet 再起動後に cgroup K8s を確認すると cpu が --kube-reserved に設定した 70m で制限されていました。
@node$ cat /sys/fs/cgroup/cpu/K8s/cpu.shares
71
--enforce-node-allocatable=kube-reserved,system-reserved と --kube-reserved-cgroup/--system-reserved-cgroup を設定する事で、--kube-reserved/--system-reserved に設定した値で Kubernetes/OS のリソースを制限できる事がわかりました。
マネージドではない手組みの Kubernetes の場合は、Kubernetes/OS 用に cgroup を作成してそれぞれのリソースを制限するという使い方が可能という事かと思います。
なお、cpu.shares は相対値のためリソースに空きがあれば設定された数値より多くのリソースを使用する事が可能です。
5. まとめ
上記の検証結果によるまとめです。
--enforce-node-allocatable=kube-reserved,system-reservedなし--kube-reserved-cgroup/--system-reserved-cgroupなしの場合- 特定のプロセス用にリソースを確保しているわけではなく、単純に Pod が使えないリソースというだけ
--kube-reservedと--system-reservedは同じ意味(そのため EKS では--kube-reservedのみ設定)
--enforce-node-allocatable=kube-reserved,system-reservedあり--kube-reserved-cgroup/--system-reserved-cgroupありの場合- 指定した cgroup に対してリソースを制限する事が可能
- どのプロセスをどのようにグループ(cgroup)化し、どれぐらいリソースを割り当てるかという設計が必要
- (個人的には)EKS 等のマネージドサービスの場合はこれらの値を気にしなくて良い(クラウドベンダの設計にまかせて、何か問題が起きた際に考える)
6. 参考
Reserve Compute Resources for System Daemons | Kubernetes
design-proposals-archive/node-allocatable.md at main · kubernetes/design-proposals-archive · GitHub